Member
Joined 2009
Paid Member
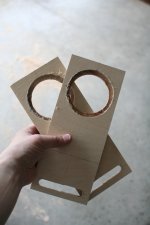
25 - the router plunge depth is set appropriately (around 5mm) and the driver rebate is cut into the front piece
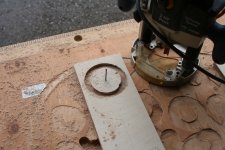
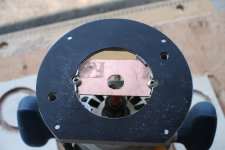
26 - for the driver opening I need a smaller hole so I cut out a jig from a piece of scrap pcb and screwed it onto the base of the router.
27 - The cutting bit clears the large hole in the centre of the pcb jig and a small hole drilled off to one side will fit over the pivot (nail) in the workpiece
26 - for the driver opening I need a smaller hole so I cut out a jig from a piece of scrap pcb and screwed it onto the base of the router.
27 - The cutting bit clears the large hole in the centre of the pcb jig and a small hole drilled off to one side will fit over the pivot (nail) in the workpiece
Attachments
Member
Joined 2009
Paid Member
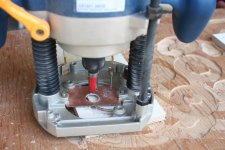
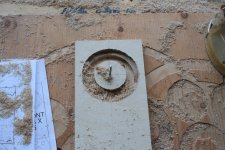
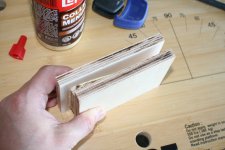
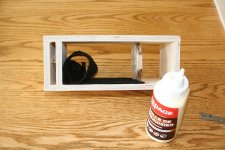
28 - the driver opening is routed out, the depth of the plug router is set to cut through the workpiece into the scrap underneath
29 - driver routing finished, next job is to route the slot ports
30 - finished front pieces, the slot ports turned out slightly ragged due to my poor clamping of the workpiece
Cutting and routing finished. The braces will be sized to fit against the back of the driver magnets. Before I do that I'll wait for the new drivers to arrive from Madisound so I can dry fit everything and check dimensions.
Attachments

Member
Joined 2009
Paid Member
I posted pics in another thread
another good build: http://www.diyaudio.com/forums/full-range/188569-fountek-fr88ex-3-build.html
Member
Joined 2009
Paid Member
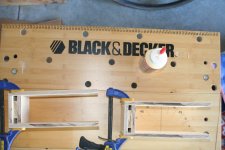
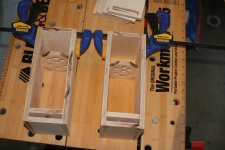
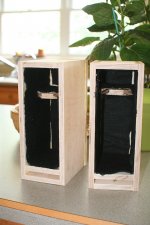
31 - start the build by gluing up the port spacer to the piece that forms the top of the slot port
32 - add the both piece to make a sandwich of the port spacer
33 - clamp the bottom assembly
32 - add the both piece to make a sandwich of the port spacer
33 - clamp the bottom assembly
Attachments

Looking good so far.
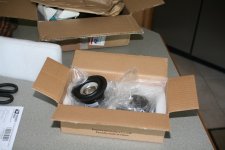
FYI, I am still enjoying my Martello's almost everyday. For a desktop system, in combination with a sub and my Virtue Audio One.2 amp, it has exceeded my expectations.
FYI, I am still enjoying my Martello's almost everyday. For a desktop system, in combination with a sub and my Virtue Audio One.2 amp, it has exceeded my expectations.
Member
Joined 2009
Paid Member
I'm very pleased to hear !Looking good so far.
FYI, I am still enjoying my Martello's almost everyday. For a desktop system, in combination with a sub and my Virtue Audio One.2 amp, it has exceeded my expectations.
so on with the build...
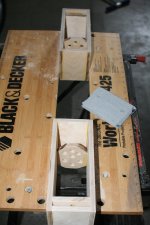
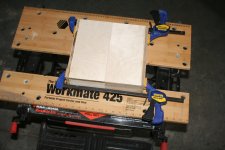
34 - next step is to glue the sides onto the bottom assembly, place the whole thing flat against the bench surface to ensure the edges of the sides are parallel
35 - the new drivers arrived in the mail today, which is great timing because I need them to size the holey braces
36 - braces sized and along with the tops, glued into place between the sides. I'm not a neat person when it comes to gluing things - it'll all be hidden in the end.
Attachments
Member
Joined 2009
Paid Member
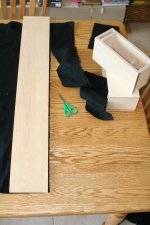
37 - next we sand paper the edges flat, we want to get a good seal between the edges and the front/back panels and it's good to do the sanding now so all the dust can be kept away from the felt lining
38 - cut the felt into strips with a width equal to the inside depth of the speaker enclosure
39 - install the felt along the inside of the box, I use wood glue to hold it in place
38 - cut the felt into strips with a width equal to the inside depth of the speaker enclosure
39 - install the felt along the inside of the box, I use wood glue to hold it in place
Attachments
Member
Joined 2009
Paid Member
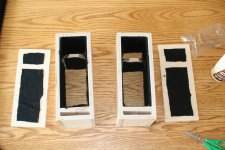
40 - cover the backs with felt but leave a space for the brace and box edges. The felt I have isn't very thick, so I cover all the surfaces and before I close it up I'll throw a few scraps of felt inside for good measure
41 - glue on the backs and clap
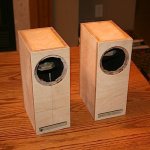
42 - end result, just need to add the front baffle
41 - glue on the backs and clap
42 - end result, just need to add the front baffle
Attachments
Member
Joined 2009
Paid Member
After taking a break from this project to build some other speakers I decided to get back to finishing these !
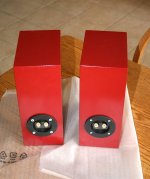
I put some big holes in the back to fit terminal cups instead of the screw terminal feedthrough type I used before. I glued on the front baffles.
And I flush-routed the edges. It's a bit rough and I'll need to do some work before I can apply any finish.
I put some big holes in the back to fit terminal cups instead of the screw terminal feedthrough type I used before. I glued on the front baffles.
And I flush-routed the edges. It's a bit rough and I'll need to do some work before I can apply any finish.
Attachments
Member
Joined 2009
Paid Member
Thanks Sippy.
We're in the painting phase now. A coat of primer, a few spots of filler, some sand paper, back to the primer. After 4 or 5 coats of primer I'm ready to go and get a can of top coat.
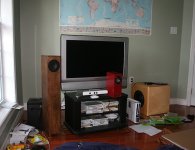
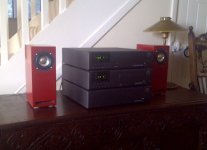
I will get a photo of them with the Big'un. In the meantime, here's a photo of the first MARTELLO (red) with the MARTELLO-2 and on the right there is my ALPAIR sub-woofer (an older thread on here somewhere).
http://www.diyaudio.com/forums/full-range/220047-martello-2-mini-tower-single-2-x-4-a.html
We're in the painting phase now. A coat of primer, a few spots of filler, some sand paper, back to the primer. After 4 or 5 coats of primer I'm ready to go and get a can of top coat.
I will get a photo of them with the Big'un. In the meantime, here's a photo of the first MARTELLO (red) with the MARTELLO-2 and on the right there is my ALPAIR sub-woofer (an older thread on here somewhere).
http://www.diyaudio.com/forums/full-range/220047-martello-2-mini-tower-single-2-x-4-a.html
Attachments

Last edited:
Member
Joined 2009
Paid Member
Nice "family" you are putting together! 🙂
Thanks !
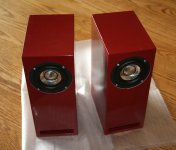
Quick photo of the paint job, going for the same "colonial red" colour as before.
Attachments

Member
Joined 2009
Paid Member
Member
Joined 2009
Paid Member
Well I've spent a lot of hours with these speakers, recently driven from my Cellini tube amp, Cambridge audio phono-pre and a NAD turntable.
They beat my Moon Onken speakers based on Fostex FE127. There's simply no doubt about it, the Fostex units even though famed and larger simply pale in comparison.
I'm so impressed with the sheer musicality of these little red speakers that I am wondering if Fountek have some larger drivers that I should be exploring.
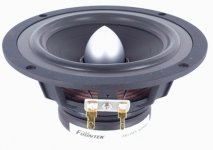
Hello, Yes Fountek has a larger fullrange driver. Its a 5 inch fullrange driver called the Fr135ex. I have never heard it. So if you buy it let me know if it's worth $102.85 each? Jm
Member
Joined 2009
Paid Member
Hello, Yes Fountek has a larger fullrange driver. Its a 5 inch fullrange driver called the Fr135ex. I have never heard it. So if you buy it let me know if it's worth $102.85 each? Jm
It looks a rather nice driver to me but unfortunately I have not had a chance to hear it. With rare earth magnet, good size and construction, the price looks reasonable to me.
The FR plot looks quite reasonable - perhaps a slight concern around 8kHz where there could be a resonance going on. There's a recommended EQ filter to flatten the response here: http://www.madisound.com/pdf/FR135EX-Encl.pdf
I think I'd like to hear one of these in an ML-TL enclosure.
Attachments
First DIY Speaker build Martello w FSR8s
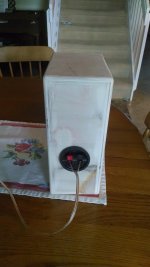
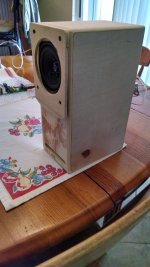
New to the forum, really enjoy reading all the posts. I had some small speakers hanging around and decided to try building the Martello v0.21 for my son who just moved into an apartment and has no stereo - new generation listens to everything from his phone. The amp is a Bluetooth TA2020. Haven't built the box for it yet. So, I didn't have the FR88EX drivers - only 3" were a pair of Visaton FRS-8 and a pair of TB WS-881SIs. Built up the cabinets with a few tweaks - used mitred cuts on the top and front. Still have to sand, paint and cover the speaker grills. They sound really nice to me. I used the FRS first since it seems the TB will need a NF. I also have a pair of Vifa TC7FD00-04 2.5 in drivers any suggestions for a cabinet for these?
Thanks,
Bob
Attachments


Last edited:
I joined this forum today and have really enjoyed reading this post - and malibujeff's build post as well. I'm building a CNC router with my father-in-law, this may be a great project to break in the new machine! Thanks for all the info!
Member
Joined 2009
Paid Member
Welcome both of you !
My Martello's are still in daily use - I like them a lot. We will look forward to seeing some photos from your CNC DloKs.
Bknabe - great job of the mitred joints!
p.s. for a larger option I also designed a compact floorstanding speaker (use Mark Audio CHR/P-70 instead of the obsoleted EL-70):
http://www.diyaudio.com/forums/full-range/220047-martello-2-mini-tower-single-2-x-4-a.html
Last edited:
- Home
- Loudspeakers
- Full Range
- Martello enclosure for FR88EX