No smoke this time, I will say i checked, double checked and then checked everything again though.
Now what do I have in que, Waynes Linestage, Pearl 2. and a speaker build.
A DIY fork in the road it seems.
A DIY fork in the road it seems.
Congrats flamethrower1. Great builds mattattnet.
Has anyone done a build with flange-less heatsink? I guess the PCB would mount vertically on the heatsink with standoffs and Q5/Q6 and R7/R8 would mount vertically on top of the PCB. Since the PCB will be on stand offs I will either have to put the Q5/Q6/R7/R8 on thick washers to match the height or bend the leads and insert them via the back of the PCB. Will the leads on these be long enough to reach the positions on the PCB. I could of course solder wires to the leads as well.
A few other questions.
- I see that the R100 is mounted with an allen screw and a washer. Is it just a standard M3 screw that goes into a tapped hole on the heat sink? What would be the length?
- What is the size of the shoulder washer used on the R100 and R7/R8.
I haven't done enclosure work so appreciate if you could tell me what other hardware I'd need (other than drill). I'm thinking
- M3/M3.5/M4 screws and taps for them. What about length?
- washers for the screws + hex nuts.
- PCB Stand offs.
- Keratherm or other heat sink glue.
Is there a good and cheap online place to buy this hardware?
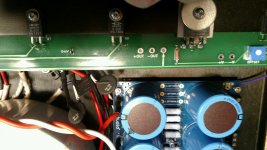
For flange-less heatsink mounting you want to do the bend-the-leads-from-the-back thing. Here's an example of a diode bridge mounted that way:

The R100 should ideally have two washers: a shoulder washer and a Belleville washer. The Belleville keeps the JFET clamped tight even when the allen screw expands/contracts due to heat. Size of the shoulder washer doesn't really matter much.
R7/R8 mounting isn't critical at all. (In fact, they don't even require mounting on the heatsink.)
Use M3 for everything and then you only have to buy one tap. 10mm length should work well. HSS taps are more expensive than carbon steel, but you only have to break one carbon steel tap in a hole to really wish you had bought the HSS ones....
Use a heatsink compound, not a heatsink glue/adhesive. You don't want it to set for this application.
Attachments

Thanks Jeff. The pic confirms what I had in mind.
I assume the Belleville washer goes on the back, shoulder on top. Also, all M3 will be round heads (except for the heat sink devices where socket head looks better IMO)?
I won't have the cabinet to start with so I was thinking of using suitable heatsinks to test. If I solder wires on the device pins I worry I won't be able to clean off the solder on the leads to get them into the PCB holes. The PCB holes can be cleaned off with the desolder tool. Is there a male/female connector that fits on those leads which can be used while testing or is this a no-no?
Device, shoulder washer, Belleville washer, screw head.
Solder the wires to the leads.
When you want to unsolder them put some safety glasses on. A face shield would be even better. Keep the device bolted to the heatsink (or put it in a vice). Heat up the pin. Gently deflect the pin downwards with the soldering iron, and then run the iron off the end of the pin. The pin will spring back up and solder will go everywhere -- but it won't be on the pin afterwards.
Cheers,
Jeff.
Did mine as Jeff suggested but used nylon lock nuts instead of tapping them.
My amp is now in my main system in place of the F5.
Is one better then the other?
I like them both, the J2 is a little smoother on the top end and bass seems deeper.
Will be interesting to see what happens after I get some more time on it.
Glad I built them both.
In fact I just started to populate some M2X boards.
Attachments
In order for me to better understand "what I am actually doing" I started reading some things on this website https://www.electronics-tutorials.ws/amplifier/amp_1.html.
Are there any other books, websites etc that one could recommend?
Are there any other books, websites etc that one could recommend?
I've found this site very helpful. I'm still not even close to understanding amplifier circuits, but it has been a great resource. FWIW, I find the .pdf layout to be easier to follow than their links, particularly for the "tests" and the intended sequence. So, I pull up one page with the .pdf and one using the links, so I don't need to print it.
Textbook for Electrical Engineering & Electronics
Also, I absolutely love the EEVBLOG.
Edited to add - I think I understand a bit of the first few chapters of Bob Cordell's book.
Textbook for Electrical Engineering & Electronics
Also, I absolutely love the EEVBLOG.
Edited to add - I think I understand a bit of the first few chapters of Bob Cordell's book.
In order for me to better understand "what I am actually doing" I started reading some things on this website https://www.electronics-tutorials.ws/amplifier/amp_1.html.
Are there any other books, websites etc that one could recommend?
6L6 shared this with me a while back. It’s been a huge help for me: Electronics Demonstrations
Thanks, appreciated.
That is a boat load of info.
I checked out Bob Cornells book, would love to sit in front of my system listening to music and reading it verses sitting at a computer.
That is a boat load of info.
I checked out Bob Cornells book, would love to sit in front of my system listening to music and reading it verses sitting at a computer.
Woah.
I just accidentally stumbled into this thread and started to read…
It is absolutely fantastic how you guis teamed up and zapped this into reality like nothing!
Love it!
I just accidentally stumbled into this thread and started to read…
It is absolutely fantastic how you guis teamed up and zapped this into reality like nothing!
Love it!
Common guys NP's generosity to share ideas is enough for me.
This really is not enough to keep you busy?
We should just explore from a hundreds or thousand ways permutation how to get rid of heat.
Leave that signature heat sink design to FW customers, or just buy the original?
i know at least 3 aluminum extrusion plants in NCR, you can just draw the profile and submit for quotations, and fabrications, dies are limited to 6 inch diameters afaik....but big initial investment is needed, about P25k for the die/mould, and at least 200kg of profile moq....so for a diy'er is a bit prohibitive...
At last got all my parts and found some time to start my J2 clone. Thanks to Nelson for sharing the mosfets and then I got the matched octets of 2SJ74bl from Punkydawgs seller of eBay - Toshiba 2SJ74 LAB MATCHED OCTET to 0.03mA / 4mV -- 8 matched FETs (9-10mA "B") | eBay.

Also another kind member of NL when he was doing the matching of 2SK170 jfets I got 2 pairs matched to 8mA IDSS.

I need a help in terms of mounting the octets (quads in each J2 pcb) in place of 2SJ109. Orientation is confusing considering that each 2SJ109 contains 1 pairs of 2SJ74. If someone can guide me or if used in the same configuration with a pic then it helps me to finish the amp.
Thank you.
Also another kind member of NL when he was doing the matching of 2SK170 jfets I got 2 pairs matched to 8mA IDSS.
I need a help in terms of mounting the octets (quads in each J2 pcb) in place of 2SJ109. Orientation is confusing considering that each 2SJ109 contains 1 pairs of 2SJ74. If someone can guide me or if used in the same configuration with a pic then it helps me to finish the amp.
Thank you.
You can find the answer here:
https://www.diyaudio.com/forums/pass-labs/207103-f5-turbo-builders-thread-506.html#post5323033
https://www.diyaudio.com/forums/pass-labs/207103-f5-turbo-builders-thread-506.html#post5323033
You can find the answer here:
https://www.diyaudio.com/forums/pass-labs/207103-f5-turbo-builders-thread-506.html#post5323033
Thanks Gyuri, I see that the J2 clone board has one extra pin hole as you can see in the picture compared to the one you referred to, so should I just leave it blank? Also from the link which direction the jfet goes in the J2 against the pcb board.


And if I am following the link I just need to follow the nomenclature of G/D/S of 2sj74bl against the 2sj109 as in like:
2sj109:
1. Drain 1
2. Gate 1
3. Source 1
4. Substrate (use the substrate lead with open) - i am presuming it says need to leave it blank
5. Source 2
6. Gate 2
7. Drain 2

2sj74:
1. Drain 1
2. Gate 1
3. Source 1

Last edited:
- Home
- Amplifiers
- Pass Labs
- Long skinny builders thread