Hard to say. For my MX50X2 one board blew and it was 2 shorted D1047 of the 2 boards x 4 = 2 of the 8 D1047 that went. For my L20.5 one board blew and it was 1 shorted B817 of the 2 boards x 8 outputs = 1 of the 16 outputs that went.
I am using 32-0-32 which should be no problem at all for the L20.5 (at least as claimed). So why did it blow on first power up? Before I could even apply a signal? My best guess is poor quality or fake outputs.
Yet my repaired MX50x2, MX50SE & L20.5 with Toshiba 2SC5200N & 2SA1943N are (so far!) rock solid. That is the L20.5 with only one pair installed in the output as a test!
Make an amplifier. There are a hundred wrong methods. It can damage him.
But there is only one correct installation method.
So DIY is a good amplifier. There are far more wrong methods than the right ones.
In fact, I don't care how others damage it. Because I sold a lot of machines. I assembled the machine myself. From more than ten years ago to now. No machine (finished product) is damaged yet.
But DIY amplifier. It's really easy to break it.
So I don't recommend DIY amplifiers for most people.
Especially the amplifier circuit board with more transistors in parallel. Its installation is particularly troublesome.
Hi LJM. Did you perhaps see my question about L20SE here?
https://www.diyaudio.com/community/threads/l20se-help-to-add-overcurrent-protection.384592/
https://www.diyaudio.com/community/threads/l20se-help-to-add-overcurrent-protection.384592/
Hi guys, which LJM model is most suitable for driving subwoofers? I intend to build a pair, left and right under the monitors.
Thx
Thx
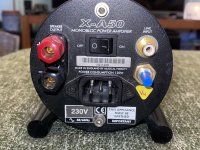
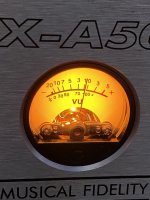
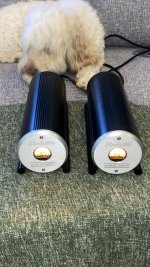
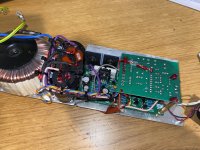
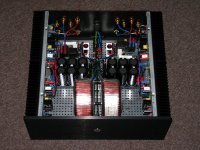
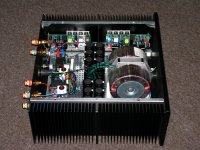
Been working on a rebuild project for a pair of mono bloc musical fidelity x-50’s. These had no protection and had blown the outputs. After deliberating I decided to go with a full rebuild using The amazingly clean L20SE amp boards with new caps etc but also fit power meters and protection.
All done. Sound is so clean, no noise and very balanced and detailed low to high at comfortable listening levels. Was tight to get it all in. Pics to follow.
All done. Sound is so clean, no noise and very balanced and detailed low to high at comfortable listening levels. Was tight to get it all in. Pics to follow.
Pics of finished project.
Attachments
-
 9CF982D3-BC58-40FC-BB8D-430EADA1DC3B.jpeg283.1 KB · Views: 343
 -
 4D7BB61C-5D6F-4417-BB33-79AF21B00C1F.jpeg682.6 KB · Views: 354
 -
 00338720-2CCD-4563-AAF9-034315D9B91C.jpeg399.9 KB · Views: 326
 -
 C86DB6F4-496A-4C2A-8EC4-23DBA075D5A1.jpeg426.9 KB · Views: 336
 -
 0DF427EA-C44D-4D67-B13C-3094B2CEA0D2.jpeg514.5 KB · Views: 376
 -
 226704F8-FC2C-4EF0-BA8A-D56DD0AADAF3.jpeg423.5 KB · Views: 367
 -
 1B215068-282C-4C3E-B063-C8D33A93D058.jpeg468 KB · Views: 341
 -
 E5EDCC70-C90C-44D6-B577-12EB6A1D5BCA.jpeg512.7 KB · Views: 351

Hello,
my L20.5 DIY-Amps.
L20.5 No.4 Bridge-Amp
L20.5 No.3 Stereo-Amp
L20.5 No.2 Stereo-Amp
More information: HERE
Regards
Michael


my L20.5 DIY-Amps.
L20.5 No.4 Bridge-Amp
L20.5 No.3 Stereo-Amp
L20.5 No.2 Stereo-Amp
More information: HERE
Regards
Michael
Hey,
L20.5 Bridge-Amp ( or 4-Channel Amp ) with conventional power supply .
Greeting
Michael
L20.5 Bridge-Amp ( or 4-Channel Amp ) with conventional power supply .
Greeting
Michael
Attachments


Hello,
my L20.5 DIY-Amps.
L20.5 No.4 Bridge-Amp
L20.5 No.3 Stereo-Amp
L20.5 No.2 Stereo-Amp
More information: HERE
Regards
Michael
look amazing as always, i actually am finishing up my 20.5 which i modeled after yours. i purchased 2 of the exact smps units you use (58v), but one arrived DOA and the other got blown up when my 20.5 modules smoked. as many have stated, had the D1047 & B817 combo and they didnt last much past the 3rd power up
so i had to rebuild the boards, and after reading your posts in the diy hifi forum, looks like you and i went the same route in 'modding' the board
i replaced the main transistors with toshiba 5200/1943 (looks like you did the NJW3281G/NJW1302G combo), i found a diy forum member who had authentic toshiba 1930/5171 drivers, i do not know how others will fair in this manner as they are no longer made. i too left the 699A in place
i also went and replaced all the 120uf/80v caps with nice panasonic 150uf/100v ones, 10uf/50v with a 10uf/63v UVP nichicon. my board had a nice nichican 470uf/16v already in place, so i left that as is
i randomly also replaced the R050 1w with 2w versions
and then for SMPS, got a connex SMPS500R +/- 54 from hifimediy (US warehouse)
just waiting on beefing up my case with some additional headsinking, so i'll post some pics when i finish up, thanks for the inspiration!
for those needing authentic 1930/5171 drivers: https://www.diyaudio.com/community/threads/toshiba-bjt-npn-pnp-2sc5171-2sa1930.296532/ @udailey has them for sale
Many Japanese receivers can be purchased used (for parts) for very good prices and if you get the right model (higher end 7 channel) you can get 7 pairs of genuine Toshiba 1930/5171 drivers and also Toshiba outputs. The right models often have extruded heat sinks and pretty capable transformers.
Preamp9 is not suitable. Because it drives less than 1K impedance, there will be no low-frequency signal.Can someone advise, can preamp 9 be used to drive in ear monitor earphones? They're 32ohms.
Ha-pro2 is recommended
look amazing as always, i actually am finishing up my 20.5 which i modeled after yours. i purchased 2 of the exact smps units you use (58v), but one arrived DOA and the other got blown up when my 20.5 modules smoked. as many have stated, had the D1047 & B817 combo and they didnt last much past the 3rd power up
so i had to rebuild the boards, and after reading your posts in the diy hifi forum, looks like you and i went the same route in 'modding' the board
i replaced the main transistors with toshiba 5200/1943 (looks like you did the NJW3281G/NJW1302G combo), i found a diy forum member who had authentic toshiba 1930/5171 drivers, i do not know how others will fair in this manner as they are no longer made. i too left the 699A in place
i also went and replaced all the 120uf/80v caps with nice panasonic 150uf/100v ones, 10uf/50v with a 10uf/63v UVP nichicon. my board had a nice nichican 470uf/16v already in place, so i left that as is
i randomly also replaced the R050 1w with 2w versions
and then for SMPS, got a connex SMPS500R +/- 54 from hifimediy (US warehouse)
just waiting on beefing up my case with some additional headsinking, so i'll post some pics when i finish up, thanks for the inspiration!
for those needing authentic 1930/5171 drivers: https://www.diyaudio.com/community/threads/toshiba-bjt-npn-pnp-2sc5171-2sa1930.296532/ @udailey has them for sale
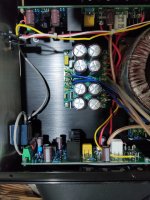
L20.5 installation is slightly more difficult. I often help customers assemble l20.5.
It has been used for more than 5 years. None of them is damaged. I use 8171047 or njw0302g 0281g.
Use 1659a 4370a. The test results are identical to 1930 5171 APSYS. There is no performance difference. But there were many fake goods in 1930 5171. I don't recommend it.
L20.5 outer hexagon nuts must be used. Use a wrench. Add screw cushion.
Please refer to the machine I installed yesterday.
Attachments

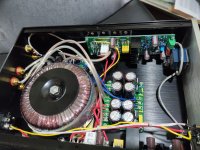
Hi,
From LJM Audio shop (Taobao)
https://world.taobao.com/item/558915415270.htm

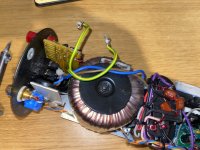
Ljm L20.5 with 300 VA and ¿36 Vac? Are not heatsinks necessary?
The transformer is too close to the rest, let alone the speaker cables, as the box is so small. Woul did not it be more logical to use two boxes, one for amplification and one for power? Or a big box.
From LJM Audio shop (Taobao)
https://world.taobao.com/item/558915415270.htm
Ljm L20.5 with 300 VA and ¿36 Vac? Are not heatsinks necessary?
The transformer is too close to the rest, let alone the speaker cables, as the box is so small. Woul did not it be more logical to use two boxes, one for amplification and one for power? Or a big box.
Last edited:
Use a switching supply. Almost guaranteed no hum/hiss - dead quiet, even with ear right in front of speaker.
You're right. If you can. A wider chassis is recommended.Hi,
From LJM Audio shop (Taobao)
https://world.taobao.com/item/558915415270.htm
View attachment 1076778
Ljm L20.5 with 300 VA and ¿36 Vac? Are not heatsinks necessary?
The transformer is too close to the rest, let alone the speaker cables, as the box is so small. Woul did not it be more logical to use two boxes, one for amplification and one for power? Or a big box.
Will reduce interference.
In fact, PSU will have high-frequency interference. About 100k frequency.Use a switching supply. Almost guaranteed no hum/hiss - dead quiet, even with ear right in front of speaker.
I have encountered this phenomenon in more than 50% of PSUs. Serious will make the output transistor heat up. Damage.
Of course, not all PSUs have problems. But it's hard to judge.
Will be huge problems. You need heatsinks an a bigger box.Hi,
From LJM Audio shop (Taobao)
https://world.taobao.com/item/558915415270.htm
View attachment 1076778
Ljm L20.5 with 300 VA and ¿36 Vac? Are not heatsinks necessary?
The transformer is too close to the rest, let alone the speaker cables, as the box is so small. Woul did not it be more logical to use two boxes, one for amplification and one for power? Or a big box.
I use AC 24-0-24.Will be huge problems. You need heatsinks an a bigger box.
It's basically not hot. The temperature is about 40-45 ℃.
The indoor temperature is 32 ℃.
In fact, a lower voltage is used. The calorific value is still very small.
- Home
- Vendor's Bazaar
- LJM Audio