when I was a kid, came to one particular idea very often - what would happen if I sharp 90 turn my bicycle bars, while going full speed ........
and, once I did it
remember - I was pretty skilled then , how to fall properly
you didn't think - what would happen with your amp, if you connect it directly to 380Vac?

and, once I did it
remember - I was pretty skilled then , how to fall properly
you didn't think - what would happen with your amp, if you connect it directly to 380Vac?
I know what will happen trying the 380 VAC connection. Anyway It is good the plugs does not fit directly.....
When I was kid I had an small battery driven electrical car. My farther got tired providing all the batteries so he made a small PSU (3-6VDC or so) with a long wire from the car. It used banana-plugs to the PSU. Those also fit into the 220 VAC outlet. I did try that......and what happens was a short flash from the car (very visible though the yellow plastic). I knew I did something bad but never told what I did). But I did complain that the car did not work anymore......and my farther spend a lot of time trying to find an error in the PSU he has made.......
Those 4n35 seems quite stable.......they work fine in e.g. M2X and other amps.


As "grown up kid" things becomes more expensive when it goes wrong.
My old Saab 9000 got a problem (some years ago) with too much pressure from the turbo during a tuning session.
The failure could probably be compared to what could happen if 4n35 fails......when a regulator fails in a closed loop.

My old Saab 9000 got a problem (some years ago) with too much pressure from the turbo during a tuning session.
The failure could probably be compared to what could happen if 4n35 fails......when a regulator fails in a closed loop.
What is the correct value for R1 (Mu part). Is it 6k8 or 8k2 (included in kit).
The Mu part schematic which I printed where number of source resistors has been reduced from 10 to 6 R1 is 6k8.
It is called Mu part for 2SK2087C and that is probably the reason. For THF51s 8k2 is the right value?
The Mu part schematic which I printed where number of source resistors has been reduced from 10 to 6 R1 is 6k8.
It is called Mu part for 2SK2087C and that is probably the reason. For THF51s 8k2 is the right value?
As "grown up kid" things becomes more expensive when it goes wrong.
My old Saab 9000 got a problem (some years ago) with too much pressure from the turbo during a tuning session.
The failure could probably be compared to what could happen if 4n35 fails......when a regulator fails in a closed loop.
That takes me back......I used to know a guy who was experimenting with a turbocharger on his clubman's racing car. (A low-cost, front engined category.) He had quite a collection of valves like that on his mantlepiece. 🙂 We stopped testing another friend's Volvo turbo saloon racer when the 'fireproof' lagging around the exhaust/wastegate caught fire. Stainless steel glowing an almost translucent orange is pretty impressive. Big boys' toys were such fun!
Yes, now I have a Turbo Boost / Vacuum meter direct coupled to the inlet manifold via a hose. It should not go above 1.8 bar or so. +2 is too much.
If the mixture is lean engine can produce a lot of power but only for a short time. There is also built in an "emergency fuel cut" in the mapping if pressure goes a bit past 2 bar. There is a 3-bar map sensor so ECU knows the pressure and can control how much gasoline to apply depending on rpm and which gear is selected. It is an old car now so long time ago I have pressed it to the limit.
If the mixture is lean engine can produce a lot of power but only for a short time. There is also built in an "emergency fuel cut" in the mapping if pressure goes a bit past 2 bar. There is a 3-bar map sensor so ECU knows the pressure and can control how much gasoline to apply depending on rpm and which gear is selected. It is an old car now so long time ago I have pressed it to the limit.
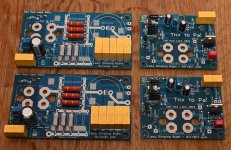
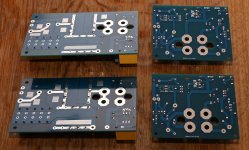
A small update. PCBs has now been soldered and flux has been removed.
I ensured that resistor close to small heatsink does not touch. I decided to cut the fin close to PCB.
I ensured that resistor close to small heatsink does not touch. I decided to cut the fin close to PCB.
Attachments
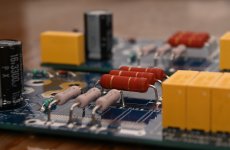
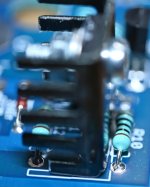
Ok, I see what you mean so heatsink is raised from the PCB and pointing up into the air.
When I did the assembly (transistor / heatsink) it felt most natural to have full contact to heatsink.
I think I am safe as is electrically and mechanical it is very stable.
When I did the assembly (transistor / heatsink) it felt most natural to have full contact to heatsink.
I think I am safe as is electrically and mechanical it is very stable.
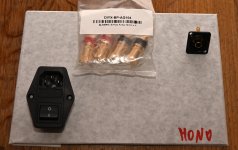
I have acquired two back panel stereo kits from the Store. I like to have two sets of speaker binding posts for easy bi-wire.
It is also the plan to use the IEC in the kit for the back panel. The mono block back panel has no pre-cut holes so for the IEC I need to cut a square hole.
Any good ideas to do this easy? e.g. like drill a lot of small holes and use a file to make it square?
My own idea is to get a saw like this:
https://www.conrad.de/de/p/kwb-315700-metallsaege-150-mm-2732537.html
Then first drill a hole. Unmount the "saw-wire" in one end and put it through the hole and then "saw-cut" the hole.
Other smart ideas?
Attachments
1/4” drill bit, drill the 4 corners and cut straight line to outside of holes with jigsaw. Minimal filing😉
Ok, that could be an idea. I have the smallest Bosch jigsaw. It has no pendul-function for the saw blade but it has worked well for smaller tasks.
I wonder if a good handsaw exists that works like a jigsaw. Like a handle and a stiff blade for cutting into metal. This would give a bit more control.
I wonder if a good handsaw exists that works like a jigsaw. Like a handle and a stiff blade for cutting into metal. This would give a bit more control.
I have just finished cutting some rectangular openings in 1/8 inch (3mm) aluminum plate and found drilling holes and using a jigsaw works well. I used 21 teeth per inch metal cutting blades. I had no problems with blade control. I was able to cut the drilled corners square. Like Vunce said, minimal filing needed after.
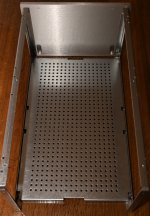
I have started pre-assembly of the mono blocks chassis. The front panel has to larger "oval" cut-outs. I wonder what they are for?
I have decided that they have no function for my version of the chassis. I have placed the cut-outs at the bottom. Will see if I get a "surprise" during final assembly........
I have decided that they have no function for my version of the chassis. I have placed the cut-outs at the bottom. Will see if I get a "surprise" during final assembly........
Attachments
- Home
- Amplifiers
- Pass Labs
- Lazy Singing Bush mono block build using THF51s