


Hi Scottjoplin,
It is probably a little residual from the original stepped finish. I'll try shaping the other cabinet and see how that one comes out. If it's not visible then I'm not going to worry. It certainly won't be enough to effect sound quality. Fingers crossed.
Niffy
It is probably a little residual from the original stepped finish. I'll try shaping the other cabinet and see how that one comes out. If it's not visible then I'm not going to worry. It certainly won't be enough to effect sound quality. Fingers crossed.
Niffy
Looking good. I was wondering if it was between the plys it may always be there due to the different orientations and the way they would sand?
I did have a bit of trouble loading them and they weren't showing thumbnails. Doubling up is better than not at all.
I've shaped the front section of the second cabinet. It has the same issue of the slightly undulating surface. Again it isn't really visible and is only noticeable to the touch.

I going to have to ponder whether I want to try and smooth it out further.
Niffy
I going to have to ponder whether I want to try and smooth it out further.
Niffy
I expect if your finish has a sheen that you'd be more likely to notice. Otherwise... they look great. Excellent job!
Hi mhenschel,
I believe that you are on to something.
Before I glue on and shape the rear panel I think I'll varnish the front section to see if any surface imperfections are visible. Then decide from there which way to go.
Niffy
I believe that you are on to something.
Before I glue on and shape the rear panel I think I'll varnish the front section to see if any surface imperfections are visible. Then decide from there which way to go.
Niffy
It seems to me that a lot depends on how you expect this shape to operate for you. If the objective is primarily to not have a sharp diffracting edge then minor imperfections are likely immaterial. Except for the appearance.
On the other hand if the desired function is more like that of the sphere on the Morrison 19 then the configuration and conformity probably matter a lot more.

Overview — Morrison Audio
(I don't think the image worked so take a look here: Reviews — Morrison Audio )
On the other hand if the desired function is more like that of the sphere on the Morrison 19 then the configuration and conformity probably matter a lot more.
Overview — Morrison Audio
(I don't think the image worked so take a look here: Reviews — Morrison Audio )
Attachments
Last edited:
Hi mhenschel,
My design is not omnidirectional like the morrison. It looks like the spheres in this design are used as reflectors.
The spherical nature of my design is purely to give the smoothest diffraction and a benign baffle step. My wanting to get the surface as smooth as possible is purely cosmetic, the slight undulations won't have any effect on sound quality.
I have varnished the front sections of both cabinets.

They look pretty smooth so I probably don't need to do any further shaping, and the colour is great.
Niffy
My design is not omnidirectional like the morrison. It looks like the spheres in this design are used as reflectors.
The spherical nature of my design is purely to give the smoothest diffraction and a benign baffle step. My wanting to get the surface as smooth as possible is purely cosmetic, the slight undulations won't have any effect on sound quality.
I have varnished the front sections of both cabinets.
They look pretty smooth so I probably don't need to do any further shaping, and the colour is great.
Niffy
I was just pointing out the circumstances where you might want to be rigorous.
It looks.... marvelous!
It looks.... marvelous!
niffy,
After applying varnish it's looking pretty smooth in the pic - well done! You intend to do a natural finish (which btw, is looking very nice)?
After applying varnish it's looking pretty smooth in the pic - well done! You intend to do a natural finish (which btw, is looking very nice)?
Hi zman01
I really like the colour. The finish is a bit glossy. I'll finish up the shaping of the rear sections and revarnish them. I'll decide on the final finish based on how they look.
Niffy
I really like the colour. The finish is a bit glossy. I'll finish up the shaping of the rear sections and revarnish them. I'll decide on the final finish based on how they look.
Niffy
Last bit of gluing.
I've glued the rear panels to the cabinets this morning. The glue to was well cured so it was on with a bit of sanding. First one done. I've attached the second one to the turntable in preparation for its final shaping.

Niffy
I've glued the rear panels to the cabinets this morning. The glue to was well cured so it was on with a bit of sanding. First one done. I've attached the second one to the turntable in preparation for its final shaping.
Niffy
Last edited:
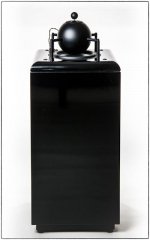
The finished shape
I've finished shaping both cabinets and given them both a coat of varnish. The shape is just what I was after. They will need several more coats with a bit of a rub down in between. I feel like I'm in the home straight.


Niffy
I've finished shaping both cabinets and given them both a coat of varnish. The shape is just what I was after. They will need several more coats with a bit of a rub down in between. I feel like I'm in the home straight.
Niffy
I'll bet you are impatient to have a listen 😉 Are you in a position to take measurements?
As I've had the drivers for a year and a half I've learnt to be patient. I am looking forward to hearing them but I'd rather take my time now and get them right.
I don't currently have a working measurement system. One of the advantages of using a full range driver, as mentioned in #2, is that "if you are new to speaker building you will probably also need to buy a calibrated microphone and design software. Without this your chances of getting the crossover to work is virtually zero". With a full range driver it is a bit like buying a mid-bass and tweeter with a crossover that has perfect phase alignment in a single package. The main point of taking measurements is to get the phase of the two drivers aligned over the crossover region. It is also helpful for getting the levels matched.
If you are building a sealed box with a full range driver measurements are not so important. I decided that I would spend my entire budget on the best possible drivers rather than splitting it between drivers and measurement equipment.
Niffy
- Home
- Loudspeakers
- Full Range
- Jordan Eikona Translam Ellipsoid