I'll say that twisting and heat shrinking to lock in a tight twist is likely mostly for "looks" and not for noise/EMI reduction. Not to discourage you from buying a good tool (Heat Gun) as I'm all for having good tools for the job, just saying it's more of a "nice to look at" thing in my mind than anything else. @rhthatcher was the inspiration for the power drill to twist wires and adding heat shrink to "lock" in the tight twist was the logical next step.
For anyone interested in doing that, I'll say it's extra work, but looks really nice and makes for tidy wiring. Here's my technique....
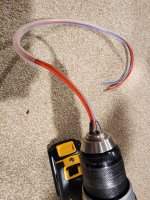
Step 1: Cut off more wire length than you need by say 25-30%. (2 wires, 3 wires, or even 4 wires if that's what you need).
Step 2: Slide the untwisted straight wires through some quality heat shrink (I've pulled the wires through if needed using a string if the length won't push through. Don't bother trying to "lube" up the wires with water, or oil in an attempt to make them push through a long length of heat shrink....tried that...not a good idea. The length of heat shrink should be 2/3 the length of the wires as they will of course get shorter once twisted and you don't want to stop twisting because you bumped into the heat shrink length.
Step 3: Clamp one end (or hold with fingers if you have strong grip strength) with a vice grip, or pliers, and chuck up the other ends into the drill.
Step 4: Run the drill slowly to twist the wires inside the heat shrink tube until it's all twisted up to your liking. If you go too fast with the drill, the heat shrink will catch on the wires and start to twist, which you don't want. The heat shrink diameter should be large enough that the wires twist freely inside the tube of heat shrink and the heat shrink remains as it's straight "tube form".
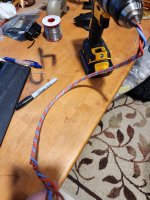
Step 5: While holding the twist with the drill and pliers (or fingers), use a heat gun to fully shrink the heat shrink around the wires. You'll need a third hand, use your feet, or a heat shrink gun that sits pointed up on its own.
Step 6: After the heat shrink is all shrunk, while still maintaining the twist by holding both ends to prevent "unwinding", run that now very hot heat shrinked wire combo under cold water in your sink (or perhaps dunk in a cold bowl of water?). Only after the heat shrink is back at room temperature (takes 30 seconds running under cold water) do you unchuck the wire and remove the vice grip. Now the wire maintains the twist permanently.
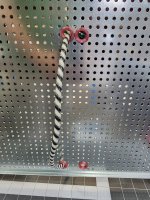
Step 7: Install wiring as needed. Cut to length and cut away excess heat shrink enough to allow you to solder to boards, or install ....dare I suggest Faston spades for those folks willing to risk ridicule from Zen Mod 🙂
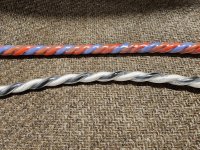
Cheers, you got some nice looking wiring you can route and zip tie as needed.
Reference: I use 3:1 marine grade heat shrink in 1/4" for 2x 16ga wires, 5/16" for 3x 16ga wires, and 3/8" for 4x 16ga wires. I am using clear heat shrink from Bezo's bookstore, XHF brand (but Haisstronica 3:1 works well too, but it's just not clear like the XHF).
Edit: Definitely OCD driven approach 😎


For anyone interested in doing that, I'll say it's extra work, but looks really nice and makes for tidy wiring. Here's my technique....
Step 1: Cut off more wire length than you need by say 25-30%. (2 wires, 3 wires, or even 4 wires if that's what you need).
Step 2: Slide the untwisted straight wires through some quality heat shrink (I've pulled the wires through if needed using a string if the length won't push through. Don't bother trying to "lube" up the wires with water, or oil in an attempt to make them push through a long length of heat shrink....tried that...not a good idea. The length of heat shrink should be 2/3 the length of the wires as they will of course get shorter once twisted and you don't want to stop twisting because you bumped into the heat shrink length.
Step 3: Clamp one end (or hold with fingers if you have strong grip strength) with a vice grip, or pliers, and chuck up the other ends into the drill.
Step 4: Run the drill slowly to twist the wires inside the heat shrink tube until it's all twisted up to your liking. If you go too fast with the drill, the heat shrink will catch on the wires and start to twist, which you don't want. The heat shrink diameter should be large enough that the wires twist freely inside the tube of heat shrink and the heat shrink remains as it's straight "tube form".
Step 5: While holding the twist with the drill and pliers (or fingers), use a heat gun to fully shrink the heat shrink around the wires. You'll need a third hand, use your feet, or a heat shrink gun that sits pointed up on its own.
Step 6: After the heat shrink is all shrunk, while still maintaining the twist by holding both ends to prevent "unwinding", run that now very hot heat shrinked wire combo under cold water in your sink (or perhaps dunk in a cold bowl of water?). Only after the heat shrink is back at room temperature (takes 30 seconds running under cold water) do you unchuck the wire and remove the vice grip. Now the wire maintains the twist permanently.
Step 7: Install wiring as needed. Cut to length and cut away excess heat shrink enough to allow you to solder to boards, or install ....dare I suggest Faston spades for those folks willing to risk ridicule from Zen Mod 🙂
Cheers, you got some nice looking wiring you can route and zip tie as needed.
Reference: I use 3:1 marine grade heat shrink in 1/4" for 2x 16ga wires, 5/16" for 3x 16ga wires, and 3/8" for 4x 16ga wires. I am using clear heat shrink from Bezo's bookstore, XHF brand (but Haisstronica 3:1 works well too, but it's just not clear like the XHF).
Edit: Definitely OCD driven approach 😎
Attachments


Last edited:

When you see my post expect the following....
When you see Birdbox post something, expect this....
When you see Birdbox post something, expect this....
Been playing my Iron Pre for a while now, really wonderful! Thank you @Zen Mod and all who made it possible to own a reference level preamp for very short $$$. I had been on a Grateful Dead kick lately so started with Capitol Theater 2/18/71, very nice. On to Boston 5/7/77, spectacular.
From there started playing my standard demo tracks:
Nils Lofgren, Keith Don't Go, Acoustic Live, heard it hundreds of times on numerous systems totally engaging with the IP. I listened to the track beginning to end, which I never do when evaluating. It seemed that I could hear the type of strings he was using 😛.
Next up Archie Shepp and Horace Parlan, Trouble In Mind, Steeple Chase. Excellent recording of a sax and piano with the sax somewhat in front of the piano. Very good image placement. The piano is captured beautifully and the harmonic texture is excellent with very nice decay of the notes. The sax is equally well captured! Again, I listened to the whole track.
Jacintha, Here's To Ben, a tribute to Ben Webster, Georgia. Once again very revealing, great sense of space, I know that it's manipulated, lovely texture on instruments and a beautiful voice.
Got more listening to do, but when they hit the store, real soon a little birdiebox told me, grab 1 before they go!
If there is any thing that I'd like it would be more top end, but no peamp's gonna restore that
Yah uh huh, twisting wires... Let's see what this guy has to offer. OMG! That's gorgeous! Rare to see something done so perfectly. Yes, this will become something else that I will pick up for future projects.
Hai Guys,
this is just a random query ...pl help
I am doing Aleph J and was planning to do Iron pre as a preamp
Zen-Mod advised me thats the best option
Now i am looking for this Kit to be available at DIY audiostore
I have registered for alert when kit is available
but since last 8 months I see this kit not available
Any idea
^ I have a pretty good idea... 😉
Soon... very soon...
To all - Thanks for your patience.
Soon... very soon...
To all - Thanks for your patience.
and ......... it'll be superduper iteration, doubletrippppple better than original one, so everyone need to ........ buy it again
I'm learning from Best One
"what I'm going to sell tomorrow, if I make The Best I can, today?"

"what I'm going to sell tomorrow, if I make The Best I can, today?"
Now seriously (if that's possible with ZM), for those who are leaning to over-stress .......
- first two batches of Iron Pre (both SE and Bal) were possible strictly due to Papa's generosity - he secured quantity of complementary TO92 Toshiba JFEts for buffers.
- soon to be current third (and hopefully final iteration) batch of Iron Pre in Store is equipped with non-complementary JFet (2SK2145BL) buffer, and that became possible only because (and when) IAIMH is willing to conduct all tedious matching the bugz and soldering the bugz work
- there is slight difference in performance between these iterations (TO92 vs. smd), but said difference is not of quality , more applicable on personal preference ....... if one is even able to differentiate in direct comparison

I deserve none in this case 🙄, this unit sort of dropped into my lap already built. Still planning upon building a SE version as I already had all the parts.
And I don't care for glory, I want to save the world from bad HiFi
That said the music flowing thru this into my AJz is Glorious!
That said the music flowing thru this into my AJz is Glorious!
just use what sounds best ....... just take care to not wake it up with digital volume all the way up; probably good practice should be - as usual - first dialing physical volume all the way down before powering off entire shebang
and, yes , by explanation, your digital volume is less obtrusive than resistive volume you implemented in Iron Pre
what would happen in case of implementing possibly better resistive attenuator, only you can know
and, in the end, it's what you have it, if using resistive attenuator........ it doesn't matter if you wrap it in skin of 300.000$ line stage, or in skin of decent made for best buddy - type of kit
they'll sound similar in best case, only MFBB kit sold without BS, for peanut price
Got the pre up and running W/O hum. Very happy that I changed out the old controls, moved the pots close to the circuit board, and especially that I took more care while wiring. It doesn't look perfect, but it sounds Great again. Done deal. Next up, rewire a power amp that, well, I used as a donor for a short time. Not recommended practice folks.

- Home
- Amplifiers
- Pass Labs
- Iron Pre Essentials Kits For The DIYA Store - Register Your Interest