is it hornresp DL page down ?
i try to DL the new version and it just time out...
any ideas ?
i try to DL the new version and it just time out...
any ideas ?
I'm grateful to have a reply from you David.Create a template by selecting the above options and then adjust the dimensions and driver parameter values to suit your specific design.
If I may, a few more quick questions for the time being. Since I think the program will look at the horn folds as 3 total lengths and CSAs, how do I add L2 ( left ) and L2 ( right ) together?
My first guess ( trying not to guess )-
Add the CSA's for fold 2 together and leave the length the same? Essentially, I'm combining them like two pipes that are now the same length?
Would the same principle apply to L3 and S3?
Please feel free to correct me in any way. No issue pushing my ego to the side and learning.
Thanks!
NICE..!!!!Thanks to very valuable input kindly provided by Dr Bjørn Kolbrek, I now have an APR model 🙂.
If all goes according to plan, hopefully it can be included in the next Hornresp update.

I'd like to know if the lossy Le would really be closer to reality than the normal one
If the driver has a large motor, then probably yes.
Add the CSA's for fold 2 together and leave the length the same?
Yes.
Would the same principle apply to L3 and S3?
Yes again.
i try to DL the new version and it just time out...
I just did a test download - worked fine for me.
Ok so maybe it would be better if i make something in between ?If the driver has a large motor, then probably yes.
Or i have to find a way to use the semi-Le ?
Learn how to implement the lossy Le or the full Thorborg simulation. You will be repaid your time involved with much more accurate simulations.Ok so maybe it would be better if i make something in between ?
Or i have to find a way to use the semi-Le ?
I don't know, but here is a starting point:How you do loosy Le
https://www.diysubwoofers.org/misc/semi-inductance.html
Somewhere i read that the needed values for a driver can be get from the ZMA file(if available).
And, for drivers with low Le the topic is less important.
Car audio drivers are a great place to use the semi-inductance model. Plus anything that is working into the midrange. You simulations will be much more accurate.don't know, but here is a starting point:
https://www.diysubwoofers.org/misc/semi-inductance.html
Somewhere i read that the needed values for a driver can be get from the ZMA file(if available).
And, for drivers with low Le the topic is less important.
everything is fine server-side... try agin.is it hornresp DL page down ?
i try to DL the new version and it just time out...
any ideas ?
Hornresp Update 5500-230913
Hi Everyone,
CHANGE 1
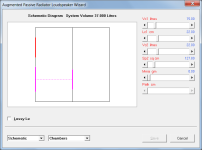
Augmented passive radiator loudspeaker systems can now be simulated. My thanks to Dr Bjørn Kolbrek for providing the APR model used in Hornresp. Following is a copy of the relevant section in the Help File relating to the new feature. Probably the best way to start is to create a template using the Input Wizard and then adjust the input parameter values to suit the required design.
The APR Input Wizard options are:
Half space > Direct radiator > Passive radiator > Augmented
//////////////////////////////////////////////////
|Closed-Box With Inline Driver and Augmented Passive Radiator
~~~~~~~~~~~~~~~~~~~~~~~~~~~~~~~~~~~~~~~
Select the Augmented Passive APR option from the Loudspeaker Configuration tool or press the Ctrl key and double-click on the ABC label in edit mode to set the APR flag.
Double-click on the Mmp label to specify the total extra mass in grams to be added to the augmented passive radiator diaphragms. The input parameters window Mmp label changes to red when mass is added, and the value of the mass added to the diaphragms can be seen in the bottom status bar panel by moving the mouse pointer over the Mmp label or text box.
Press F5 or click the Wizard button to open the Loudspeaker Wizard.
An augmented passive radiator can be created by taking two normal passive radiators and physically connecting their diaphragms back-to-back. The required Cmp, Mmp and Rmp input parameter values for the APR are calculated as follows:
Cmp = Cmp1 * Cmp2 / (Cmp1 + Cmp2)
Mmp = Mmp1 + Mmp2 + mass of the link connecting the two diaphragms
Rmp = Rmp1 + Rmp2
Where Cmp1, Mmp1 and Rmp1 are the parameter values for the first passive radiator and Cmp2, Mmp2 and Rmp2 are the values for the second.
It is not possible to specify more than one APR.
If the piston areas Sp1 and Sp2 of the two connected passive radiator diaphragms are the same then the forces due to the pressure acting on them will be equal and opposite, and the diaphragms will not move. The system performance will be identical to that of a closed-box with inline driver.
If piston area Sp2 is set to zero then the performance of the APR will be identical to that of a conventional passive radiator having the same Sp1, Cmp, Mmp amd Rmp specifications.
//////////////////////////////////////////////////
CHANGE 2
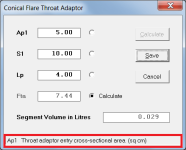
When used with a throat adaptor, the Horn Segment Wizard was not showing a description for Ap1 and only generalised descriptions were given for S1, Lp and Fta. All descriptions are now shown, and are specific to the throat adaptor.
Post #13,903 refers:
https://www.diyaudio.com/community/threads/hornresp.119854/page-696#post-7442587
Kind regards,
David
Hi Everyone,
CHANGE 1
Augmented passive radiator loudspeaker systems can now be simulated. My thanks to Dr Bjørn Kolbrek for providing the APR model used in Hornresp. Following is a copy of the relevant section in the Help File relating to the new feature. Probably the best way to start is to create a template using the Input Wizard and then adjust the input parameter values to suit the required design.
The APR Input Wizard options are:
Half space > Direct radiator > Passive radiator > Augmented
//////////////////////////////////////////////////
|Closed-Box With Inline Driver and Augmented Passive Radiator
~~~~~~~~~~~~~~~~~~~~~~~~~~~~~~~~~~~~~~~
Select the Augmented Passive APR option from the Loudspeaker Configuration tool or press the Ctrl key and double-click on the ABC label in edit mode to set the APR flag.
Double-click on the Mmp label to specify the total extra mass in grams to be added to the augmented passive radiator diaphragms. The input parameters window Mmp label changes to red when mass is added, and the value of the mass added to the diaphragms can be seen in the bottom status bar panel by moving the mouse pointer over the Mmp label or text box.
Press F5 or click the Wizard button to open the Loudspeaker Wizard.
An augmented passive radiator can be created by taking two normal passive radiators and physically connecting their diaphragms back-to-back. The required Cmp, Mmp and Rmp input parameter values for the APR are calculated as follows:
Cmp = Cmp1 * Cmp2 / (Cmp1 + Cmp2)
Mmp = Mmp1 + Mmp2 + mass of the link connecting the two diaphragms
Rmp = Rmp1 + Rmp2
Where Cmp1, Mmp1 and Rmp1 are the parameter values for the first passive radiator and Cmp2, Mmp2 and Rmp2 are the values for the second.
It is not possible to specify more than one APR.
If the piston areas Sp1 and Sp2 of the two connected passive radiator diaphragms are the same then the forces due to the pressure acting on them will be equal and opposite, and the diaphragms will not move. The system performance will be identical to that of a closed-box with inline driver.
If piston area Sp2 is set to zero then the performance of the APR will be identical to that of a conventional passive radiator having the same Sp1, Cmp, Mmp amd Rmp specifications.
//////////////////////////////////////////////////
CHANGE 2
When used with a throat adaptor, the Horn Segment Wizard was not showing a description for Ap1 and only generalised descriptions were given for S1, Lp and Fta. All descriptions are now shown, and are specific to the throat adaptor.
Post #13,903 refers:
https://www.diyaudio.com/community/threads/hornresp.119854/page-696#post-7442587
Kind regards,
David
Attachments

Time for another BOXPLAN... 🙂
Realistically there is probably no need for a BOXPLAN - the APR loudspeaker designs are pretty straight-forward 🙂.
Hornresp Update 5500-230913
The following should also have been included:
CHANGE 3
When using the BP4 Loudspeaker Wizard 'automatic calculation' feature it was sometimes possible to obtain a negative value for the rear chamber volume. This can no longer occur.
My thanks to rertrobaer for the feedback in Post #13,749:
https://www.diyaudio.com/community/threads/hornresp.119854/page-688#post-7422370
What I've found is the BOXPLAN approach makes it easier to create a design, as you're starting with the actual physical layout, rather than starting with the sim and then trying to convert it to a physical layout, only to discover for example that the dimensions required to achieve the net volumes in the sim make it impossible to install the driver in the box 🙂.Realistically there is probably no need for a BOXPLAN - the APR loudspeaker designs are pretty straight-forward 🙂.
Hello David,
Do you mind to take a look in the post below and see if you have any suggestion?
https://www.diyaudio.com/community/threads/hornresp-model-for-paraflex-top.403288/
Thanks you in advance,
Best regards,
Marcelo
Do you mind to take a look in the post below and see if you have any suggestion?
https://www.diyaudio.com/community/threads/hornresp-model-for-paraflex-top.403288/
Thanks you in advance,
Best regards,
Marcelo
- Home
- Loudspeakers
- Subwoofers
- Hornresp