I haven't used the PnP, so keep that in mind reading this post:
If you are using an clothing iron, you don;t really have to worry about too much heat on the PCB, unless you leave it on there for a LONG time. The iron won't get over 500F (likely not even that hot - doesn;t melt solder I don't think. If it does, maybe I can use one for tinning my boards!) PCSs can take a fair amount of heat in the 800F+ range.
An interesting test would be to put a full-heat iron on a scrap board and see just how long it will take the heat. I'd sure be interesting for when I try the PnP.
-b
AndrewT said:Hi,
I thought the sockets were in contact with the TO3, but I may be wrong. Someone else said they are on the other side of the heatsink. Can an expert confirm where the TO3 sockets are located?
If the sockets are between the TO3 and the heatsink then I recommend you omit them and use conventional thermal jointing.
Still4given, what thickness Kapton did you use? 0.001 inch(1 thou) is good, 0.006 inch is not so good but ok. Both are better with thermal grease to each contact face.
regards Andrew T.
Hi Andrew,
The Kapton is described as "1 Metre x 25mm x 25um Kapton Tape ". That's what I bought. I should have plenty to make pads for all of the TO-3's on this amp.
Blessings, Terry
wwood said:The laminator is about $130 at office supply stores.
I am told it is offered on Ebay sometimes for far less.
I'm not sure what those last two posts have to do with this. 
Well I made the PCBs. I used the Press-n-Peel sheets. I made a few mistakes. I'll share for those who are thinking of doing this.
First, I cut the boards to the exact size before I ironed on the sheets. This particualar design has traces running right along the sides. I found it really hard to get the trace to stick to the edge like that. I will trim the board to size after I etch it next time.
Second, I didn't get the iron hot enough the first time and so a lot of traces didn't stick. I had to scrub it off redo it with a new sheet.
On the second go around, most all of the traces stuck but there were a few that didn't. I went to Radio Shack and bought a trace pen and filled in the bare spots. That worke fine. The etchant didn't penetrate it.
Then, I didn't read enough about using the Ferric Chloride. I didn't realize it should be heated and that it needed to be agitated. After about 20 minutes I decided I had better look it up. So, I put a flood lamp over it and began rocking the glass tray I was using and finally began to see results.
Here are some pictures of the finished boards. Well, finished being etched. Obviously I still have a lot to do. 😀
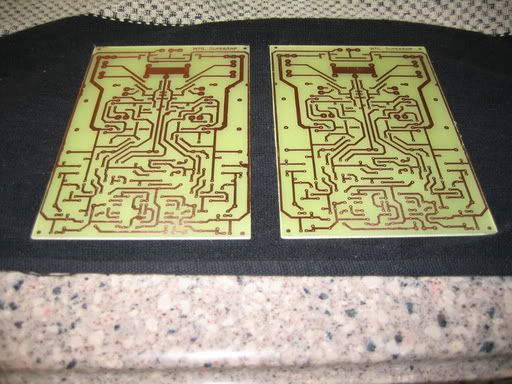
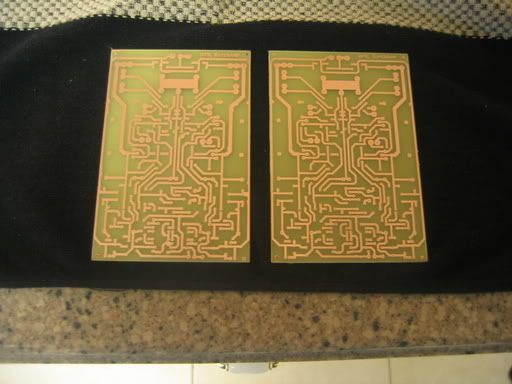
Blessings, Terry
Well I made the PCBs. I used the Press-n-Peel sheets. I made a few mistakes. I'll share for those who are thinking of doing this.
First, I cut the boards to the exact size before I ironed on the sheets. This particualar design has traces running right along the sides. I found it really hard to get the trace to stick to the edge like that. I will trim the board to size after I etch it next time.
Second, I didn't get the iron hot enough the first time and so a lot of traces didn't stick. I had to scrub it off redo it with a new sheet.
On the second go around, most all of the traces stuck but there were a few that didn't. I went to Radio Shack and bought a trace pen and filled in the bare spots. That worke fine. The etchant didn't penetrate it.
Then, I didn't read enough about using the Ferric Chloride. I didn't realize it should be heated and that it needed to be agitated. After about 20 minutes I decided I had better look it up. So, I put a flood lamp over it and began rocking the glass tray I was using and finally began to see results.
Here are some pictures of the finished boards. Well, finished being etched. Obviously I still have a lot to do. 😀
Blessings, Terry
Congrats Terry. They look great. Drilling is the fun part...
The two posts you mentioned were related. it's possible to get a laminating machine (used for badges and cars and such) and make an adjustment to the rollers to allow you to pass circuit boards through it with the press and peal. Gives nice even heat and a lot of pressure. $9 isn;t a bad price if you're gonna make a lot of boards (or laminate stuff I guess - would keep the cat from shedding as much).
-b
Oops, I missed wwood's first post.
That does look like a pretty cool way of doing it. I'll have to keep that in mind. I'm not sure I will be making enough PCBs to justify it, but I love tools. 😀
Thanks for the tip.
Now I have to find some really small drill bits. Any sources?
Thanks, Terry
That does look like a pretty cool way of doing it. I'll have to keep that in mind. I'm not sure I will be making enough PCBs to justify it, but I love tools. 😀
Thanks for the tip.
Now I have to find some really small drill bits. Any sources?
Thanks, Terry
First time i tried the P-n-P thing a long time ago it took me multiple attempts to end up with a board that does not even come close to yours. I find it hard to get an even pressure on the foil with a roller.
Means : you are very handy and i am not, or P-n-P has come a long way since TEC foil.
I am hoping for the latter.
I should be building instead of talking
The flaws on the boards i made with press-on foil i corrected by putting a thick layer of tin over the copper after the drilling.
Its sold in bottles, the pcb in a tray and the stuff just poored over it.
Nice job, Terry
Hi Jacco,
Thanks for the support!
I'm not sure we are talking about the same process. This this is not a "press on foil" application. With this system you simply print the pattern onto the blue sheet and when you iron it on to the solid copper clad board only the portion that is printed sticks. I suppose the toner from a laser jet printer has some etchant resistant properties. I know that it is heat sensitive because that's how it is applied to the paper in the first place. At any rate, the etchant doesn't penetrate it so when you dip it, the etching solutions eats away every thing else. It took over a half an hour for the the etching process. Probably because I didn't heat the solution and because I didn't agitate it until about half way through.
Like I said, I had to touch up the image a little before I dipped it because it didn't stick everywhere. Not too much trouble with the little pen I bought from Radio Shack.
I'm looking forward to drilling and adding the componants.
Blessings, Terry
Hi Terry-
About the drill bits... I looked for a while. Grizzly Industrial has sets of "wire gauge bits", but they are 6" long (for aircraft use). Seemed like they would be too long and be hard to keep from flexing. http://www.grizzly.com/products/item.cfm?itemnumber=G9752&
Then I found these at DigiKey:
http://www.digikey.com/scripts/DkSearch/dksus.dll?Criteria?Ref=44853&Site=US&Cat=32244229
Then, I was poking around on a web site that AceNov posted, and found this set, which is probably what I would get (the DS-100 set):
http://www.oselectronics.com/ose_p56.htm
Will be ordering them myself in the next few days.
-b
Terry,
Another source for drill bits is www.drillbitcity.com. They sell re-sharpened carbide drills in sets that have a useful selection of sizes. The prices are reasonable and the service very good.
Jacco,
PnP has changed quite a bit, actually it is PnP Blue that is special. The original was just a toner transfer system. Now, the toner is used to adhere to the board and to another film is on top of the toner. The result is equivalent to first transfering toner and then putting another layer on top of the toner. The second layer is the key. It seals the toner surface so you get pin hole free resist. The top layer is quite rugged. Resolution is excellent and Terry's results are typical. Using PnP Blue and a laminator is the best approach that I have ever used. Like some one else posted, I have been making boards for a lot of years .... going back to coating boards with liquid resist.
The Pulsar web site gives an interesting etching technique .... soak a sponge with ferric chloride and rub the etchant on the board. They claim very rapid etching. Have not tried it, but it does look interesting.
Pulsar also shows a way to use the toner transfer system with a white film on top to create an equivalent silk screen effect. It works. Best part about the Pulsar stuff is that it is available from DigiKey.
Sorry if this is too off topic,
Bill
Nice link wwood!! Glad I didn't guy yet.
-b
http://www.drillbitcity.com./catalogue/product_detail.asp?Tg=301-R8WSFBRB
Bingo. I'm going to get a sliding vice for my drill press as well. Easier to align with my drill points, then I can use the edge cutter to machine the sides of the board perfectly.
http://www.grizzly.com/products/item.cfm?itemnumber=H0967
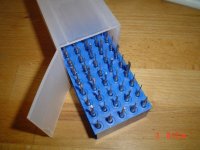
Overhere a set of drills like on the picture is sold for around $10 on the web.
I checked each one with a magnifiying glass first time i bought a set, the tips looked as good as new.
I use them on a dremel style drilling machine in a stand on a powersupply with speed control, i am almost enjoying to drill holes.
Ooff, the relief.
TEC was just a transparent going through a laser printer.
First the foil had to be ironned on the board, then pressed on with a foam roller.
At the time i cursed my head off each time i tried to remove the foil from the pcb (so to speak).
Thanks, Bill.
Attachments
I picked one of these up about a year ago for just over $100 on sale:
http://www.delta-tools.net/delshopdp8de.html
Good for 99% of the wood and metal working I do. My little brother has an old Wilton floor press that I maight swap it for (needs a little TLC).
Just bought the vice. $65 with shipping. They have a smaller version as well for about $12 less.
-b
http://www.delta-tools.net/delshopdp8de.html
Good for 99% of the wood and metal working I do. My little brother has an old Wilton floor press that I maight swap it for (needs a little TLC).
Just bought the vice. $65 with shipping. They have a smaller version as well for about $12 less.
-b
Whats the maximum speed on that drill press ?
I have a floor stand one in my garage the size of Gibraltar, originally from my dads plant.
I spent months behind it from the age of 8, drilling holes in production tools my dad developed.
I have drilled up to 2 inch diameter holes with it in solid steel.
At one time it took 4 square inches of skin off my right hand.
A 10.000 rpm table model delivers very clean holes in pcb's.
A board like Terry's Super Leach would take me half an hour in my hobby room.
How much time would such a board take on a drill press as shown ?
Hey Working,
You're not off topic. This thread is about building an amp based on the Transformer that I already owned. Making the PCBs is all part of it. The only shame is that someone who needs to know this stuff may not see it because it isn't part of the thread title.
Hi wwood,
I was ordering the bits while you were posting the link. I probably would have ordered them from there instead. The ones from oselectronics.com look good enough but they charge $8 shipping. Man, I think I've already paid for one of those big brown vans that UPS drives.
I ordered one of those etching tanks while I was there. Now I have to make more. 😀
Blessings, Terry
Not sure of the top speed, I'll check tonight. If I need to I can always swap out the pulleys to speed it up (I have this little 2-inch pully from my table saw motor that should do it).
Also, the only circuit board I have made since I got the drill press measured 2x3cm (12VDC -> 5V 2A car power supply for my MP3 player). That took about 1 minute, but isn;t really representative. Cut it with an Exacto knife.
-b
Also, the only circuit board I have made since I got the drill press measured 2x3cm (12VDC -> 5V 2A car power supply for my MP3 player). That took about 1 minute, but isn;t really representative. Cut it with an Exacto knife.
-b
Jacco,
The problem with modifying a "good" floor standing drill press such as you describe or the Delta's to run at 10,000 rpm is that their bearings are not designed to run at the high rpm. When the bearings wear, the quill begins to wobble and eventually you drill ellipses I know, my floor standing drill press is an example.
For drilling circuit boards I now use a small hobby drill press by Proxxon. Runs at 8000 rpm. Works nicely.
Bill
The problem with modifying a "good" floor standing drill press such as you describe or the Delta's to run at 10,000 rpm is that their bearings are not designed to run at the high rpm. When the bearings wear, the quill begins to wobble and eventually you drill ellipses
I know, my floor standing drill press is an example. For drilling circuit boards I now use a small hobby drill press by Proxxon. Runs at 8000 rpm. Works nicely.
Bill
- Status
- Not open for further replies.
- Home
- Amplifiers
- Solid State
- Have transformer, will build