The drill press will only hit 3100 with the facotry pulleys. I will try the drilling at that RPM, but will need to go slow with such small bits.
As for cutting my boards, I guess it's the band saw.
-b
As for cutting my boards, I guess it's the band saw.
-b
Hi,
I've purchase this very same trasformer
62+62+17+17V 1000VA Toroid Servo Power Amp Transformer
I'm also interested on building a Leach Superamp. Just wondering about what output transistors to use. Because I have both the TO-3's and TO-264's. If I'm going to use TO-3's, is this heatsink assembly suitable for 2 channels without the fan, if not to run the fan at a low rpm?
apexjr.com
Also, these are the capacitors that I'm willing to use for the power supply per channel
2pcs ADCOM 100v 22000uf computer grade capacitors NEW
22,000uF per rail, total capacitance of 44,000uF.
Btw, Terry, what did you use to cut your pcb's, because I'd have little experience making my own pcb's and I have no experience using the Press-n-Peel stuff. I've used ExpressPCB for most of my pcb's.
Those pcb's looking pretty good, nice work Terry.
Ryan
Hi Ryan,
I don't know yet how hot the transistors will run on this amp. I will digress to someone here who has experience with those tunnel type heatsinks. I know on the P101 that I just finished I bought heatsinks from Conrads and now that I've finished the amp, I find that the heatsinks barely get warm at all. I'll know better in a couple of weeks when I have mine up and running.
I was looking at those caps you bought. I went with multiple caps on the P101 because of many suggestions that that is better, but all of my Hafler amp and Soundcraftsmen amps use only two filter cap and they sound fine.
I cut my board by scoring them with a utility knife and then snapping them. They are tougher than they look. The only draw back to scoring and snapping in that the copper raises a small ridge where you score it. That made it hard for the PnP to sit flat against the face. I had to file it a bit to get rid of the edge. The PnP works great once you get it ironed on properly. That was the toughest part for me. I'm seriously thinking of buying that laminator mentioned earlier in this thread.
I have both types of transistors as well but I think for this one I will stick to the original design just to be safe. I may try Jans' design for the Low TIM with multiple outputs next if I like what I hear when I finish this.
The TO-3s are the proper fit for the heatsink you are looking at anyway.
Blessings, Terry
rsp071981 said:...If I'm going to use TO-3's, is this heatsink assembly suitable for 2 channels without the fan, if not to run the fan at a low rpm?
apexjr.com
Also, these are the capacitors that I'm willing to use for the power supply per channel
2pcs ADCOM 100v 22000uf computer grade capacitors NEW
22,000uF per rail, total capacitance of 44,000uF.
...
Those pcb's looking pretty good, nice work Terry.
Ryan
Ryan,
I used those heatsinks for a 4 channel Leach Low-TIM amp. Without a fan they are suitable for low power use - normal at home listening with an occasional brief loud spell. You could break with convention and mount them vertically and make a tall narrow amp for better no fan airflow.
I'd suggest at least a low speed fan with those sinks, preferably variable speed. Rod Elliot has a useful circuit on his site, or you could use a temperature switch(es) that closes on rising temperature to bypass dropping resistor(s) in series with the fan supply to increase speed as the temperature goes up.
Those caps should be adequate for normal use, but like being too thin or too rich... (can you get another pair or two?)
Agreed. Nice looking boards Terry. I may give up point to point and try making them myself next project.
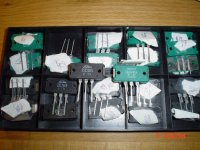
I am going to use the transistors below first with some other mods for the Super Leach.
Mine will be modular ones, i am going to do the metal-can output stage version too for comparison, the better ones remain.
The powersupply will be a dual one anyway, lots of added stability and not a waste of voltage in the output stage.
These are leftovers from building Metaxas replica amplifiers with Fred Gassmann style battery powersupplies, the fastest i have built.
And, second after the Pass Aleph, the smartest looking.
Kostas Metaxas used different output transistors on his Iraklis and Solitaire amps, the Tosh's were one version.
These are in my view the best sounding transistors ever made for power amplifiers, rated at 60 mHz. Now hard to come by i think.
For those interested : Avantgarde and MAS on the web
I use a Proxxon Micromot with a Minicraft press and 12 volt powersupply with speed control.
The Proxxon weighs some 8 ounces and goes from 5000 to 20.000 revs.
I hate sloppy pcb edges, for board sizing i use a router.
( ELU Mof96,Swiss, now owned by De Walt, best router ever made).
I have a Minicraft mini circlesaw table i used for sawing boards to size, even tried a Proxxon saw unit that accepts the Micromot.
A router gives the smoothest edge and i can do round edges with it.
Right now i am building GainClones for which i bought pcb sets from BrianGT to see what all the Fuss about GC's is about.
I could not resist to shave the edges.
Attachments
For an approximate heatsink calculation you can find an excel sheet on the amp forum.
I think Rod Elliot has one on ESP.
There are graphs for vent cooling ratio's with different vent/air speeds on the web.
If you cant find one i can look one up for you in my data mess.
I think Rod Elliot has one on ESP.
There are graphs for vent cooling ratio's with different vent/air speeds on the web.
If you cant find one i can look one up for you in my data mess.
Hi Terry,
Thanks for the reply.
I'm also thinking about using Jens' design using lower voltage rails (approx +-77) using 4-5 pairs of TO-264's with this transfomer that I also purchase a while ago.
For now, it would be nice to have all that extra power of the Superamp. I currently have the lower power version of the Leach Low Tim amp with only 2 pairs of TO-264's (MJL3281A/1302A) per channel with +-54V rails. They sounded great with clear highs and excellent bass response. I'm pretty sure the Superamp should have similar performance because the front end is exactly the same.
BobEllis,
Yeah I plan on getting another pair of those caps for a total of 88,000uf and I'm planning on using dual bridges. Is it best for both channels to share the same capacitor bank which will have 44,000uf per rail with a seperate bridge per rail or for each channel to have it's own bridge and 22,000uf per rail and tie the two secondaries together as center tap?
I've used that Thermo-Fan circuit from Rod before, it's pretty sensitive.
Ryan
Hi,
I recommend 4 bridges for a stereo amp, 1 to each rail. Then 22mF per rail.
IMO the performance is better if you keep the channels separate once you pass above a minimum capacitance. I guess that min cap will depend on the amp design.
regards Andrew T.
I recommend 4 bridges for a stereo amp, 1 to each rail. Then 22mF per rail.
IMO the performance is better if you keep the channels separate once you pass above a minimum capacitance. I guess that min cap will depend on the amp design.
regards Andrew T.
jacco-
I have been looking for those transistors for a long time! Can you post links to Aventgard and MAS?
BTW: the doc I have for them rate them at 80MHz. I can post scans of the specs I have (from my Nikko repair manual) if you would like.
-b
I have been looking for those transistors for a long time! Can you post links to Aventgard and MAS?
BTW: the doc I have for them rate them at 80MHz. I can post scans of the specs I have (from my Nikko repair manual) if you would like.
-b
Oh, and on cutting boards. If you score and snap them as Terry mentioned, a couple passes with a sharp mill file will get rid of the bur.
-b
-b
I think the bandwidth depends on the version, minimum is 60 MHz.
I would very much appreciate the document posted, thanks.
I already read that some used Toshiba's 1302/3281 and the MJL versions. That is why i thought mine could be another improvement.
I do like to known what the original sounds like though.
Here is the link to Fred Gassmann in Switserland, he should have a link to the Metaxas Audio Systems site of his friend Kostas Metaxas.
http://www.avantgarde-highend.ch/
Jacco,
Using the router is a great idea, will have to try that. Currently I use a shear and have used a paper cutter (works fairly well and is easy). When you use the router, do you sanwich the board between pieces of wood as a template or how?
Terry, WorkingAt Home,
With the score and break approach, how hard is it? Take much time? Simply use a utility knife? Removing the burr does not seem like a big deal.
Bill
That mini table saw is great (http://www.minicrafttools.com/37006.html). I'm asking my brother if he can make something like that (builds machinery). Perhaps a table jig for a clamped Dremel tool.
Hmmm.
-b
Hmmm.
-b
wwood said:Jacco,
Using the router is a great idea, will have to try that. Currently I use a shear and have used a paper cutter (works fairly well and is easy). When you use the router, do you sanwich the board between pieces of wood as a template or how?
Terry, WorkingAt Home,
With the score and break approach, how hard is it? Take much time? Simply use a utility knife? Removing the burr does not seem like a big deal.
Bill
Hi Bill,
It's not hard though it took more pressure than I thought it would. It's very quick, just two or three hard scores and then snap it.
Blessings, Terry
If you try to cut all the way through with the utility knife, after the tenth pass you will automatically apply the correct snapping pressure when you attempt to smash the board in frustration. This is how I stumbled upon this methed a few years ago... 😉
-b
-b
The router i have is almost the same as De Walt's DW625.
The universal edge guide DW6913 also fits my ELU.
With small boards i use the original edge guide legs.
For big boards i had several sets of longer hardened rods made,
i use them too for doing woodwork.
Al interior woodwork on my 36 foot boat was made with the ELU and the different length guide rods.
The edge guide has a fine adjustment, getting it right exactly is easy. Most of my relatives are US born, as the DW6913 is not sold here i had my cousin in Seattle sent me one.
It has an attachment for a dust cleaner which is great for working on GRP.
I make my own Teflon boards, teflon pcb boards were hard to get. Now the places i know that sell them charge way too much.
I found it impossible to get a smooth edge on Teflon boards with a circlesaw, thats how i tried the router.
I am not really sure what the difference between Minicraft and Proxxon is, but the Proxxon fits the press and plugs in the Minicraft powersupply. (call me stupid).
I was a bit in a hurry to pick up my kid, the MAS site is
www.Metaxas.com of course.
edit added:
The router i welded a stand for, the stand is held in my workbench , the router held upside down.
I just slide the boards over it.
Hi Jacco,
Thanks for the router setup information. Given your approach, the board needs to be straight with right angle corners before you start. I was thinking that you might use a pattern bit or something.
Thanks,
Bill
Thanks for the router setup information. Given your approach, the board needs to be straight with right angle corners before you start. I was thinking that you might use a pattern bit or something.
Thanks,
Bill
Bingo. Relevation. Very sinple, should have thought of it before.
I made a sliding clamp jig a couple years ago for my router table, used for routing rails and stiles of cabinet doors.
I can clamp my boards down and just slide them by the stright-cutting bit on my router table. Easy. No need to rely on an ititnal straight (or paralell) edge.
I use only of these clamps (A) on a piece of 3/8" birch plywood, slides in a t-slot:
http://www.woodcraft.com/images/family/web4419big.jpg
Sorry for the OT, if it is.
- Status
- Not open for further replies.
- Home
- Amplifiers
- Solid State
- Have transformer, will build