I am hurrying up as fast as I can - the days are constantly a few hours too short... 🙄
I have a Macbook that I could easily have used for testing purposes with JRiver but its old and need a trip to the Mac-doctor. So I am keeping my free sparetime spent on the speakers, not everything else hence the purchase.
Right now I am investigation my options regarding damping of the cabinet so I can physcially close it up. That and manufacturing the base/screw assembly 😀
Quick update:
Receieved the Ashly MXQ2150 analogue EQ-unit yesterday and looking forward to start playing with it. I am seriously thinking about getting a measurement mic so I can do some qualitative testing when all is closed up. Did drop by the hardware store to collect the remaining nuts and bolts for the base plate assembly. Besides that I havent had the chance to do any work on the array so far this week It brings me down... 😱
Receieved the Ashly MXQ2150 analogue EQ-unit yesterday and looking forward to start playing with it. I am seriously thinking about getting a measurement mic so I can do some qualitative testing when all is closed up. Did drop by the hardware store to collect the remaining nuts and bolts for the base plate assembly. Besides that I havent had the chance to do any work on the array so far this week
It brings me down... 😱Yes, a measurement mic like Beringher has is cheap enough and will help you get focused when you finish your arrays.
I know, the balance between life and building time seems unfair sometimes, but hang on! One day, you will appreciate all that you have done and forget about your troubles.
I know, the balance between life and building time seems unfair sometimes, but hang on! One day, you will appreciate all that you have done and forget about your troubles.
Perceval - indeed 🙂 I know that a little "each" day equal a finished project eventually and considering the little time I have had available the first Column is soon finished 🙂 Then onto #2 😉
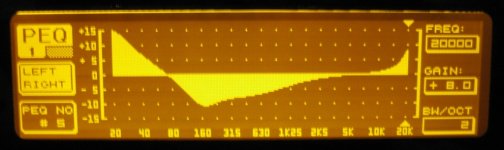
Tried the EQ-unit yesterday and it works as expected, despite the crude "test-enviroment" the Column started to impress already... Now I REALLY am motived to close it all up and test it as intended 😱 Will aquire miniDSP UMIK-1 once the pair is done...
I really dont like working with little time on my hands as I dont get to get as detailed as I'd have liked... I have manufactured the base screw assembly and will glue this in tonite before leaving town for the weekend. For next week its rear baffle/slate rock that will get my attention 😀
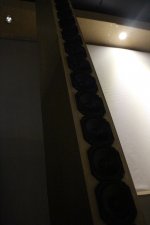
Have been away this weekend but before hitting the couch with the Mrs I did manage to get in an hr worth of effort. Drilled the holes on the slated rock, Ø8mm for the hole and Ø10mm countersunk halfway in from the bottom. Also aligned the screw plate and glued this in.
So as of right now the array is secured to the floor base and next step now is to fill up the cabinet and close the rear. Some minor details remain but the first array should soon produce sound as intended
So as of right now the array is secured to the floor base and next step now is to fill up the cabinet and close the rear. Some minor details remain but the first array should soon produce sound as intended
Attachments
Yesterday I found time to spend on my first array and I had two things on my agenda:
1 - Insert damping material (glass insulation)
2 - Trim and glue in the rear baffle
Managed to perform both tasks and very briefly play music through it 😀
As far as damping material I opten to follow one advice passed on from Adyton's designer Geir Fredriksen - to go heavy. Used 12g/liter = 450g worth (450g = 1lbs more or less for you un-metric people 😉 )
This equated pretty much to filling 2/3 of the available volume.
This was a really quick affair so I had time to trim the rear baffle to size and glue it all shut 🙂
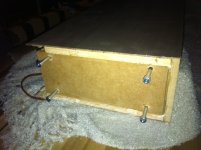
I am all out of 100mm M6 screws (my current 80mm are too short) so waiting for those before I can really lock the cabinet to the base. Image show the current base, I will use spikes underneath. I might consider using a bigger slate of rock for stability but as it is now I am not able to gauge the true rigidity of the setup. (Slate rest on felt wool not to scratch the floor.)
Listening impressions (Still far from qualitative readings, EQ set to approx values of what the graphic EQ-image show) Also note (pun intended) that only one array is done so no stereo imageing takes place.
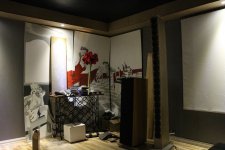
1 - I listened to the single array, sound appear to be crystal clear and the frequency response goes very low indeed 🙂 Sound appear to be "effortless" in apperance. No stress test was performed
2 - I also listened to the array with one of the B&W DM604 so I had stereo atleast. There is a very obvious sound difference between the two - they are fundamentaly very different animals. While one array alone the sound appeared "slim" the sound broadened up a whole lot with DM604 playing the other side. Cant wait to compare the two systems side by side!
(2b - Not much worth as a qualitative test I know, just having fun with my build 😀 )
1 - Insert damping material (glass insulation)
2 - Trim and glue in the rear baffle
Managed to perform both tasks and very briefly play music through it 😀
As far as damping material I opten to follow one advice passed on from Adyton's designer Geir Fredriksen - to go heavy. Used 12g/liter = 450g worth (450g = 1lbs more or less for you un-metric people 😉 )
This equated pretty much to filling 2/3 of the available volume.
This was a really quick affair so I had time to trim the rear baffle to size and glue it all shut 🙂
I am all out of 100mm M6 screws (my current 80mm are too short) so waiting for those before I can really lock the cabinet to the base. Image show the current base, I will use spikes underneath. I might consider using a bigger slate of rock for stability but as it is now I am not able to gauge the true rigidity of the setup. (Slate rest on felt wool not to scratch the floor.)
Listening impressions (Still far from qualitative readings, EQ set to approx values of what the graphic EQ-image show) Also note (pun intended) that only one array is done so no stereo imageing takes place.
1 - I listened to the single array, sound appear to be crystal clear and the frequency response goes very low indeed 🙂 Sound appear to be "effortless" in apperance. No stress test was performed
2 - I also listened to the array with one of the B&W DM604 so I had stereo atleast. There is a very obvious sound difference between the two - they are fundamentaly very different animals. While one array alone the sound appeared "slim" the sound broadened up a whole lot with DM604 playing the other side. Cant wait to compare the two systems side by side!
(2b - Not much worth as a qualitative test I know, just having fun with my build 😀 )
Attachments

Thanks, I am pretty happy with being able to complete the first line 🙂
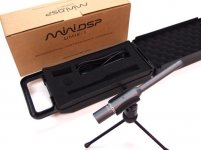
I did order the miniDSP UMIK-1 microphone today which should be here on monday, thus allowing me to get some decent (hopefully!) readings 😀
Construction of the second line will start shortly and I hope to have paired set of speakers soon 🙂
I did order the miniDSP UMIK-1 microphone today which should be here on monday, thus allowing me to get some decent (hopefully!) readings 😀
Construction of the second line will start shortly and I hope to have paired set of speakers soon 🙂
Attachments
Last edited:
Wait until you get two up! The stereo imaging is incredible... just like wearing headphones.
I have a video on my thread. Doesn't do them complete justice, but you can get the idea.
I have a video on my thread. Doesn't do them complete justice, but you can get the idea.
Perceval - checked yout video but only listened to it on the office PC so sound dont do it justice 🙂 I am quite certain image perception will change dramaticly once both are playing 😀
Still waiting on delivery of the miniDSP UMIK-1, both ordered items were in stock last Thursday... 🙁 Patience is a virtue...
Plan for this week is to get startet on the second array, prefabricating the parts in wood/MDF required.
Still waiting on delivery of the miniDSP UMIK-1, both ordered items were in stock last Thursday... 🙁 Patience is a virtue...
Plan for this week is to get startet on the second array, prefabricating the parts in wood/MDF required.
Great thread! Very nice work, Halair!
I will second X's recommendation of miniDSP. I am very impressed with mine. With that new mic and REW software, you can measure response and then export the correction data to the miniDSP (2-way advanced plugin). I've done this recently and my bass is better than it ever has been. Goodbye room modes and nulls.
The over-the-counter price in Norway is quite high. You could simply order it directly from the web-shop for $80USD and then pay some tax as it crosses the border. Or, did I misunderstand your post, and you in fact already ordered the miniDSP with the mic?
I've only ordered the miniDSP UMIK-1 test mic. For any imported goods exceeding 200NOK in value trigger a 110NOK handling fee plus 25% VAT on item value and freight charges. (200NOK = 32USD) So importing smaller items is cost prohibitive... Unless item value is below 32usd as this is excempt VAT/fee's.
So 80usd item cost and probably 30usd in freight, +25% pluss 18usd add up quickly. Norway is an expensive country indeed 😛
I would happily purchase a miniDSP for 30usd + 70usd in freight hehe....🙄
So 80usd item cost and probably 30usd in freight, +25% pluss 18usd add up quickly. Norway is an expensive country indeed 😛
I would happily purchase a miniDSP for 30usd + 70usd in freight hehe....🙄
I've only ordered the miniDSP UMIK-1 test mic. For any imported goods exceeding 200NOK in value trigger a 110NOK handling fee plus 25% VAT on item value and freight charges. (200NOK = 32USD) So importing smaller items is cost prohibitive... Unless item value is below 32usd as this is excempt VAT/fee's.
So 80usd item cost and probably 30usd in freight, +25% pluss 18usd add up quickly. Norway is an expensive country indeed 😛
I would happily purchase a miniDSP for 30usd + 70usd in freight hehe....🙄
What is the policy on "gifts"?
I can get the miniDSP 2x4 "kit" (not in enclosure) for $100USD, to my door, no extra charges.
I can ship that size of package to nearly anywhere in Europe, via "Small Packet - International" for $18.75 CAD. 6-10 business days, but no insurance.
PM me if you would like to discuss this further.
I can ship that size of package to nearly anywhere in Europe, via "Small Packet - International" for $18.75 CAD. 6-10 business days, but no insurance.
PM me if you would like to discuss this further.
Thanks, I´ll might just do that 🙂
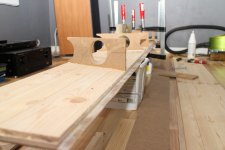
Startet on the second array tonite, glued the floor panels into a larger sheet where the side panels will be cut from. Front/rear baffle also cut but no holes made yet - that is for tomorrow 🙂
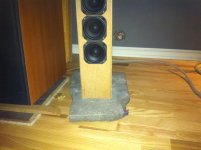
Also the speaker binding posts (Jantzen Audio) and 100mm M6 bolts arrived today so thats sorted 🙂 The bolts fit nicely and the first array is secured well to the base. I need to make arrangements to add spikes to the slated rock base and at that point is should rest firmly in place 🙂
Startet on the second array tonite, glued the floor panels into a larger sheet where the side panels will be cut from. Front/rear baffle also cut but no holes made yet - that is for tomorrow 🙂
Also the speaker binding posts (Jantzen Audio) and 100mm M6 bolts arrived today so thats sorted 🙂 The bolts fit nicely and the first array is secured well to the base. I need to make arrangements to add spikes to the slated rock base and at that point is should rest firmly in place 🙂
Last edited:
Progress made, not much but still! 😉
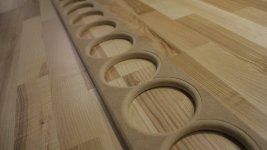
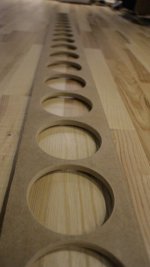
Front baffle #2 is cut, 20x 76mm holes drilled and back side routed to aid breathing. Thats about it for today 🙂
Also added a couple of images of array #1
Front baffle #2 is cut, 20x 76mm holes drilled and back side routed to aid breathing. Thats about it for today 🙂
Also added a couple of images of array #1
Attachments
Progress report:
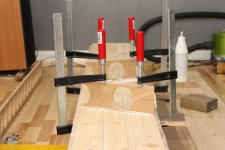
Found some time to make dust in the garage, spent about an hour to get the side panels routed to size, with a nice flange for the front/rear baffle to mount to.
Also got the internal brackets done with correct width to them 🙂
Images show the first two glued in place, followed up by the last two just now. Let to harden over night. Wood glue was generously applied to all surfaces, let to sit for 5mins before being placed and clamped tight. This allow the wood so properly soak thus allowing a proper bond 🙂
I also got a new roll of felt cloth to line the inside of the cabinet with, application might start tomorrow already, at least the sizing of each piece, x2 🙂
Once that is done I can glue in the other side panel followed by the front baffle. The flanges are routed oversized and will be cut flush with baffles once they are in place.
I also got to test the MDF with satin and matt black spray paint, starting to plan for what to do for finishing the off...no pics of this yet. A couple of better images of the first array is also attached (didn't use iPhone cam this time 😉 )
Attachments

Last edited:
- Status
- Not open for further replies.
- Home
- Loudspeakers
- Full Range
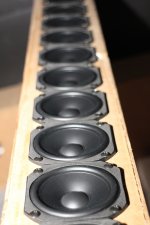
- Halair Column - my line array build (20 FR drivers)