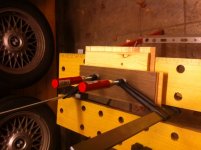
Hehe thanks X - crimping sure is a quick and easy way to hook things up (not suprisingly I might add - just didnt have the tools on hand until yesterday)
I have a 40W Weller soldering iron with a heavy tip so soldering would have been a fairly quick affair aswell. However that would not allow me to do all the cables outside the cabinet and for a first run the flexibility of the quick connectors have its merits, especially if I hook up something wrong 🙂 Once all is up and running I dont intend to move the elements about solder might be the way to go. But for now I am pretty happy with yesterdays effort.
Yeah, applying low DC voltage to the main terminal once all is hooked up is a test soon to be performed 😀
Btw - how do one measure total resistance of the driver circuit once all is connected?
I mean - as per Thiele-parameters a single Vifa TC9 have a DC resistance = 6.3ohm which mean if I measure resitance with a DVM it should read 6.3 ohm - correct?
And - measuring the complete array should then give me a reading = 5,1 ohm?
I mean - as per Thiele-parameters a single Vifa TC9 have a DC resistance = 6.3ohm which mean if I measure resitance with a DVM it should read 6.3 ohm - correct?
And - measuring the complete array should then give me a reading = 5,1 ohm?
Halair,
Yes, I beeline your calcs for 4 series 5 parallel with 6.3 ohm per driver nominal DCR seems right at about 5 ohms. If one of your drivers moves the wrong way under the DC voltage test it will be very easy to switch the polarity with quick connect terminals. The nice thing about quick connects is pulling a single driver off (if front mounted) once all is assembled. De soldering in place with a driver dangling out the front of a baffle is a pain and not always easy to get a good cold solder free joint.
Looking forward to hearing your first sound impressions. Do you have an EQ yet?
Thank you X for helping out 🙂
Yeah, as long as the drivers are not intended to be fixed quick connectors are the way to go, however I am pretty confident they will get soldered up when its all done up and approved... But I hear ya on the flexibility 😛
I have not aquired any means for EQ yet...but it is soon time to commit 😱
Yeah, as long as the drivers are not intended to be fixed quick connectors are the way to go, however I am pretty confident they will get soldered up when its all done up and approved... But I hear ya on the flexibility 😛
I have not aquired any means for EQ yet...but it is soon time to commit 😱
I can highly recommend the miniDSP as an excellent choice that is easy to use and very cost effective. It will let you have a XO to a sub as well and sounds very good to my ears.
What amp(s) will you be using? A good choice might be the TAS5630 class D which will have enough oomph to power 20 drivers per channel.
What amp(s) will you be using? A good choice might be the TAS5630 class D which will have enough oomph to power 20 drivers per channel.
I will use my current power amp, Emotiva UPA-5.
MiniDSP cost over the counter here in Norway approx 200usd for the 2x4, 25% Sales tax + dealer profit does that. The Behringer DEQ2496 in comparison is almost 500usd.
I have a 100usd bid on a Alto31GEQ which might be useable.
MiniDSP cost over the counter here in Norway approx 200usd for the 2x4, 25% Sales tax + dealer profit does that. The Behringer DEQ2496 in comparison is almost 500usd.
I have a 100usd bid on a Alto31GEQ which might be useable.
Halair,
Yes, I beeline your calcs for 4 series 5 parallel with 6.3 ohm per driver nominal DCR seems right at about 5 ohms.
I measured 5,2ohm DCR for the whole array tonite so all connections are good and wiring is correct 🙂 Pulled everything apart in preperation of finishing the top/bottom of the cabinet - which basically is as far as I am getting tonite...😱
After a excruciating long week last week I found 30min of "me-time" last night and managed to fabricate the top cabinet plate (floor tile) and also the bottom insert (MDF)
I need to prefabricate structure to the bottom in order to fix it solid to the floor plate but regardless of that I am now able to glue the top/bottom shut - my intention is to do this this evening...
Once that is firmly in place I will start installing drivers and wires, finish of the base support and rear baffle 🙂 I havent taken any pictures of the few latest efforts yet but will try to bring some images to the table soon 🙂
Finally a few pictures showing progress 🙂
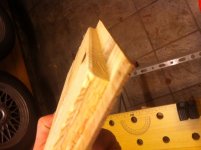
Two days ago I prefabricated the bottom and top plate, however they were slightly oversized in width (2mm or about 1/12") so didnt get to glue them in immideately, Had a quick session in the garage yesterday nite routing it to correct size and also managed to glue them in.
The bottom plate will recieve two more plates to give it thickness + side bracing but as of now top/front/bottom side of the cabinet is closed 🙂 Today I will route the top plate edge flush and then the wire/driver installation can commence 😀
Attachments
Looking forward on how your build will go Halair. I've always been interested in line arrays but due to budget & size constraints I haven't had the opportunity to build one myself.
Question - how much time does it take to align 20 drivers, secure 40 screws without making a blister in the palm of my hand?
20 drivers, that's not 80 screws? you only have 2 screws per driver?
A long time .... just finished screwing all of mine on the baffles, and I'm 3/4 through my wiring... I have a smaller cordless drill, wouldn't dare to do this by hand! You're going to have forearms of steel!
In any case, I'm not starting another array next month! Maybe in 10 years! Maybe...
A long time .... just finished screwing all of mine on the baffles, and I'm 3/4 through my wiring... I have a smaller cordless drill, wouldn't dare to do this by hand! You're going to have forearms of steel!
In any case, I'm not starting another array next month! Maybe in 10 years! Maybe...
Answer to the question:
About an hour, good thing I only spent like 58mins on that task :roll eyes:
I have only used 2 screws per driver in case I need to dismount a few for whatever reason. As of right now I have them all mounted and wired up in groups of 4. Resistance for each group is 25,2ohm and all is good, all left to do is to parallel the 5 groups, fill up the cabinet and close the rear wall 😉 I might put a signal on them tonite but I don't have an EQ-solution available today. However they will need break-in so...
I have a cordless screwdriver swell but prefer manual control, I find it easier to slip with power tools 😱
There are some construction left to do but I am really close now 😀
You can use a power driver if you cup your hand around the bit and screw and avoid the:
Ah ****!
Ah ****!
Yep, that's what I did.
Drilling 128 pilot holes then screws is not fun, but using a small power driver made it manageable.
Finished wiring both baffles tonight. Resistance looked good, so I went with a test run BEFORE mounting everything up tomorrow. Good thing I did!
Even though I had already checked all my drivers (or so I thought), one driver didn't work anymore. It was a lot easier to replace it with the baffles off.
So, don't forget to do a test run before you close everything!
Perceval - my drivers are mounted on the outside of the baffle so worst case scenario I can swap out one without touching the others 🙂 But all is green at the moment, the array plays! 
The 5 groups have now been soldered to heavier gauge speaker wire (in parallel) and the DC resistance was measured to 5,3ohm which is pretty much spot on.
With that reassuring measurement I hooked it up to my amp and let her play - and sound came from it 🙂 This was no qualitative test, just for function as the rear baffle is not in place, no damping material inside and no EQ. But it works!
What I now need to do is to measure up an appropriate amount of glass insulation, glue the rear baffle in and EQ it and the verdict can be made 😎
Download Jriver 30 day demo and hookup your PC/Laptop to your stereo for a quick (temporary) EQ fix 😉.
Can't wait to hear your impressions once you have it dialed in somewhat. And we need pictures of coarse, a line is always impressive to see...
Can't wait to hear your impressions once you have it dialed in somewhat. And we need pictures of coarse, a line is always impressive to see...
Wesayso - yeah, I'll attempt that very soon 🙂
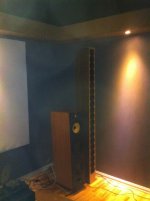
Images from yesterday, apologize for the crappy imagery but I simply havent had time to document it with imagery finesse... Doing 15mins there, 10 here, half hour then etc 😱
Ignore the pink bean bag, I had a young helper on thursday morning (19months old) 🙂
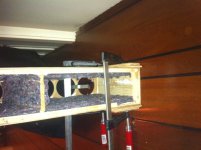
First image show how the 5 groups are wired, I hooked up +/- on the first along with the single wire going to the next. Fed the first driver into its place, hooked up speaker 2 and continued untill the group was done. Then fed a +/- line down to the center of the array. Did this for each group resulting in 5 +/- pairs at the center. These were then connected in parallell and soldered to a single speaker cable.
Before hooking all groups up I measured resistance of each group and did another check when they were all in parallell - all good 🙂
As far as putting music through the array I only had sound on it for five minutes and at low sound levels. Didnt see the point in doing a more extensive "test" as the cabinet isnt sealed or dampened yet. This is for next week as I am away this weekend. I also need to prefabricate the parts for the second array... 😀
Images from yesterday, apologize for the crappy imagery but I simply havent had time to document it with imagery finesse... Doing 15mins there, 10 here, half hour then etc 😱
Ignore the pink bean bag, I had a young helper on thursday morning (19months old) 🙂
First image show how the 5 groups are wired, I hooked up +/- on the first along with the single wire going to the next. Fed the first driver into its place, hooked up speaker 2 and continued untill the group was done. Then fed a +/- line down to the center of the array. Did this for each group resulting in 5 +/- pairs at the center. These were then connected in parallell and soldered to a single speaker cable.
Before hooking all groups up I measured resistance of each group and did another check when they were all in parallell - all good 🙂
As far as putting music through the array I only had sound on it for five minutes and at low sound levels. Didnt see the point in doing a more extensive "test" as the cabinet isnt sealed or dampened yet. This is for next week as I am away this weekend. I also need to prefabricate the parts for the second array... 😀
Attachments


Last edited:
Have purchased an EQ that is on its way - found an Ashly MQX2150 online for very little cash. Its only 15band 2/3octave EQ +/-15dB and analouge but for the price its fine to play with until the second array is complete. Then I will invest in a proper EQ-unit 🙂
Have been away this weekend so no further work have been done but my plan for this week is to fill/close the first array up and spend just a little more time in front of it 😀 After that its onwards with build #2
Have been away this weekend so no further work have been done but my plan for this week is to fill/close the first array up and spend just a little more time in front of it 😀 After that its onwards with build #2
Last edited:
Glad you are making progress.
Hurry up and join the "array" club! ha ha!
JRiver is really not bad. It's got crossover duties for each channel, 2 parametric and 1 nine band EQs, room correction, the ability to import VSTs (for EQ or else) and much more.
I'm just starting to play with it and I like it. It may be that it will dethrone my macs and I will have a PC to run my audio and video.
- Status
- Not open for further replies.
- Home
- Loudspeakers
- Full Range
- Halair Column - my line array build (20 FR drivers)