Quick update - before I went to bed last night I got to glue the front baffle to the first side panel 😀
Made sure the side panel was lying true flat, had to weigh down the ends to make it sit right then lined up the front baffle. Used squared supports to make sure the baffle sat right then ran a good bead of glue down the edge before placing the baffle in place.
Checked the glue joint this morning before leaving for work, looks all right and added a bead of construction glue on the inside to properly seal the joint. Not for structural reasons but to get a "smooth" rounded edge 🙂 Tonite I will try to get the internal braces glued up and perhaps also the other side panel. No pics yet though...sorry 😉
I am glad too!
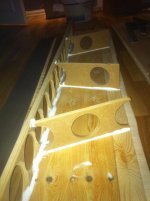
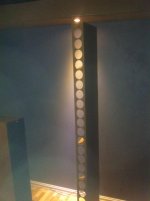
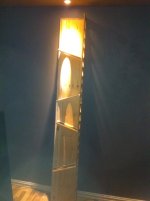
Father-in-law is celebrating his 60th birtday on Saturday and family is flying in so this weekend will be a wash as far as speaker build goes... However I did manage to glue in the internal brackets yesterday and current status is whats shown in the pictures 🙂
The glue joints are solid and the structure feel quite solid as-is 🙂 Very happy with that 😀
1 - Used constructional glue for the brackets and as fillets.
2 - Column standing up 🙂
3 - Still far from sealed 😉 I will add a 5th bracket plus mounting structure for the base. But now atleast I can prepare the other side panel and hopefully be able to glue it in soon...
Attachments
Last edited:
Correct, they might be flush mounted when I get to that - provided I can efficiently route the odd-sized flange required 😉 But they will just be bolted directly to the baffle to begin with.
BTW - I would appreciate feedback on my impedance calculation:
I want to user 5 groups where each group have 4 in series (4S5P)
Each group of 4 in series = 32ohm (8ohm x 4)
1/R= 1/32 x 5 => 1/R= 5/32
R =32/5 = 6,4 ohm
Correct?
BTW - I would appreciate feedback on my impedance calculation:
I want to user 5 groups where each group have 4 in series (4S5P)
Each group of 4 in series = 32ohm (8ohm x 4)
1/R= 1/32 x 5 => 1/R= 5/32
R =32/5 = 6,4 ohm
Correct?
Last edited:
Yep, your calculations are good.
That's why I try to keep it simple in my case. Any combination of 2-2, 3-3, 4-4, 5-5 will result in the same R as a single driver.
That's why I try to keep it simple in my case. Any combination of 2-2, 3-3, 4-4, 5-5 will result in the same R as a single driver.
Thank you both for confirming, I will measure before any amp see them though 😛
Yeah, I wouldn't mind a even number but I wanted as close to full coverage as possible and based on that 20 drivers is what will fit. I could squeeze in 22 but that would throw the impedance about a bit and separate resistors (dummy drivers, than bear! 🙂 ) would needed to be used.
Yeah, I wouldn't mind a even number but I wanted as close to full coverage as possible and based on that 20 drivers is what will fit. I could squeeze in 22 but that would throw the impedance about a bit and separate resistors (dummy drivers, than bear! 🙂 ) would needed to be used.
Just a quick update, had to get some more wood work done but also experienced a couple of problems 😉 One problem was my own (measurement) but the other was the router (failed lock bolt, loose head) What it all amount to is that this cabinet will be for prototyping only and that the router will be replaced with a different one 😉
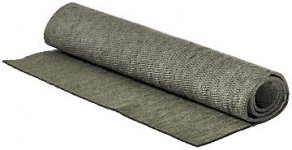
The good news is that I now have both side panels for the first cabinett done and it will be glued tonite. I also found cloth for sound isolation in about 6x3' rolls and 1/4" thick (pic). I intend to line the inside of the cabinet with this using spray glue. I intend to use a fair amount of damping inside and I recall 100g/10l (4oz/gallon roughly) - does this seem right or is my guess as good as yours? 😉
The good news is that I now have both side panels for the first cabinett done and it will be glued tonite. I also found cloth for sound isolation in about 6x3' rolls and 1/4" thick (pic). I intend to line the inside of the cabinet with this using spray glue. I intend to use a fair amount of damping inside and I recall 100g/10l (4oz/gallon roughly) - does this seem right or is my guess as good as yours? 😉
Attachments
Too late to edit so a new post it is.. :
As far as damping goes how does this sound like (pun intended):
- Two layers of the felt cloth imaged in previous post on the rear cabinett wall. (a little over 1/2" overall thickness)
- One layer on both sides of the cabinett (a little over 1/4" thickness)
- Loose damping material for the internal volume. I am open to suggestion as to what materials to use however regular insulation for housing is being considered due to price & availability.
I have also become aware of Twaron Angel Hair (Kevlar hair) but find little useful information except sales pitches, however tempted to have a go with it...
You need something that does well on the entire spectrum. From what I could find in online tests both fiber glass house insulation and Angel Hair perform really good there.
You might need less Angel Hair for the same performance, that is a good thing as it is rather expensive!
You might need less Angel Hair for the same performance, that is a good thing as it is rather expensive!
Ok, so you believe the thicker glass insulation more or less do the same job but need more mass to achieve a similar effect to Angel Hair?
Neither is difficult to obtain but I have several sheets of glass insulation after building my home theater room. Obvious place to start with the first cabinet 😱
I want to refine my building process so the first column will serve at a prototype where as build #2 & 3 will becoming my stereo pair 😛 Perhaps use #1 as center...
How about rockwool? Would that be dense enough?
I have a big package of 60kg/m3 of rockwool left from building some bass traps sitting in my garage that I could use with my projects.
I have a big package of 60kg/m3 of rockwool left from building some bass traps sitting in my garage that I could use with my projects.
I have been using poly fill, they make a higher quality version of it, more tiny facets on the fibers... no itchy problems.
Overstuffed is not good.
_-_-bear
Overstuffed is not good.
_-_-bear
Anyone use real wool? I have access to raw wool, looks like the cleaning process is rather simple. good idea?
I have heard good things about real wool - and it is used in the recommended felt lining on a lot of enclosures. Some folks on this forum actually farm sheep and have ready supplies! I think the main thing to look for is a fiber structure that has a high surface to volume ratio. Engineered polyester microfiber with a cross section that resembles a snowflake may actually work well. The idea is that the surfaces with nooks and crannies help to absorb heat so that the pressure waves are not adiabatic during compression.
You can see why wool is better than plain smooth polyester here:

If you look at certain engineered microfibers on an EM, it appears to have the superior surface area to volume ratio:
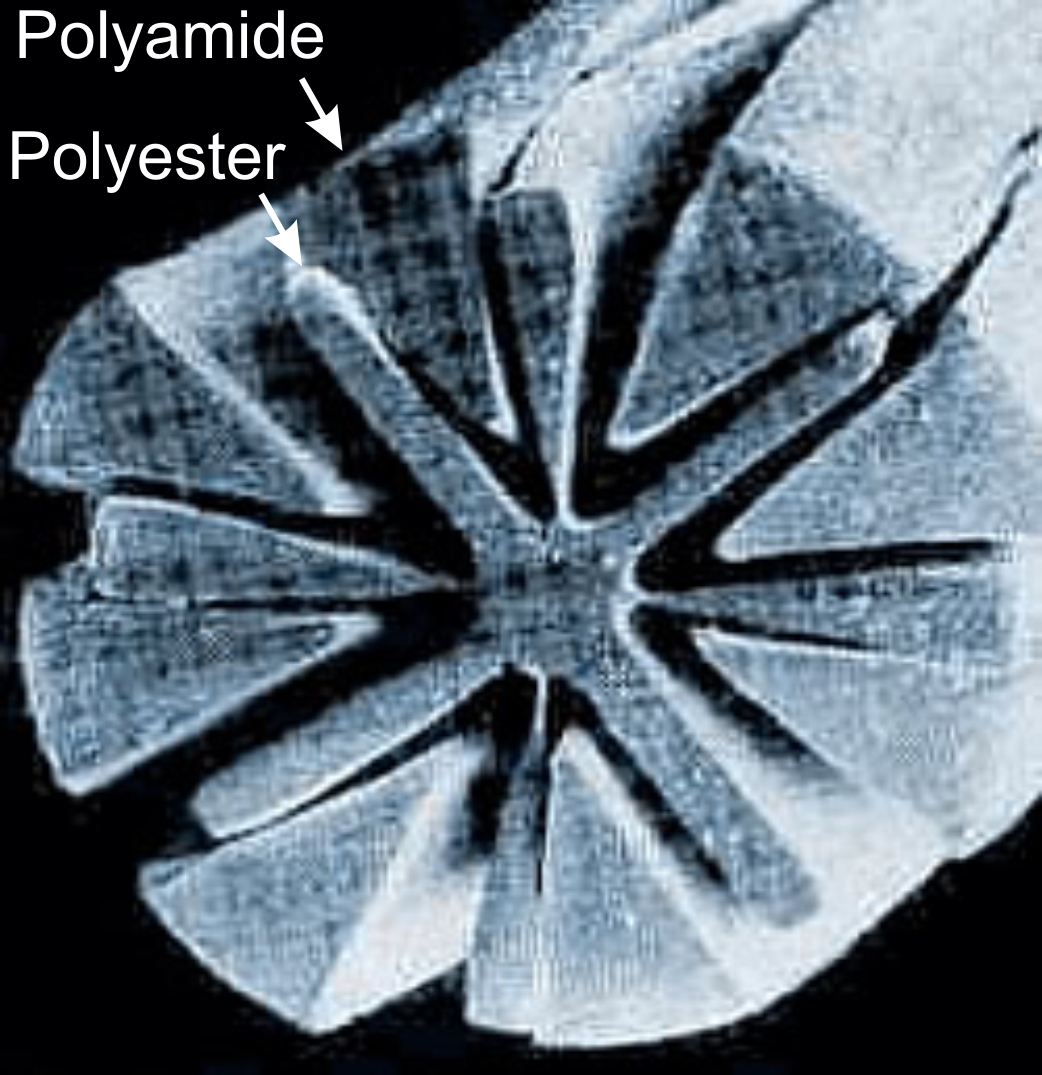
This is why the microfiber clothes clean things so well...
You can see why wool is better than plain smooth polyester here:
If you look at certain engineered microfibers on an EM, it appears to have the superior surface area to volume ratio:
This is why the microfiber clothes clean things so well...
Quick update - second panel glued to baffle 🙂
Next step is to clear time to continue, then line the inside with felt, route the top and bottom panel and check fit of the rear baffle.
Then its time to cable it up, fill it with glass insulation mats and close it all up... 😉
Next step is to clear time to continue, then line the inside with felt, route the top and bottom panel and check fit of the rear baffle.
Then its time to cable it up, fill it with glass insulation mats and close it all up... 😉
Time to wrap things up for tonite 🙂
Managed to glue the complete inside with felt (wool mat 7mm thick) including the support brackets.
What´s left to do:
Pre-route top cap and support base
Prepare the rear baffle
Prepare and lay up the internal wiring
Test each driver 🙄
Solder the wire to drivers
Mount the drivers
Test the driver array 😱
Stuff in the insulation
Install speaker teminals
Glue the cabinet shut :guitar:
- Status
- Not open for further replies.
- Home
- Loudspeakers
- Full Range
- Halair Column - my line array build (20 FR drivers)