Yes, a nasty business that I would not wish on anyone. I prefer to buy mine spun in yarn and dyed already. I am just saying I know some folks who actually use their own sheep's wool for stuffing. Someone in Oregon - I forget who.
Images shot yesterday, when working against the clock good photo´s is a chore so these are just iPhone-shots 🙂
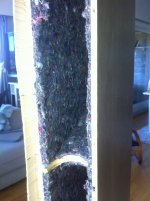
Inside lined with felt and both sides are now completed. The lip of the side running past the front baffle have been routed flush, however the cheapo router failed me again as the router bit started to shift out of the chuck causing the tracer BB to enter the driver hole = a little chunk of desired material removed.. 😡 You can see this on the right side of the 7th driver hole from the top.
Inside lined with felt and both sides are now completed. The lip of the side running past the front baffle have been routed flush, however the cheapo router failed me again as the router bit started to shift out of the chuck causing the tracer BB to enter the driver hole = a little chunk of desired material removed.. 😡 You can see this on the right side of the 7th driver hole from the top.
Attachments
Good progress! I feel your pain. With so many holes to take care of, the more chances are for something wrong to happen. I just started my build, and already have some mistakes pop out! Keep it up!
Wow, what a project!
Mistakes happen and the cabinets look good imo.
how thick is the felt? If to thin only high frequencys are effected...
Regards
Mistakes happen and the cabinets look good imo.
how thick is the felt? If to thin only high frequencys are effected...
Regards
Yeah, the smaller mistakes dont affect SQ anyways 😉
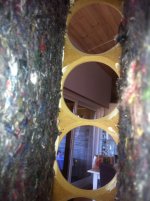
Sayrum, thank you 🙂 The felt is 7-10mm thick. The rear baffle will get two layers and in addition the internal volume will get additional stuffing - hope it will be enough 🙂
Sayrum, thank you 🙂 The felt is 7-10mm thick. The rear baffle will get two layers and in addition the internal volume will get additional stuffing - hope it will be enough 🙂
In a different forum I've been given references passed on from the designer of Adyton Imagic-series that they performed the best with a lot of dampening. However these cabinets also have a woofer and tweeter and do not directly compare.
I have not been able to continue with my build due to travel the past week and this saturday I am turning 40 plus we're christening my youngest boy on sunday.
All this equal no build time untill next week 😉
I have not been able to continue with my build due to travel the past week and this saturday I am turning 40 plus we're christening my youngest boy on sunday.
All this equal no build time untill next week 😉
Welcome to the 40ish club!
No worries, take your time, it will all come at some point. It's the same with my build, I've been going slow lately. Maybe because we hit 100% humidity, rainy and hot... yep, it's spring on the East coast of Taiwan.
No worries, take your time, it will all come at some point. It's the same with my build, I've been going slow lately. Maybe because we hit 100% humidity, rainy and hot... yep, it's spring on the East coast of Taiwan.
The actual model which is refered to is the Imagic 1.6 and 2.0. They do have a tweeter, but not the woofer. The one with the woofer is the Imagic 1.5, and this is based on some sort of transmission line.In a different forum I've been given references passed on from the designer of Adyton Imagic-series that they performed the best with a lot of dampening. However these cabinets also have a woofer and tweeter and do not directly compare.
The actual model which is refered to is the Imagic 1.6 and 2.0. They do have a tweeter, but not the woofer. The one with the woofer is the Imagic 1.5, and this is based on some sort of transmission line.
Thank you for the clarification SannaX - I forgot that the woofer was only employed in the Imagic 1.5 🙂 I have a desire to have a go on such a design (TL) in combination with the arrays... Dual chambers, one sealed for the full range array and a TL with a woofer. Maybe when the kids grow up hehehe 😱
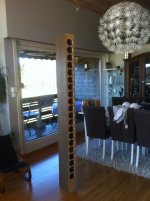
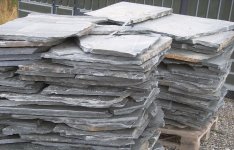
While I dont expect much time to DIY this week I am all ready to fabricate the top and bottom end plates + start soldering speaker wire. As the cabinet base I intend to use slate rock as I have quite a few lying around 😀 Some have thickness of about 25-30mm and will provide a heavy and solid base for my Columns. I plan on using threaded rod to secure the cabinet firmly to the slated rock.
When the soldering and bottom/top cap is in place there really isnt much more work left to be done....
 Except back baffle & speaker terminals that is.... 😉
Attachments
Last edited:
I would use crimped solderless quick connect terminals instead of soldering as it lets you swap drivers easier if one goes bad, it lets you reuse the drivers on other projects later, it is faster, it is easier to install.
I am using crimped quick connects as well. Came in handy when I made a small mistake in my first wiring test... glad I found it when I double checked everything prior to connecting to my amp.
That stack of stones looks a lot like what we got here, except in white or green marble. Marble is so abundant, that's what they use for sidewalks here 🙂
That stack of stones looks a lot like what we got here, except in white or green marble. Marble is so abundant, that's what they use for sidewalks here 🙂
Looks good Halair. Too bad about the whoops, but can you fix it?
I think the slate will look nice.
I think the slate will look nice.
Cal, it is fixable but the mend will be visible. Obviously less visible than uncorrected 😉 The biggest bummer was that it wont be pristine 😉 Pride issue 🙄
Following ark´s advice I dropped by the local hardware store and got myself a pair of crimps and quick connects in the appropriate sizes. After completing a few of the HoneyDo´s I snuck downstairs to get on with it 😀
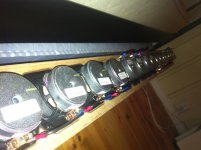
Quick half hour session yielded 15 finished interconnects, three for each group of 4 drivers which are connected in series. This gives me 5 groups each = 32ohm that will be connected in parallel giving me a nominal impedance of 6.4ohm
Will use heavier gauge speaker wire for the "mains" which is the next box to check 🙂
Attachments
BTW it should read "xrk´s" advice, not sure if its the spell checker or the late evening hrs that did that 😉
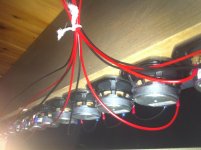
However - last pic from tonite, showing the parallel connections all crimped up 🙂
All that is left to do regarding wiring is to join them into the speaker terminal 😀
The series-connection is all black wire but with Red/Blue quick connectors while the parallel wires are black/red. Each group of four drivers have the connectors on the same side, the next 4 alternate having the terminals on the opposite side.
Oh yes, every little bit helps 😱 I have done tedious work before (try applying a thousand fake rivets on model aircraft) and the only way to get the job done and keep sanity within check is a little, take a break, do a little more etc... Suddenly you´re out of rivets 😉
Attachments
Halair,
Nice wiring job with the crimp connector - for someone who did not own crimper pliers until yesterday - beautiful work. You can see the ease and speed I was talking about now. A final check is to get a 5 volt DC power supply and apply positive to your input wire to verify all the drivers "pop" forward in the correct direction to make sure phase is correct on them. Sometimes a unit may be backwards from the factory.
Nice wiring job with the crimp connector - for someone who did not own crimper pliers until yesterday - beautiful work. You can see the ease and speed I was talking about now. A final check is to get a 5 volt DC power supply and apply positive to your input wire to verify all the drivers "pop" forward in the correct direction to make sure phase is correct on them. Sometimes a unit may be backwards from the factory.
- Status
- Not open for further replies.
- Home
- Loudspeakers
- Full Range
- Halair Column - my line array build (20 FR drivers)