You know what? It's 1 of those perfectionist things......
What it does is smooth out the baffle diffraction effects primarily in the shorter wavelengths, so for the tweeter response. The with and without difference is going to be about a 1.5dB larger dip at about 4000Hz.
Not ideal but truthfully, I don't think you really need to worry about it. Go without the roundover if that suits you better. You won't be the 1st person to do so.
You know what? It's 1 of those perfectionist things......
.
A few months ago I ordered all new cherry wood kitchen cabinets and doors/drawers -UNFINISHED. My wife wanted them a specific color (black cherry) and high gloss. I thought she was crazy but I did it. Four coats of gloss poly, sanded between coats for an almost mirror like finish. She was right - they look good but the effort and time burnt me out.
What that got to do with anything you ask? I dont feel like being fussy with these speakers and chose a simple construction technique - no miters, simple butted joints and minimal staining and finishing.
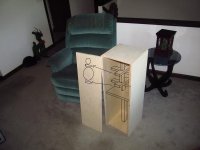
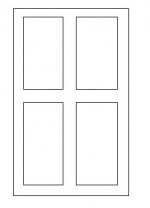
Here's the look I'm kind of shooting for except mine will be black on the top and wont have the beveled sides near the front.
SEAS
If the shape of the front of the speaker is that significant then I'm in way over my head and it takes all the fun out of it.
Tony
Tony
Technically speaking there is nothing special about the seas, consider it cosmetic only (other than width). With that said I don't see anything from stopping you from proceeding.
Now if one were to use a roundover router bit, say 3/4" min that would be an improvement. Easy enough to do after the fact (before finish is applied) if you wanted to include it.
Now if one were to use a roundover router bit, say 3/4" min that would be an improvement. Easy enough to do after the fact (before finish is applied) if you wanted to include it.
Don't sweat it. The front baffle shape makes a real difference, just as placement relative to other surfaces makes a real difference, but tiny roundover vs. none is strictly tweak level stuff unless it's right up against a small tweeter or something. Hang a strip of insulation (as in 1.5-3" thick fiberglass / mineral wool / denim / etc. wall insulation) down both front edges if you want to do a casual test by ear; that will make far more difference than a tiny roundover, and from your posts so far, I don't think you'll be persuaded to care about this. (and I think that's fine)
Tony,
Could use some bracing in there 2 or 3 of these.
3 of those? What am I building here - a battleship? 😉 Thanks for the info.
Yes three - I'm doing the same thing today - btw
http://www.divine-audio.com/wp-content/uploads/2012/01/boxLayout.png
http://www.divine-audio.com/wp-content/uploads/2012/01/boxLayout.png
ODougbo, don't forget that Tony only wants to use about half the cabinet to start with. I'm unsure if the bottom half would need bracing as well.
Tony, bracing does make a difference - cabinet panels can act like drum skins at the right frequencies and resonate loud enough to add to the overall sound. The 'window' style braces that ODougbo posted are a good method. Another way that might work for you are cross braces that are glued together in all 3 axes. I added a very quick little sketch to your picture below. That's the minimum I would use. Left over strips of plywood about 1 1/2" wide would work fine.
You should also think about lining the inside walls with some kind of sound absorbent material - quite effective is memory foam mattress topper available at your local Wallmart.
Attachments
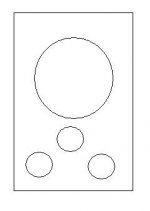
Well this is where I'm at. (see pics). I got a partition in there to bring the volume down to about 1.3 cu ft and added battens to allow the baffle to be screwed to and removed if needed. Just got to add some "ODougbo Braces" or "jReave" Braces. If I go with the "ODougbo Braces" I'm just going with two of them. Before I decide which method, what is the purpose of the one big hole and three smaller size holes?
Looking at this now, I'm thinking that if I ran the boxes through the table saw and removed the 3/4" "inset" I have on the sides, I could use some 3/4" quarter round molding on the edges to get the rounded edge. Might look nice too.
jReaves I hate to bug you but just in case I may at a later date add a second DA175, what would the spacing be? I have to figure where to put the port but not have it be in the way.
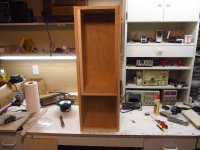
Don't look at my workbench in the pics. I got a 14ft long work bench and its always a mess and cluttered. I'm a slob.
Tony
Looking at this now, I'm thinking that if I ran the boxes through the table saw and removed the 3/4" "inset" I have on the sides, I could use some 3/4" quarter round molding on the edges to get the rounded edge. Might look nice too.
jReaves I hate to bug you but just in case I may at a later date add a second DA175, what would the spacing be? I have to figure where to put the port but not have it be in the way.
Don't look at my workbench in the pics. I got a 14ft long work bench and its always a mess and cluttered. I'm a slob.
Tony
Attachments
Lookin' good Tony. Judging by the equipment you have on your bench, this isn't your first rodeo dealing with electronics, soldering, etc. Anxious to hear how these come out. 🙂
be careful with the soldering iron
I've been burned by that soldering iron countless times.. I've had it since I was a teenager. Its an old "Ungar" and in my opinion its better than the newer "digital" ones I've bought since then.
Lookin' good Tony. Judging by the equipment you have on your bench, this isn't your first rodeo dealing with electronics, soldering, etc. Anxious to hear how these come out. 🙂
Mike
By no means my first rodeo with electronics. I've been playing with electronics since I was about six years old. I thought I knew quite a bit. I have since been humbled by speakers and the vast impressive knowledge of people on this forum. I feel insignificant now.
Tony
Looking at this now, I'm thinking that if I ran the boxes through the table saw and removed the 3/4" "inset" I have on the sides, I could use some 3/4" quarter round molding on the edges to get the rounded edge. Might look nice too.
Again, I'm not 100% sure that you are going to notice the difference with or without the roundover. However, yes the quarter round will work quite nicely - it's been done before. 3/4" will smooth things out a tiny bit more than the 1/2". Another thought that occurred to me was to run the edges through the saw on a 45 degree angle if you could make your finish work with that but maybe the quarter round is easier and will look better?
jReaves I hate to bug you but just in case I may at a later date add a second DA175, what would the spacing be? I have to figure where to put the port but not have it be in the way.
Not bugging me at all. I'm enjoying the success you are now having. I was actually thinking about this the other day. Rule of thumb is you don't want the port right behind the woofer. You have some flexibility with the 2nd woofer placement - some people put it down lower towards the floor and others put it just below the 1st one, say about an inch below it. So perhaps for now put the port on the front baffle right where the 2nd woofer might eventually go. Then if you want the 2nd woofer, that will be cut out and you could put the next port (you'll need to change it anyways) down lower on either the front or rear baffle. Just a thought. You have flexibility here.
Re braces - I kind of like the 2nd type of window braces ODougbo posted better but with vertical pieces of wood in between them right in the center so that the window braces' cross sections (+) can't flex and then the top panel is braced too. The picture I drew first I thought might just be simpler for you.
Keep in mind with the quarter round and the separating panel, the enclosure needs to be air tight except for the port.
Cheers
As JReave mentioned the second woofer placement near the first or much lower is done to help smooth out floor bounce. This bounce causes a null in the response and can be simmed with Floor/Ceiling Reflection Calculator
Also REW REW - Room EQ Wizard Room Acoustics Software has a room simulator built in that does a very good job of showing what happens to the response wherever the speaker is placed. It's free and most of use use this program for testing. Works great with a calibration microphone, like the UMIK-1, EMM6, etc.
I have two UMIK's and worth every penny spent 🙂
Ya you've been around the block.
Think I have the same BKprecision (an oxymoron) aka Circuitmat Function generator and eons ago and had the same Fluke77 (sold to my boss when upgrading to an 87 back in '90.) Next soldering station ought to be a Hakko, blow away both the Unger and Weller stations by a mile. Can't read the model # on the Tek DSO tho. Buddy of mine had the same little Oscope on the upper shelf.
Started out knee high to a billy goat and those landing gears are on my shelf too 😉
Wondering about that front edge:
1/4 round is an option, glue up some scrap plywood "corners" and run them through first to set the saw just right.
The table saw would be quick/fast, although might get some tear-out; a router with a rabbit bit would be a safer bet.
*Table saw, better to make several light passes than going hog-wild with one deep pass and use the scrap test blocks first.
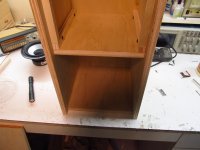
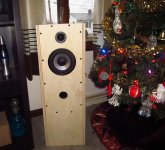
Help. I cut my holes in the baffles and just for fun put one all together - still no braces though. I hooked one of these up - no tweeter connected, no crossover and just a .6mh inductor in series to the DA175. Somethings wrong. This thing has no bass - zero - nada. It sounds like an old pocket transistor portable radio with the exception that it can play quite loud an clear - just no bass. I also tried a placing 5.6 uF cap across the DA175. No change just a shift in overall tone.
As far as the port, I mis- measured the diameter of the PVC pipe and made my hole 2 1/4" instead of 2 3/8". So for now what I did is hot glued a 5" length of 2" ID PVC to the back side of the baffle behind the hole.I guess that would mean I have a total length of 5 3/4" which I'm sure is slightly too long.
Keep in mind that back several posts ago I mentioned , when I got the DA175s in, I made a makeshift ported enclosure of about .6 cu ft. That ones got some really good bass. On that one the woofer is close to the floor. Does that make a huge difference. I hope not.
Any ideas? I'm stumped. Heres a pic if it helps
Tony
Attachments
- Status
- Not open for further replies.
- Home
- Loudspeakers
- Multi-Way
- First Build Dayton DA175 and Vifa BC25SC06-04