I made a little progress with the cracks. I've opened them up with a saw, just plain groove right in the middle of the crack. Mixed white wood glue with sawdust, used it as a body filler...man did that turned out hard as a rock! have to sand it tomorrow and will give the first speaker a try at fiberglassing...
Fingers crossed.I think I might not have enough 400g cloth though.We will see.Pics from fiberglassing come tomorrow
Danny
Fingers crossed.I think I might not have enough 400g cloth though.We will see.Pics from fiberglassing come tomorrow
Danny
Looking forward to see your progress...
Are you going to do some pre-cutting on the cloth? Your shape is quite curvy, just wondering what the best procedure would be in a case like that.
Are you going to do some pre-cutting on the cloth? Your shape is quite curvy, just wondering what the best procedure would be in a case like that.
I'd make a pattern akin to the gore of a hot air balloon.
http://www.buddhamind.info/leftside/actives/colour/figure1.gif
Dont forget to add extra for the lap.
The end fibres will lift slightly, don't forget to sand em smooth!
http://www.buddhamind.info/leftside/actives/colour/figure1.gif
Dont forget to add extra for the lap.
The end fibres will lift slightly, don't forget to sand em smooth!
Wes... I have to cut it in some smaller pieces.No way I can wrap it around the shaoe in one piece.
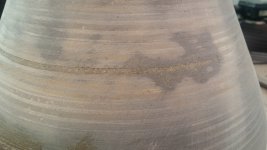
Fixed the crack on one speaker...see photo. Its hardrr than wood which is good.A little body filler to prepare it for fiberglass and its done.
Sippy I know the fibers will be everywhere...what Im not looking forward to is the sanding 🙁 and lot of it...will try to stick it i a lathe and rev it up to 600rpm and sand it that way.Might be better
Danny
Attachments
Horray for fiberglass!
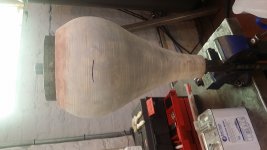
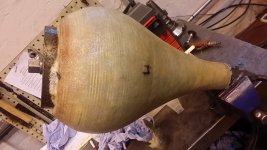
It took 350ml of resin, 0.7m2 of 400g cloth and an hour of elbow grease (still hurts) to cover first speaker.
I had to be quick.20 min since adding the catalyst.Thought I wont make it after playing around with the top part.
Anyway...see pic before and after
Danny
It took 350ml of resin, 0.7m2 of 400g cloth and an hour of elbow grease (still hurts) to cover first speaker.
I had to be quick.20 min since adding the catalyst.Thought I wont make it after playing around with the top part.
Anyway...see pic before and after
Danny
Attachments

facing off to have it square for the mounting ring...nothing beats a CNC 🙂
Missed this one the first time... nice tools to play with!
The covered enclosure looks great! Should give a nice base for paint when done..
By the way, I know how that feels, the limited play time with a mixed batch. I felt I was running around like a fool at times.
To get a grip on timing I set an alarm for about half time to know where I should be 😀.
Last edited:
Thanks guys, I'm just afraid that the sanding will be a pain in the buttocks 🙁
Will have to use car body filler (hard as rock) to smooth it out.Not sure if I use the fine cloth (finishing cloth). I think not really necessary.The layer is quite thick as it is.
Have to make my self a bung for the back to be able to stick it in a lathe.Then use some rough sanding disc on a air driven sander (have them at work, you can see it on the second pic) and rough sand it like that.Take most of the bumpy surface down with this. Then we'll see 🙂
Danny
Thanks guys, I'm just afraid that the sanding will be a pain in the buttocks 🙁
You'll end up ambidextrous and over developed 😀😀
(if you did it by hand)
Sanding the fibers is no fun... even though I used protection I did have the tingling of fine needles for a few days....
PM-ed you some thoughts, hope it helps...
PM-ed you some thoughts, hope it helps...
Sanding the fibers is no fun... even though I used protection I did have the tingling of fine needles for a few days....
PM-ed you some thoughts, hope it helps...
Hot Coat - AKA Sand Coat - AKA Filler Coat.
Tis pointless and bad for you / your object to sand a naked laminate.
Also beware of 'burning' the laminate if your machine sanding, last thing you want is it to 'blow the glass off' (bubble lifting) the substrate.
Last edited:
Sippy....didnt get this one quite.....what?
BTW looking for a WINisd driver file for Beyma 12LX60v2... anybody have it? my help file in winisd is not working...cant have a look how to input new driver data.what value in what order.
Danny
BTW looking for a WINisd driver file for Beyma 12LX60v2... anybody have it? my help file in winisd is not working...cant have a look how to input new driver data.what value in what order.
Danny
Had to look it up again,
This is the order I have as a note in my archive:
1 – Qes
2 – Qms
3 – Fs
4 – Vas
5 – Znom (nominal resistance, for example 2,4 of 8 ohm)
6 – Re
7 – Choice: Sd of Bl
8 – Pe
9 – Xmax
Sd is preferred over Bl, as it doesn't depend on other values...
This is the order I have as a note in my archive:
1 – Qes
2 – Qms
3 – Fs
4 – Vas
5 – Znom (nominal resistance, for example 2,4 of 8 ohm)
6 – Re
7 – Choice: Sd of Bl
8 – Pe
9 – Xmax
Sd is preferred over Bl, as it doesn't depend on other values...
Last edited:
Hi Wes....
gonna give it a try.Shame it does not work under Win7.even with Xp compatibility.
Danny
gonna give it a try.Shame it does not work under Win7.even with Xp compatibility.
Danny
Did you try a Virtual machine environment on Windows 7?
http://www.howtogeek.com/howto/12309/install-xp-mode-with-virtualbox-using-the-vmlite-plugin/
With the Virtualbox with VMLite plugin you can run it simultaneously on your desktop...
(disclaimer, you need Windows 7 Pro or above for that to work)
http://www.howtogeek.com/howto/12309/install-xp-mode-with-virtualbox-using-the-vmlite-plugin/
With the Virtualbox with VMLite plugin you can run it simultaneously on your desktop...
(disclaimer, you need Windows 7 Pro or above for that to work)
Last edited:
Sorry barakuda, I shall explain:
When making surfboards, we laminate the bottom first - a single layer of glass that has a lap that wraps onto the 'deck' (top) by say.... 50mm.
Then the deck is laminated, usually 2 layers of glass, lap is 50mm.
We use resin much like yours (if you used 'poly') and it never really cures out 'hard' as it does not have 'wax in styrene' included - if / when you try to sand this it will 'ball up' and stick in the grit of your paper.
We then (quite literally) 'slop on' a 'filler' or 'Hot Coat' resin.
This is the same resin as used to laminate BUT has 'Wax in Styrene' added at a ratio of 3% by weight.
This performs two roles:
1: It acts as a leveling agent
2: It acts as a thermal insulator allowing the laminated resin to 'self cook' and cure out almost down to the porous foam.
Once again, we hot coat the bottom first, this fills in the discrepancy created by the double lap and when cured, the board is flipped and we do the deck.
Note that we mask off the 'Rail' (edge) of the board - hot coat does not bond to hotcoat because of the wax content so we create an 'open edge' to facilitate bonding.
One must also remove the masking tape when the resin is at an advanced state of 'gel' to create a 'hard edge' - and we dont want the tape to become a permanent fixture 😉
The hot coat then becomes the 'Sand Coat', it has filled the weave and, as it is 'fully cured' it is brittle and can be sanded effectively.
Sanding this provides a few challenges - the biggest is Heat Management.
We start sanding with 40 grit paper on a 'hard pad' and run sanders at 800 - 1000rpm to get rid of the 'waxy' layer and gradually reduce the grit to 400.
Once we reach 120 grit we swap to a 'soft pad', we also increase the rpms to 1200 - 1600, this is where the heat issue rears its head......
The laminate is thin and glass retains heat (from friction) and it is 'held in' by the resin (good insulator).
In the case of sanding a surfboard, excess heat first appears as 'brownies' - this is the foam starting to burn, worst case is a total overheat on a spot, the glass/resin matrix expands and de-laminates, not from its self but from the foam, leading to a 'blow' - this is 'cured' by sanding / cutting out the blown section, laminating in a patch.....
Now.....
With a very hard substrate the chances of overheating / blows are increased, caused by pores being smaller (in the case of wood, grain lifting can cause premature blowing) = less mechanical bond, it's counter intuitive, bit like womanses 😉
I note you have said you might use 'bondo' to smooth things out, mounting the teardrop in a machine to rotate and sand it.
You might not blow the laminate off per-se, but you could find that the heat generated causes the bondo to delaminate from the glass / resin causing cracks.
Absolute worst case is the bondo peeling off in quite big bits (think of times you've used bondo to repair a dent on a car and how the feather edges can lift).
This situation might not be immediately apparent until you start to apply the final finish.
You work with machine tools so you will be au-fait with 'surface speed', factor this in when chucking up your teardrops, work with caution and things will be A-OK.
Maybe take a look on youtube and see if there are any surfboard laminating / sanding / finishing vids.
I hope my words help (and dont frighten you).
Sippy many thanks for such exhaustive explanation...you should post this to the subforum with construction tips.
Heres what I will do after reading your post:
- sand down rough surfaces and bumps on a lathe at slow slow revs.Just to get even thickness
- apply two part body filler (car repair,boat repair etc...) on the whole surface in as even coat as I can manage
- on a lathe again start manualy sanding at very low revs ( also helps to position the shape,better then on my lap)
-repeat last two steps until I have desired finish
Now how do I know I have the best finish for white high gloss finish? On model planes this was not critical.I want to have these spot on.Ive asked a company for doing the painting....quote me for £900 !!! No way Im paying that.
Danny
Your welcome 🙂
I used to fly Control Line Team Race - Vintage and 'Open' Goodyear..... though I've done / flown just about everything in 32yrs of aeromodelling bar Heli's (well, I dabbled with a friends 10cc ship, not my 'cup of tea', though very interesting).
Right, the correct finish for finishing:
Work down through the grit sizes:
Cut down the finish you have now with 40 grit, this will look rough, but it's a Good key for your bondo'ing.
Bondo layer should be 'just thicker' than needed, leave to dry in a cool Dry place for 24 - 36hrs. Once 'cured' hit it with 60 or 80 grit to take down the unevenness, then go 120 > 180 > 240 > 320 > 400.
Do Not Use Water to lubricate or wash away dust - Bondo is porous, use a medium / soft broom head or a good quality 100mm paint brush, either will 'pull' sanding residue from any opened 'bubbles' or scores / scratches.
Now you can start hitting it with primer 🙂
Lots of light coats is the key - 5 to 10 coats initially - leaving 10 - 20 mins between coats depending on ambient temp.
Thin coats 'tack up' faster and have less tendency to 'sag' or run = less sanding 🙂
Leave this finish to harden up over night, then sand with 320 or 400 to the point of it looking 'thin' - this fills / will show any blemishes.
Remove 'dust' with tack cloths.
Now more primer, 5 - 10 coats, leave to dry for a day or two then sand gently with 320 > 400.
At this point you should be able to start with colour, same technique of application of primer, once you think you've got enough colour, sand lightly with 400 > 600 grit.
Now the 'gloss'....
Same as before, light coats and plenty - build till you start to see 'orange peel', car finishers call this 'Fat Ladies A$$' 😀😀
OR: Till it looks like a dose of 'slight cellulite'.
Now sand this using 400 grit WET - bucket of water with a lil washing up liquid added - be REALLY gentle, take your time.
Work through 400, 600, 800, 1000 - if you can see very slight scratches after 1000, take your 1000 grit and use the Reverse side, this is abrasive and similar to 1200 but crucially it is 'grit free' and, provided you keep the work piece wet and sludge free, it will pull out those lil scratches.
Remember to keep the paper wet and use rags to remove 'sludge' - sludge captures 'grit' and can leave scratches, not what you want at this point because you are nearly finished 😉
The next step is 'Polish'.
DO NOT USE 'T-Cut', 'Brasso' etc - it's way too course.
The BEST polish you can get bar none is 'Farecla': G3 Premium Range | farecla
It's also good for polishing aluminium😉
You can use this to give your final polish, wet a cloth, squirt some Farecla on the work and buff away keeping the workpiece damp with a 'plant spray' bottle - dont worry too much about the 'sludge', it means your cloth is correctly 'loaded' 🙂
To check progress, use a clean damp cloth to remove what likes 'blooming' and a dry one to buff.
Soon you'll have that 'Liquid' look gloss 🙂
You can see where that quote of £900 comes from, though they probably quoted you high just to get rid of you - car people are a funny bunch when it comes to anything other than 'auto' finish.
If you could find a board finisher, you'd be looking at £200 - £250, we're very "Ooooo, thats fun and interesting" and enjoy a challenge.
Paint, abrasive paper, tack cloths, farecla:
Find a local Automotive paint specialist, they will have the primer in bulk spray cans and should also be able to make 'colour cans' for you at reasonable price (compared to 'high street' autofactors).
I do know Youtube has good vids on car finishing, well worth a bit of time as spoken words could help fill any gaps in my 'epic'.
If any one else thinks this should be stickied / moved to Construction, feel free to ask a moderator.
- Status
- Not open for further replies.
- Home
- Loudspeakers
- Full Range
- FE168E Sigma teardrop enclosure