Actually, the photo you posted shows the "shoulder washer" is inherent in the package. The screw cannot touch the metal on the back unless you deliberately apply a large side force. A shoulder washer on the back of the heat sink will center the attachment, which isn't a bad thing, but it is not strictly necessary with the package in the photo. I cannot state that all of the TO-126 packages are this way, but all that I have are either like the one pictured, or completely encapsulated like the KSA/C 1381 and 3503 from On. The JEDEC standard does not seem to contain a requirement for the center insulator.

I would second this since I experienced it during my build.
I would recommend to use insulating shoulder washers in this location.
Also take care to wipe clean your heatsink with paper towel or cloth dampened with isopropyl alcohol before mounting the transistor insulating pads. You don't want dust or grit or heaven forbid a tiny piece of metal swarf getting between your insulating pads.
The build guide has steps to check for shorts prior to power up, shorts can avoided by the above tips.
Hope this helps
- Daniel
Using a insulated shoulder washer even for TO-126 that have a insulated hole is a good idea, because if your mounting hole is slightly oversize this can allow enough clearance if the transistor is pushed all the way to one side of the hole in the heatsink. The non insulated surface of the transistor can then make contact with the grounded heatsink. Using a insulated washer prevents this.
Thanks mhuth1776 for the feedback on the capacitors. I would have put a thumbs up if I could finally find that button...
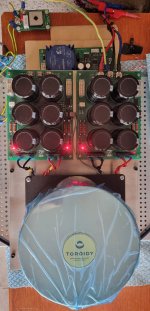
This psu is a part of protection circuit by Jeff & Valery.
Really a very good, safe,all in one protection,slow start, microcontroller based solution.
Underside the PSU ,board with the blue transformer is the main CPU protection board.👍
Really a very good, safe,all in one protection,slow start, microcontroller based solution.
Underside the PSU ,board with the blue transformer is the main CPU protection board.👍
Last edited:
The games are about to get started....Awaiting the mouser BOM and then right into the deep.

https://www.aluminiumopmaat.nl/ you can fill out LxWxH so they are as indicated in the Wolverine BOM. 6 of them for 25 euro's
w
w
Last edited:
@fireanimal also has stock of these ready to go with all holes drilled. Send him a pm@wkloppen - Where did you get the aluminum heatsinks? Did you buy in bulk and cut to size, or were you able to buy them pre-made close to the spec'd size. Those heatsinks are the final parts needed to get started and was hoping to find a source sized close enough to avoid cutting my own.
Could you provide a link?Hi Gaetano,
Virtual zero distortion audio modular psu board
- Dan
Coils...........
Found several coil calculators playing with it a little and was wandering why there is a difference in outcome. Also counted the tunrs on Stuarts coil on the pic in his gallery which turned out to be 15 turns. while still measuring exactly 1.5uH. Might by a bigger former or thinner wire with the same coil lenght or something. I bet there's an expert opinion on this topic...🙂

https://coil32.net/online-calculators/one-layer-coil-calculator.html
Found several coil calculators playing with it a little and was wandering why there is a difference in outcome. Also counted the tunrs on Stuarts coil on the pic in his gallery which turned out to be 15 turns. while still measuring exactly 1.5uH. Might by a bigger former or thinner wire with the same coil lenght or something. I bet there's an expert opinion on this topic...🙂
https://coil32.net/online-calculators/one-layer-coil-calculator.html
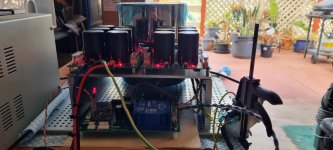
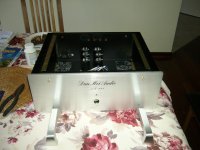
I got lucky this time, I bought this amplifier enclosure with heatsinks for U$230 shipping included. Of course I had to pay 10% Australian GST on top of it. Now it costs U$540.
Images show intended layout of EF3- 4, transformer is only 625VA 2x46.5V, PS will be dual bridge 6 x 15mF/80V Panasonic caps. plus soft start and speaker protection.
cheers,
Images show intended layout of EF3- 4, transformer is only 625VA 2x46.5V, PS will be dual bridge 6 x 15mF/80V Panasonic caps. plus soft start and speaker protection.
cheers,


One more driver insulation question.......
If I'm reading the manual for the driver heatsink it says this....which I dont'understand. Why would one need 2 shoulder washers if a cap screw and nut assembly is elected? Or is that just an additional assurance?

If I'm reading the manual for the driver heatsink it says this....which I dont'understand. Why would one need 2 shoulder washers if a cap screw and nut assembly is elected? Or is that just an additional assurance?
- Home
- Amplifiers
- Solid State
- DIY Class A/B Amp The "Wolverine" build thread