Like I said, obsolete dance 😎 Those are good if you have 'em, use 'emWhat about 2sa1859A/sc4883A? Would these manage to drive 5 pairs at 71V or not?
I use these to drive 3 pairs at 71V and 4 pairs at 64V. I'm just finishing these two builds, all is ready for powering up. Should I proceed?
Last edited:

The 2 transistors Q101/Q102 used for the capacitor multipliers, if I use 3503D and 1381E, will the hfe difference have a big impact?
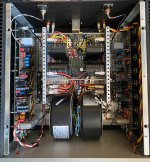
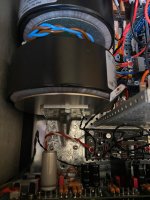
Does anyone have a solution for how to mount two toroidal transformers for a dual mono setup?
Further to this for higher V rail options use the 3503D/1281E and choose higher gain parts.The 2 transistors Q101/Q102 used for the capacitor multipliers, if I use 3503D and 1381E, will the hfe difference have a big impact?
For lower rail options use the TTA004B/TTA004C since they typically have higher gain than the 3503D/1281E
Check out the line in the BOM related to this also.
Hope this helps
- Dan
Nope, you're fine. We looked into this recently.The 2 transistors Q101/Q102 used for the capacitor multipliers, if I use 3503D and 1381E, will the hfe difference have a big impact?
Both TTC/TTA004 and (XXX)3503X/1381X parts work in the cap multi position for all rail configurations.
TTC/TTA004 are preferred due to typically having ~200 hFE vs the ~90-130 of the 3503/1381.
That said, either work fine and there'd be miniscule difference.
It's the predrivers and VAS where rail voltage becomes a real concern.
Hi Guy's, Just a very quick update on the V5 GB.
1. All the documentation is complete and sitting ready for everyone in the Dropbox folder. You'll receive your link to the Dropbox folder when you receive your tracking number. A big thanks again to @Mainframe and @Harry3 for there massive contribution to compiling all the information.
2. The last set of boards (EF3-5 R) is now in production.
3. Everything else is primed and ready to go.
Hopefully orders will start being sent out within a week.
Thanks again for everyone's support and interest in the Wolverine project and the 5th Group buy.
Any good recommendations for housekeeping boards to address soft start, standby, and remote trigger?
Hypex soft start is an option. Its 1500VA rated, has an extra low voltage standby switch and bidirectional LED function so your switch can be red when off and green when on.
Works well with this Red & Green illuminated, latching power switch: AV1911PA12Q04 (picture doesn't show power logo but that part does have the power logo). If you use a latching switch, you can make it work in series with the trigger 12V input controlling a small relay coil, as I've drawn below with the addition of a NO/NC 12VDC coil relay similar to this: G2R-1-T-DC12. Effectively there is a closed loop to keep it in standby and then when either the front switch or the trigger in is toggled the amp will start. Unfortunately, it won't work with a trigger input if you desire to use a momentary press power switch, unless you get fancy with extra components.
Another downside is the 1500VA rating, I kind of wish it was 2000 or 2500VA rated but 1500VA still plenty for most builds.
Last edited:
Hi for those who already built this, how much is the total cost, including everything, roughly for stereo set with 4 pairs of Output Transistors?
Go for 5 pairs. Electronic components are cheap. I got 3 pairs version and then 4 pair version as I did not know that there would be a 5 pair version. The whole cost depends on how much you spend on your enclosure, heatsinks, PS capacitors and transformer/s. Some 13 years ago I spent about US$450 on my Honey Badger. On this one (EF3-4) I have spent almost US$800.
I have not built this beast yet but in Canada these are the US $ prices I have spent so far:how much is the total cost,
XFMR $220
Case $280
PSU caps + boards $100
PSU Rectifiers $35
Jack posts and RCA $50
PCB caps $110
PCB Resistors $110
Output transistors $150
PCB transistors $75
Misc? $200
PCBS and Shipping for the 5 pair board set to Canada??
- - - - - - - - - - - - -
$1,300.00 and counting...
- Home
- Amplifiers
- Solid State
- DIY Class A/B Amp The "Wolverine" build thread