Hi Janusz,If this kind of a heatsink as shown on attached pictures is OK then it is available from temteccontrols seller on Australian EBay.
Lengths available up to 400mm. Plain aluminium not anodized.
The heatsink shown is available in 400 mm length(s) but the fins go in the wrong direction.
You would need to bolt together a few sections with the fins running vertically unless you want to have the fins running horizontally, which does work but is not as efficient for convection cooling.
I have gone a similar route before and it is doable but realistically you pay more than getting the appropriate heatsink and the labour time is high.
Also they are not anodised.
I hope this makes sense.
- Daniel

I thought I'd chime in on the concerns expressed regarding the heat sinks and the dissipation needs of the Wolverine. I too was concerned about dissipating enough heat having 6 pair of outputs per channel. To provide a little empirical calibration for everyone building, this is what I have experienced... I built a quad EF3-3 Wolverine to bi-amp my speakers. I used a Modushop 5U chassis to physically accommodate the 4 boards. The speakers are 4 ohm nominal impedance and represent a significant load. I've been listening to my system for many months now and I've pushed it very hard for long periods of time to see what it could do (or can't). However, to my surprise, the 5U heat sinks have never come close to the fan thermostat setpoint of 145C. My assessment is that, if the amplifier is built per the guide, I don't believe anyone has anything to be concerned about regarding excessive heat or reliability.
We have different definitions of excessive. 😉...the 5U heat sinks have never come close to the fan thermostat setpoint of 145C. My assessment is that, if the amplifier is built per the guide, I don't believe anyone has anything to be concerned about regarding excessive heat or reliability.
I think maybe that is 145°F or 63°C 🙂We have different definitions of excessive. 😉
- Dan
Testing both EF3-3 and EF3-4 using both the 4U 300mm and 5U split heatsinks, I can with 100% confidence say that there are zero issues with temperature or uneven heat distribution on either. There is no need to reinvent the wheel here guys, and any discussion or worry on the subject is a mute point to be honest.
I have examined both with a FLIR at idle and heavy load. They are great heatsinks and perfectly matched for this build.
I have examined both with a FLIR at idle and heavy load. They are great heatsinks and perfectly matched for this build.
I hoped this would die by not giving it attention, but no. Two forum pages filled with fighting an imaginary dragon, and all of this because some people reversed the logical order of reading before writing, into writing before reading. For those who still have not read #775, please do it now.
Guys-
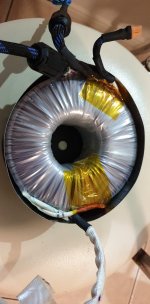
This may be a another imaginary dragon 🙂 but wondering if it is necessary/advisable to pot the torroid power transformer. Assuming good lead dressing and appropriate use of shielded cable, has anyone had hum trouble from an uncovered transformer?
Thanks
This may be a another imaginary dragon 🙂 but wondering if it is necessary/advisable to pot the torroid power transformer. Assuming good lead dressing and appropriate use of shielded cable, has anyone had hum trouble from an uncovered transformer?
Thanks
I had a AnTek transformer that I used on my Honey Badger build. The transformer was quite but not dead quite. Potting it killed any noise completely. Definitely worth doing if you have a quite listening room.Guys-
This may be a another imaginary dragon 🙂 but wondering if it is necessary/advisable to pot the torroid power transformer. Assuming good lead dressing and appropriate use of shielded cable, has anyone had hum trouble from an uncovered transformer?
Thanks
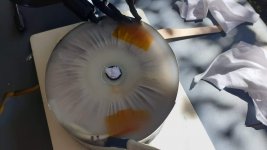
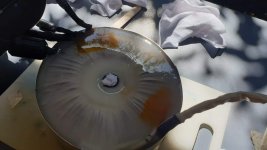
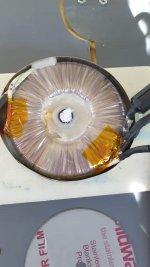
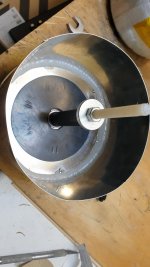
Poured it in two pours. First pour into the nu-metal housing with center tube inplace and without the transformer inplace then quickly lowered the transformer into position.
The second pour finished it off.
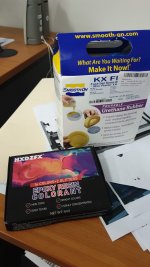
A big thanks to @neilshop for putting me on to this smooth-on product. If you use this product to pot your transformer please ensure that you get the longer setting version as the pot life on this version was very short.
Attachments
-
 Screenshot_20220901-134235_Photos.jpg296.6 KB · Views: 228
 -
 received_782433786338409.jpeg102.1 KB · Views: 239
 -
 IMG-20220901-WA0007.jpg173.5 KB · Views: 231
 -
 f677d874-9f8f-483c-a853-19f38b2a2f6bphoto.jpeg371.2 KB · Views: 236
 -
 received_1292671634806015.jpeg145.6 KB · Views: 227
 -
 57a3f687-0e39-4ca2-99a4-1f54571c1dacphoto.jpeg444.2 KB · Views: 217
 -
 received_616867776771893.jpeg75.5 KB · Views: 209
 -
 20220902_184932.jpg214.8 KB · Views: 213
 -
 20220902_103859.jpg255.8 KB · Views: 226
Last edited:
I've been potting my transformers using Vytaflex 60, a urethane rubber product from Smooth-on. Very easy to use, as you don't have to be in a hurry to make the pour after mixing it. It takes a few hours to begin setting. The small sample kit provides all the volume that's needed, but don't forget to buy some color dye of your preference. It pours like syrup and will permeate everything.... Make sure that you don't have any seams or holes that can leak 😉
Came across this unregulated power supply with an advantage of an integrated speaker protection. I ll have to add soft start boards only.
Question- is it good enough or I should go ahead and order Prasi or DIYaudio store boards, as used by some in wolverine build already?
Question- is it good enough or I should go ahead and order Prasi or DIYaudio store boards, as used by some in wolverine build already?
Take a look at the build guide, this topic should be covered there.And re smoothing capacitors. What are the recommendations for the W? Any preference ?
Ok guys,
I've sent either PM's or PayPal requests for shipping costs out to all the guys I had in North America and Europe. Please check your emails so I can get these boards mailed out.
Jeremy
I've sent either PM's or PayPal requests for shipping costs out to all the guys I had in North America and Europe. Please check your emails so I can get these boards mailed out.
Jeremy
Guys, please PM Jeremy if you'd like to advise him that you have paid. There is no need to fill up this thread with paid comments.
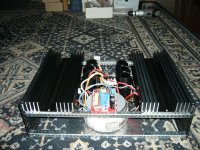
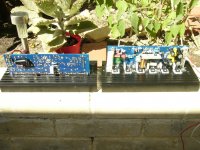
Yes, that would great if fin direction was different and heatsink black but I use heatsinks like this one with fins facing up, while PCB is underneath as on the attached photos. It works fine.Hi Janusz,
The heatsink shown is available in 400 mm length(s) but the fins go in the wrong direction.
You would need to bolt together a few sections with the fins running vertically unless you want to have the fins running horizontally, which does work but is not as efficient for convection cooling.
I have gone a similar route before and it is doable but realistically you pay more than getting the appropriate heatsink and the labour time is high.
Also they are not anodised.
I hope this makes sense.
- Daniel
Heatsink could be anodized black or simply painted with anodizing paint. Anodizing can be done at home only one has to be careful as acid is used.
I decided to buy these heatsinks as they were relatively cheap, about A$52 each. I could get two 200mm x 125mm vertical fin heatsinks from element14 for about A$90 to get 400mm. In the end I opted for the cheaper version.
cheers,
Attachments
- Home
- Amplifiers
- Solid State
- DIY Class A/B Amp The "Wolverine" build thread