stuartmp and Jeremy:
Thank you for the quick responses! In my last post, I was testing the right channel only. I've followed your guidance (increased R109 until the light bulb in my dim bulb tester went out, which was around 22 mV, removed the dim bulb tester and have reset R109 on both channels so the readings across TP101 and TP102 are 40 mV), powered up both channels and have left everything on for about 30 minutes. No magic smoke has appeared, so it seems I'm good. I'll move on to the final burn-in procedures shortly.
You guys have been great -- I really appreciate the guidance and support on a project that was slightly over my head.
I do have a final couple of questions for you. The Build Guide instructs us to install 8A Fast Blow fuses on the Wolverine boards. My rails are +/- 48.6 VDC, which seems pretty low based on Sheet 2 on your BOM. Are 8A fuses still appropriate in my case? I have 5A, 6A and 7A Fast Blow fuses on hand as well; what is the formula for determining the right fuse rating?
I'll post pictures of a very pretty integrated Wolverine amp in the next day or two.
Regards,
Scott

stuartmp and Jeremy:
Thank you for the quick responses! In my last post, I was testing the right channel only. I've followed your guidance (increased R109 until the light bulb in my dim bulb tester went out, which was around 22 mV, removed the dim bulb tester and have reset R109 on both channels so the readings across TP101 and TP102 are 40 mV), powered up both channels and have left everything on for about 30 minutes. No magic smoke has appeared, so it seems I'm good. I'll move on to the final burn-in procedures shortly.
You guys have been great -- I really appreciate the guidance and support on a project that was slightly over my head.
I do have a final couple of questions for you. The Build Guide instructs us to install 8A Fast Blow fuses on the Wolverine boards. My rails are +/- 48.6 VDC, which seems pretty low based on Sheet 2 on your BOM. Are 8A fuses still appropriate in my case? I have 5A, 6A and 7A Fast Blow fuses on hand as well; what is the formula for determining the right fuse rating?
I'll post pictures of a very pretty integrated Wolverine amp in the next day or two.
Regards,
Scott
The fuse chart is on sheet2 of the BOM
The lowest rail fuse value I'd use for +/-50V rails is 4A driving 4 ohms. You can use the 5A, 6A, or 7A fuse if you have those on hand. The fuses are mainly for catastrophic failures anyways, and they may or may not protect the amp but more to stop fires.
Jeremy
Hi Guy's
After some further feedback from Scott and some discussion with Jeremy I have just updated the Build Guide to make Points 18. A-K clearer.
The current version is now "Wolverine Precision EF3 Build Guide revision 23 (31-08-22)"
Check your Dropbox project folder for the updated file.
Enjoy 🙂
After some further feedback from Scott and some discussion with Jeremy I have just updated the Build Guide to make Points 18. A-K clearer.
The current version is now "Wolverine Precision EF3 Build Guide revision 23 (31-08-22)"
Check your Dropbox project folder for the updated file.
Enjoy 🙂
stuartmp:
This is clearly a case of the blind and dumb (uhm, that would be me) leading the experts (yup, that would be you). I'm proud to define the lowest common denominator.
Regards,
Scott
This is clearly a case of the blind and dumb (uhm, that would be me) leading the experts (yup, that would be you). I'm proud to define the lowest common denominator.
Regards,
Scott
Oh, Scott please don't feel like that. The whole idea of the detailed build guide is that its complete in every way. If its clear enough for first time builders then it opens up this amplifier to more first time or less experienced builders. Your feedback is important and welcomed.stuartmp:
This is clearly a case of the blind and dumb (uhm, that would be me) leading the experts (yup, that would be you). I'm proud to define the lowest common denominator.
Regards,
Scott
I hope things are progressing well and please free to reach out for further clarity again if needed.
Once your finished it would be great to here your thoughts on the whole build process to encourage others to give it ago.
Last edited:
Stuart:
Hey, I'm being a little facetious. The great news is that my amp has been completed. I'm stress testing it but, if it is still working properly in a day or two, I'll post photos. What I will say at this point is that this project has been an enormous amount of fun. And if it survives the next couple of days, it'll be gifted to my parents and they are going to be thrilled.
Hopefully, a little more to come.
Regards,
Scott
Hi all,
I am sourcing components for the Wolverine now and I am searching for matched Q1/Q2 and Q3/Q4 transistors.
One guy said that he have matched BC327 and BC337 for sale. Can these be used instead of the 549/559?
And if anyone have matched 549/559 C-grade I would be happy to buy. Overseas shipping is ok for me.
Br, Jonas
Hi NSPHi all,
I am sourcing components for the Wolverine now and I am searching for matched Q1/Q2 and Q3/Q4 transistors.
One guy said that he have matched BC327 and BC337 for sale. Can these be used instead of the 549/559?
And if anyone have matched 549/559 C-grade I would be happy to buy. Overseas shipping is ok for me.
Br, Jonas
You could use some BC550C and BC560C instead of the 549/559. BC550C and BC560C from CDIL are sold today at Reichelt in Germany. They are very good and cost only a few cents each ... I buy many things from Reichelt, and I have never obtained fakes until now from them.
Matching transistors home (diy) is very possible, using some care in order not to change the temperature of the transistors (yes, as they are very "nervous" when their temperature changes).
Best regards
rephil
Hi all,
I am sourcing components for the Wolverine now and I am searching for matched Q1/Q2 and Q3/Q4 transistors.
One guy said that he have matched BC327 and BC337 for sale. Can these be used instead of the 549/559?
And if anyone have matched 549/559 C-grade I would be happy to buy. Overseas shipping is ok for me.
Br, Jonas
They have the same pin out so that's good. What hfe grade are they? There are 3 grades 16, 25, 40. Hfe grade 16 has the lowest gain and hfe grade 40 has the highest gain.
Jeremy
I´m the guy 😊
My BC327/337 are all high hfe grade 40 types. They are left over from a Paradise phono amp build.
Pretty cheap as I bought them. If you have the appropriate measuring and testing capabilities I can send you some for free. It is enough if you pay me the postage. Or somebody can do a spice sim? I am curious what comes out of it...
Some specialists here on diyaudio prefer the BC3327/337 over BC550/560 when it comes to low noise application.
I measured all of them with a tester at room temperature three times within one minute and sorted them accordingly (see photo, the numbers are the hfe values). My work table is antistatic and grounded. I used tweezers to change the transistors so as not to heat them up with my fingers.
I don´t know how precise the tester is. But it´s more about same values in different position as the absolut value.
Folks:
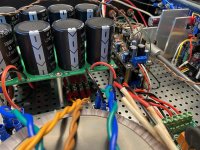
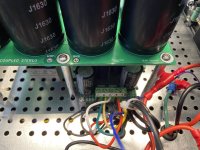
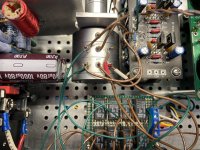
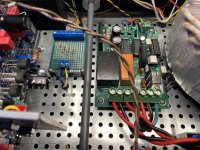
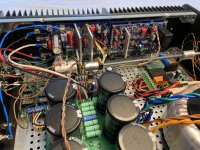
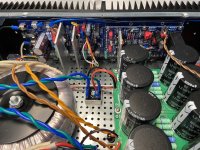
My integrated amplifier project is finished. It consists of a Wolverine amp (EF3-3 pcbs) and a set of RJM Audio buffer boards built in a HiFi2000 3U Dissipante chassis. The Wolverines are powered by a Jeff Young-designed "Decoupled Stereo" power supply (stereo for the first stage and then dual mono for the second). The buffers, source relays and front panel LEDs are powered by a small bipolar power supply hidden beneath the bigger supply. I modified the H9KPXG soft start board to work with a bicolor power switch and I mounted LEDs behind the attenuator and source select knobs to provide a nice knob backlight ring effect (something I've been doing for about 15 years now). This project is a gift for my parents, who listen to music all day long, and will replace a Gainclone I built for them in 2005. This will be a huge step up for them.
It takes a village to build an amp. Okay, that's not exactly true: it takes a village to help me build an amp. Although I've been building audio components for a while, my engineering knowledge is extremely limited. As a result, my projects invariably require expert support. This project was no exception, and I am enormously grateful to the Wolverine design team (especially stuartmp and jjs) for developing their amplifier, providing the Build Guide and supporting documents and then promptly and very helpfully responding to my inane questions. Honestly, this dope couldn't have done it without their help. That said, this project was incredibly fun and there wasn't a moment when I thought it couldn't be completed -- there are a lot of steps, but if you take 'em one at a time you eventually get to a successful end. And if I can do it, anyone can.
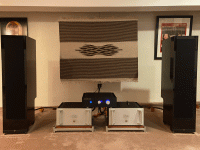
So how does it sound? After finalizing the adjustments to the amplifier (DC offset on each channel is in the 0.1 to 0.3 mV range), it was burned in for 3 days using my modified FryBaby3 burn-in device and then installed in my main system for listening tests. The speakers are Mk.6 Elsinores which have been tricked out in several ways; they're very revealing and, with good amplification, throw a broad, deep and high soundstage with exceptional resolution and neutrality. The Wolverine amp sounds fantastic: neutral, well-balanced and a very good soundstage. There is an engaging clarity with this amplifier -- eyes closed, the presentation sounds real. I could listen to this thing for hours. Unfortunately, the only way that's going to happen is if I visit Mom and Dad (I'm kidding, they're lovely people).
Kudos to the Wolverine design team!
Regards,
Scott
My integrated amplifier project is finished. It consists of a Wolverine amp (EF3-3 pcbs) and a set of RJM Audio buffer boards built in a HiFi2000 3U Dissipante chassis. The Wolverines are powered by a Jeff Young-designed "Decoupled Stereo" power supply (stereo for the first stage and then dual mono for the second). The buffers, source relays and front panel LEDs are powered by a small bipolar power supply hidden beneath the bigger supply. I modified the H9KPXG soft start board to work with a bicolor power switch and I mounted LEDs behind the attenuator and source select knobs to provide a nice knob backlight ring effect (something I've been doing for about 15 years now). This project is a gift for my parents, who listen to music all day long, and will replace a Gainclone I built for them in 2005. This will be a huge step up for them.
It takes a village to build an amp. Okay, that's not exactly true: it takes a village to help me build an amp. Although I've been building audio components for a while, my engineering knowledge is extremely limited. As a result, my projects invariably require expert support. This project was no exception, and I am enormously grateful to the Wolverine design team (especially stuartmp and jjs) for developing their amplifier, providing the Build Guide and supporting documents and then promptly and very helpfully responding to my inane questions. Honestly, this dope couldn't have done it without their help. That said, this project was incredibly fun and there wasn't a moment when I thought it couldn't be completed -- there are a lot of steps, but if you take 'em one at a time you eventually get to a successful end. And if I can do it, anyone can.
So how does it sound? After finalizing the adjustments to the amplifier (DC offset on each channel is in the 0.1 to 0.3 mV range), it was burned in for 3 days using my modified FryBaby3 burn-in device and then installed in my main system for listening tests. The speakers are Mk.6 Elsinores which have been tricked out in several ways; they're very revealing and, with good amplification, throw a broad, deep and high soundstage with exceptional resolution and neutrality. The Wolverine amp sounds fantastic: neutral, well-balanced and a very good soundstage. There is an engaging clarity with this amplifier -- eyes closed, the presentation sounds real. I could listen to this thing for hours. Unfortunately, the only way that's going to happen is if I visit Mom and Dad (I'm kidding, they're lovely people).
Kudos to the Wolverine design team!
Regards,
Scott
Attachments
-
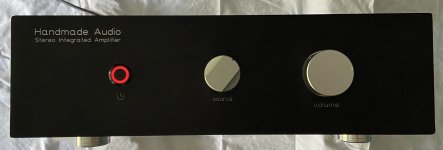 M&D Amp Front Panel Off_3.jpg143.1 KB · Views: 458
 -
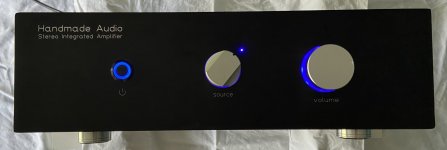 M&D Amp Front Panel On_3.jpg134.9 KB · Views: 395
 -
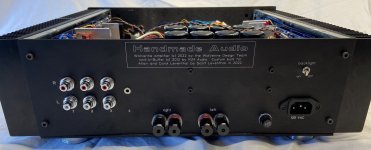 M&D Amp Rear.jpg234.5 KB · Views: 453
 -
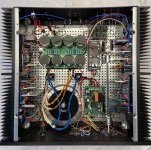 M&D Amp Overview.jpg932.4 KB · Views: 478
 -
 M&D Amp Interior 1 (Toroid & Amp PS).jpg528.3 KB · Views: 469
 -
 M&D Amp Interior 2 (Amp PS, Buffer).jpg546.5 KB · Views: 415
 -
 M&D Amp Interior 3 (Two PS).jpg477.4 KB · Views: 419
 -
 M&D Amp Interior 4 (Buffer Attenuator & Source Select).jpg556.5 KB · Views: 420
 -
 M&D Amp Interior 5 (Soft Start & LED Resistor Board).jpg555.3 KB · Views: 411
 -
 M&D Amp Interior 6 (Front Panel LEDs, Soft Start & LED R Board).jpg527.9 KB · Views: 397
 -
 M&D Amp Interior 7 (View Right).jpg625 KB · Views: 405
 -
 M&D Amp Interior 8 (View Left).jpg636.7 KB · Views: 461
 -
 tempImagew4DYvo.gif1.3 MB · Views: 479
Wow, great job! Now build 2 more to replace those pass amps 😜

Hi Scott,
I'm so happy that you have successfully completed your build. Your case and the details you've added to it look amazing. I can see the effort you've gone to for sure.
Your front speakers.... wow..... they are something very special...
I know this amplifier is going to your parents, but it must be like giving up your first born... But gifting this to your parents says alot about how special they are to you. Please post some feedback from them after they have listened to it for awhile.
I hope that your going to build yourself one or more Wolverine amplifiers in the future.
Stuart:
I had the foresight to order two stereo sets of the Wolverine EF3-3 boards, so yes, I do hope to build another sometime soon. There are three stereos in my home: a Super Gainclone-based integrated amp in the kitchen, a tube-based system in the living room and my big rig is in the basement. If there was a logical place to locate a fourth stereo (attic? garage? closet?) I'd be in the planning stages right now. My wife, she's a saint, will probably nix my stereo-in-the-bathroom idea. We've both recently retired and I'm thinking it may be time to challenge retirement orthodoxy and move into a bigger house. Or perhaps consider therapy.
In time I'll find the reason to build that second Wolverine.
My parents will probably be very happy to offer their reaction to the amp after they've lived with it a bit. I'll be happy to forward their thoughts.
Regards,
Scott
Hi Scott,
What an excellent build! Thanks for sharing the photos with us. I also have Elsinore speakers...
- Dan
What an excellent build! Thanks for sharing the photos with us. I also have Elsinore speakers...
- Dan
Thanks for all the answers regarding the transistors. If there is no problem in using the bc327/bc337 then I think I'll go with these as Baggerbole seems to be in Germany and I am in Finland. Easier with the shipment.
But if some one from the Wolverine team could check if these are good to go I would be very happy. 🙂
I am going with the 4 pair output version and 71 volts.
//Jonas
But if some one from the Wolverine team could check if these are good to go I would be very happy. 🙂
I am going with the 4 pair output version and 71 volts.
//Jonas
Hi Scott,you have done a very good job here although something is missing.
Please connect a speaker protection circuit!
I guess you don't like a burned speaker....
Please connect a speaker protection circuit!
I guess you don't like a burned speaker....
thimios:
My design includes mounting holes on the rear panel for a speaker protection board (I have a couple of diyAudio's version (V2) on hand). It was initially installed but not working as well as I would have liked, so I removed it. If I can correct whatever problem it has, it'll be reinstalled. I'm not terribly worried about my parents' current speakers, which are not very good, but if I can get a long-planned Hamlet loudspeaker project off the ground my parents will be receiving a new set of loudspeakers, in which case the speaker protection board problem will have to be corrected.
Good eye!
Regards,
Scott
- Home
- Amplifiers
- Solid State
- DIY Class A/B Amp The "Wolverine" build thread