Yes I do consider others! And no, I dont have too much money!What an odd suggestion...you probably have too much money, please consider others before writing such comments...
And you please better wait one moment, sit down and think a little bit before you criticize me this way! I don't suggest a higher price, I only suggest to bundle the essential kit with the completion kit.
Again: I just have a guess that many people order an essential kit in order to get the FET's and not to build an ACA mini.
nicoch58 are you using the smaller supply with the P089ZB? When I use the smaller supply that comes with the completion kit without P089ZB I have seen the startup problem every time I forgot to turn the bias switch off before applying power. Every time .... no exceptions. Can the P089ZB affect that? I don't think so. Have you seen the ACA Mini turn on characteristics change when using the smaller PS with vs. without the P089ZB?R4 startup is a non problem never see--btw just some second
Just DO NOT forgot to turn OFF the Aca mini .....
only ones switch ,isn't complicate !
the led is there too 🙂
only ones switch ,isn't complicate !
the led is there too 🙂
Yes, I get that. But would you be kind enough to review my previous question and answer it? I'd really like to understand that point. Thank you.Just DO NOT forgot to turn OFF the Aca mini .....
Hi audiosteve. I just had a bit more of a play and I’ve not seen the startup issue by turning on my 48W SMPS (same make/model as kit) with the switch in the on position. Note - nothing else is connected to the amp yet (no source or speakers). So far so good! It looks a bit tricky to de-solder and replace the R4s with everything else in place so I might leave it until I see the issue. The way I’m wired I’ll probably turn it all on and off in the correct sequence anyway 😉nicoch58 are you using the smaller supply with the P089ZB? When I use the smaller supply that comes with the completion kit without P089ZB I have seen the startup problem every time I forgot to turn the bias switch off before applying power. Every time .... no exceptions. Can the P089ZB affect that? I don't think so. Have you seen the ACA Mini turn on characteristics change when using the smaller PS with vs. without the P089ZB?
Last edited:

The Essentials Kit are now available 👍I was about to purchase the ACA Mini and the Essentials Kit has sold out. Will it be back in stock? Should I go ahead and purchase the Completion Kit now or wait until the Essentials Kit is available?
Thanks !
Different switchers have different capabilities to push through capacitive loads. Some put their max capacitance on their data sheets, while some do not. The P089ZB has a (very-low ESR) cap that is added to the circuit providing 24V to the Mini. Being a capacitor, its adding capacitance to the circuit. 😉 YMMV, but adding extra capacitance could tip any switcher into its capacitive problem zone, which usually manifests itself in tripping its short-circuit/reset or "hiccup" mode. Most switchers have a way to indicate this by flashing its power on light or some other LED.nicoch58 are you using the smaller supply with the P089ZB? When I use the smaller supply that comes with the completion kit without P089ZB I have seen the startup problem every time I forgot to turn the bias switch off before applying power. Every time .... no exceptions. Can the P089ZB affect that? I don't think so. Have you seen the ACA Mini turn on characteristics change when using the smaller PS with vs. without the P089ZB?
I am personally powering my ACA Mini with a bigger meanwell (LRS-150-24) through the P089ZB (see attached) and it starts up just fine. You can check out the spec here: https://www.mouser.com/datasheet/2/260/mwec_s_a0011714497_1-2274579.pdf
Attachments
Hey folks,
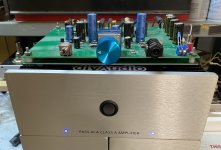
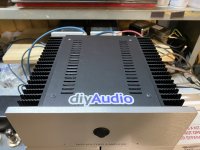
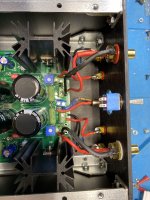
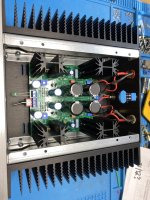
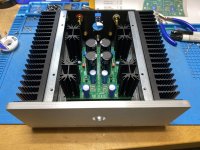
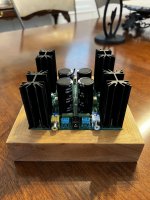
Last weekend I managed to get the ACA Mini built and installed in the latest stereo Amp Camp Chassis. I wanted to post pictures to give folks some ideas and show that it can be done as the fit is quite tight, but it will fit!
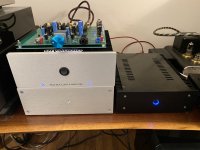
This amp to my ears, sounds better than an Amp Camp in all aspects. Its quite a sweet, tuby sounding 5 watts and for 5watts its quite dynamic and punchy. I was not able to get it to clip in my setup, driving it with the iPad + ACP+, and a max volume its quite nice! The characteristics are adjustable to your liking and I played around a little with the degen settings until I got it where I liked the sound of vocals being played through my test setup on the bench. I'm driving a pair of Vifa MTMs with it, and the ACAmini via one of my ACP+s and an iPad with Tidal and Spotify and it sounds pretty sweet. I can't wait to hook this up to my DAC and high-res Tidal later. Doing the biasing is also a good lesson/example in what an amp will sound like if you reduce its rail voltages or what happens when you move the bias from 0v upwards.
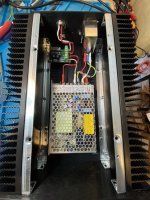
Some build considerations and questions. First, does it fit? Yes, it fits with about 2mm spacing on either side of the silver rails on the bottom. Two of the vent holes line up perfectly with the standoffs, so you really only need to drill 2 holes. Connect your metal stand-offs to the chassis. The rest are done for you. Second, does it over-heat ? Nope. I ran mine for 2 hours. Without getting out the IR temp gauge, it seems to run cooler than similarly driven ACAs on my workshop bench. The integral heatsinks sit right under the vent slots in the ACA chassis cover which is likely why.
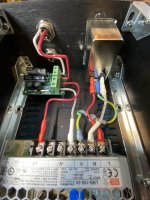
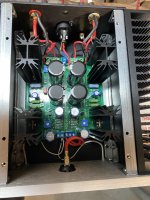
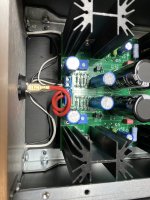
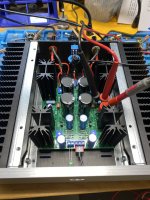
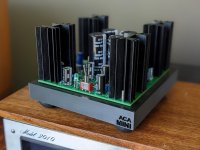
Some final notes around the fly wires you see. Connecting the i/o is straight-forward: connect a pair of RCAs to the correct + and - points where the fixed RCAs go. The DC inlet and speaker jacks from your ACA stereo chassis/completion kit (or bring your own) connect to their corresponding +/- points on the board.
I used Euro-blocks to connect to the board for easy of removal/hacking later as I usually do. I did not connect the balanced/switch but I hear from a trusted source, that a bridged/mono configuration is coming, so don't toss those just yet! 😉
Onto the front, you see I used the stock ACA's power switch to interrupt the two positive lines from the switch and I left the other alone. On the other side, I jumped two blue LEDs into the euroblock there. I switched these to blue LEDs because this is a Pass Labs project and thats just how we roll around here with those. 🙂 The voltage across two LEDs in parallel is fine but if its too bright, add some more resistance.
The observant reader might ask why I didn't connect the MOSFETs to the integrated heat sinks. I wanted to prove a point: that the stock ACAmini would fit and function inside this box without any issues, which it does. You in fact can run it as I did at first, without the I/O connected to the chassis - just built it and stuck it inside the case with the LED/power switch, RCAs and DC input stuck into the euroblocks and the speaker wires soldered in. I did that to test the thermals before I spent a lot of other time on it. That being a success, the second one I've got queued will use flywires to jump off the 3 MOSFET wires to MOSFETs mounted on the bigger heatsinks and will set the rest up the same way. I might in fact, retrofit the current one that way if I have the patience to unsolder the heatsinks from the board.
Thanks again for a fantastic project Papa Pass!
--Tom
Last weekend I managed to get the ACA Mini built and installed in the latest stereo Amp Camp Chassis. I wanted to post pictures to give folks some ideas and show that it can be done as the fit is quite tight, but it will fit!
This amp to my ears, sounds better than an Amp Camp in all aspects. Its quite a sweet, tuby sounding 5 watts and for 5watts its quite dynamic and punchy. I was not able to get it to clip in my setup, driving it with the iPad + ACP+, and a max volume its quite nice! The characteristics are adjustable to your liking and I played around a little with the degen settings until I got it where I liked the sound of vocals being played through my test setup on the bench. I'm driving a pair of Vifa MTMs with it, and the ACAmini via one of my ACP+s and an iPad with Tidal and Spotify and it sounds pretty sweet. I can't wait to hook this up to my DAC and high-res Tidal later. Doing the biasing is also a good lesson/example in what an amp will sound like if you reduce its rail voltages or what happens when you move the bias from 0v upwards.
Some build considerations and questions. First, does it fit? Yes, it fits with about 2mm spacing on either side of the silver rails on the bottom. Two of the vent holes line up perfectly with the standoffs, so you really only need to drill 2 holes. Connect your metal stand-offs to the chassis. The rest are done for you. Second, does it over-heat ? Nope. I ran mine for 2 hours. Without getting out the IR temp gauge, it seems to run cooler than similarly driven ACAs on my workshop bench. The integral heatsinks sit right under the vent slots in the ACA chassis cover which is likely why.
Some final notes around the fly wires you see. Connecting the i/o is straight-forward: connect a pair of RCAs to the correct + and - points where the fixed RCAs go. The DC inlet and speaker jacks from your ACA stereo chassis/completion kit (or bring your own) connect to their corresponding +/- points on the board.
I used Euro-blocks to connect to the board for easy of removal/hacking later as I usually do. I did not connect the balanced/switch but I hear from a trusted source, that a bridged/mono configuration is coming, so don't toss those just yet! 😉
Onto the front, you see I used the stock ACA's power switch to interrupt the two positive lines from the switch and I left the other alone. On the other side, I jumped two blue LEDs into the euroblock there. I switched these to blue LEDs because this is a Pass Labs project and thats just how we roll around here with those. 🙂 The voltage across two LEDs in parallel is fine but if its too bright, add some more resistance.
The observant reader might ask why I didn't connect the MOSFETs to the integrated heat sinks. I wanted to prove a point: that the stock ACAmini would fit and function inside this box without any issues, which it does. You in fact can run it as I did at first, without the I/O connected to the chassis - just built it and stuck it inside the case with the LED/power switch, RCAs and DC input stuck into the euroblocks and the speaker wires soldered in. I did that to test the thermals before I spent a lot of other time on it. That being a success, the second one I've got queued will use flywires to jump off the 3 MOSFET wires to MOSFETs mounted on the bigger heatsinks and will set the rest up the same way. I might in fact, retrofit the current one that way if I have the patience to unsolder the heatsinks from the board.
Thanks again for a fantastic project Papa Pass!
--Tom
Attachments
-
 IMG_4276.jpeg433.4 KB · Views: 316
 -
 IMG_4267.jpeg429.2 KB · Views: 287
 -
 IMG_4266.jpeg412.5 KB · Views: 283
 -
 IMG_4265.jpeg451 KB · Views: 304
 -
 IMG_4263.jpeg567.7 KB · Views: 306
 -
 IMG_4264.jpeg478.3 KB · Views: 312
 -
 IMG_4250.jpeg522.7 KB · Views: 295
 -
 IMG_4249.jpeg535.6 KB · Views: 293
 -
 IMG_4248.jpeg456.1 KB · Views: 283
 -
 IMG_4247.jpeg583.7 KB · Views: 281
 -
 IMG_4243.jpeg505.6 KB · Views: 316
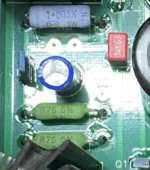
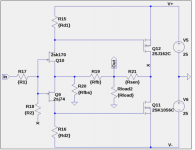
tha panasonic R11 is in the wrong positionHey folks,
Last weekend I managed to get the ACA Mini built and installed in the latest stereo Amp Camp Chassis. I wanted to post pictures to give folks some ideas and show that it can be done as the fit is quite tight, but it will fit!
This amp to my ears, sounds better than an Amp Camp in all aspects. Its quite a sweet, tuby sounding 5 watts and for 5watts its quite dynamic and punchy. I was not able to get it to clip in my setup, driving it with the iPad + ACP+, and a max volume its quite nice! The characteristics are adjustable to your liking and I played around a little with the degen settings until I got it where I liked the sound of vocals being played through my test setup on the bench. I'm driving a pair of Vifa MTMs with it, and the ACAmini via one of my ACP+s and an iPad with Tidal and Spotify and it sounds pretty sweet. I can't wait to hook this up to my DAC and high-res Tidal later. Doing the biasing is also a good lesson/example in what an amp will sound like if you reduce its rail voltages or what happens when you move the bias from 0v upwards.
Some build considerations and questions. First, does it fit? Yes, it fits with about 2mm spacing on either side of the silver rails on the bottom. Two of the vent holes line up perfectly with the standoffs, so you really only need to drill 2 holes. Connect your metal stand-offs to the chassis. The rest are done for you. Second, does it over-heat ? Nope. I ran mine for 2 hours. Without getting out the IR temp gauge, it seems to run cooler than similarly driven ACAs on my workshop bench. The integral heatsinks sit right under the vent slots in the ACA chassis cover which is likely why.
Some final notes around the fly wires you see. Connecting the i/o is straight-forward: connect a pair of RCAs to the correct + and - points where the fixed RCAs go. The DC inlet and speaker jacks from your ACA stereo chassis/completion kit (or bring your own) connect to their corresponding +/- points on the board.
I used Euro-blocks to connect to the board for easy of removal/hacking later as I usually do. I did not connect the balanced/switch but I hear from a trusted source, that a bridged/mono configuration is coming, so don't toss those just yet! 😉
Onto the front, you see I used the stock ACA's power switch to interrupt the two positive lines from the switch and I left the other alone. On the other side, I jumped two blue LEDs into the euroblock there. I switched these to blue LEDs because this is a Pass Labs project and thats just how we roll around here with those. 🙂 The voltage across two LEDs in parallel is fine but if its too bright, add some more resistance.
The observant reader might ask why I didn't connect the MOSFETs to the integrated heat sinks. I wanted to prove a point: that the stock ACAmini would fit and function inside this box without any issues, which it does. You in fact can run it as I did at first, without the I/O connected to the chassis - just built it and stuck it inside the case with the LED/power switch, RCAs and DC input stuck into the euroblocks and the speaker wires soldered in. I did that to test the thermals before I spent a lot of other time on it. That being a success, the second one I've got queued will use flywires to jump off the 3 MOSFET wires to MOSFETs mounted on the bigger heatsinks and will set the rest up the same way. I might in fact, retrofit the current one that way if I have the patience to unsolder the heatsinks from the board.
Thanks again for a fantastic project Papa Pass!
--Tom
** Important question** . Well, it turned out to be a noisy LSJ74. Somehow I damaged it. Can anyone tell me what I might have done to turn this device into a white noise factory? I'd love to know so I am sure to not do it again. Thanks in advance for any tips.Hi guys. I just finished building my second ACA Mini and it has what sounds like what is almost white noise on one channel. The noise stops when I short the input to ground. Does anyone have any idea what I screwed up? The other channel is fine, by the way. Thanks!
Maybe it was just a faulty part, rare but it happens. Heat during soldering could be a reason.
Also using a mains grounded iron while the circuit still has a path back to mains via the power supply could be a cause as also could a non grounded iron with significant electrical leakage. We'll probably never know for sure.
Also using a mains grounded iron while the circuit still has a path back to mains via the power supply could be a cause as also could a non grounded iron with significant electrical leakage. We'll probably never know for sure.
Thanks for the response. A good lesson for me. FWIW I'm using a Metcal iron but I don't recall soldering anything after power was applied. Not sure if it's grounded or not either. Cheers!Maybe it was just a faulty part, rare but it happens. Heat during soldering could be a reason.
Also using a mains grounded iron while the circuit still has a path back to mains via the power supply could be a cause as also could a non grounded iron with significant electrical leakage. We'll probably never know for sure.
I've got the kit due to arrive next week. I've bought it because I want something compact that will drive a pair of Decware tiny radials I built and can use for near field listening at my desk. I've got Dragonfly Cobalt and will probably run 3.5mm to RCA and stream Tidal from I phone or PC as source. Is there much benefit to a pre-amp or could I just add a volume pot to the ACA mini. Quite keen to build a compact case with Aluminium sides replacing the sinks in the kit and I think I've got enough scrap figured walnut to make a facia. I do have a Korg Nutube sitting idle ever since I bought a Naim Atom HE to work as DAC streamer and pre-amp on my main system. But I don't really want the bulk of Nutube (Two ACA size cases with linear power supply) on my desk if I can do without it.
Is there much benefit to a pre-amp or could I just add a volume pot to the ACA mini.
If you have sufficient signal then you are OK with just the volume control. If you can't get the volume levels you want then you need a preamp or... and I've no idea what the thinking on the 'Mini' is on this... you could try increasing the basic gain by increasing R5. The low intrinsic open loop gain limits what you can do here but its worth trying if you are just a little short of gain. I wouldn't go higher than 820 ohms but try it.
You should be fine with just a pot. It's how I run mine (on relatively inefficient bookshelf speakers on my desk) without issues. Mine is a 20K unit.
The mini has been a hit at my house. I normally get a lot of 🙄 about things, but this amp attracted my kids attention with the look, they loved the heat sinks and they even could ”hear” differences jumper in or out. This was originally headed to my office but will have to wait until we finish another. Thanks, it has been fun and it sounds great as well. I honestly think it is amazing that something like this is available and am very grateful for Papa and all who work to make these happen.
Attachments
- Home
- Amplifiers
- Pass Labs
- DIY ACA mini