Very cool.
If you decrease the angular and chordal tolerances of the STL export, you won't get those stair steps on the curves, or even better, export as a 3MF if they will accept it.
If you decrease the angular and chordal tolerances of the STL export, you won't get those stair steps on the curves, or even better, export as a 3MF if they will accept it.
2wice,
That was what I was wondering. I thought I didn't use enough sides when I drew circles and curves. Thanks for the tip!
Jim
That was what I was wondering. I thought I didn't use enough sides when I drew circles and curves. Thanks for the tip!
Jim
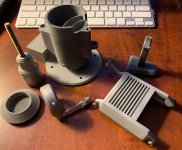
I continue to make progress on the arm.
I used lead shots to fill the space in the base.

I also glued a 2 mm thick lead sheet on the bottom.

Here is a video to show the main bearing in action.
IMG 2861 - YouTube
I used lead shots to fill the space in the base.
I also glued a 2 mm thick lead sheet on the bottom.
Here is a video to show the main bearing in action.
IMG 2861 - YouTube
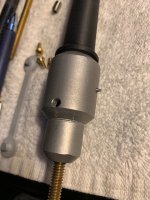
I use Uni Jetstream 0.7 mm ball pens and #8-32 stainless steel set screws for the arm bearings. The bearings prove to be excellent bearings. I didn't polish the set screws and didn't clean the ball pen heads either. Once I cut the heads of ball pens off, I kept writing on paper until all the ink ran out. In the video, the small piece of paper weights 0.1 gram.
IMG 2867 - YouTube
IMG 2867 - YouTube
Last edited:
I used lead shots to fill the space in the base.
Hello super10018,
It won't make a difference, but that lead shot is probably steel. Lead shot is not normally plated like that, but steel shot is, to prevent it from rusting.
sincerely,
Ralf
I use Uni Jetstream 0.7 mm ball pens and #8-32 stainless steel set screws for the arm bearings. The bearings prove to be excellent bearings. I didn't polish the set screws and didn't clean the ball pen heads either. Once I cut the heads of ball pens off, I kept writing on paper until all the ink ran out. In the video, the small piece of paper weights 0.1 gram.
IMG 2867 - YouTube
Hi Super 10018,
Great job indeed!.
By the way could you please tell us how you fix the ball pen and what you do on on the stainless screw to make them well working?.
Tks n rgds
Adelmo
Ralf,
I don't know if filling lead shots makes any difference. The base is 3d printed and I feel it is too light. I bought the lead shots for air-bearing arms. It sits there no other uses. At least, it adds some weight to the base.
The lead shots are not magnetic so I guess they are lead.
Jim
I don't know if filling lead shots makes any difference. The base is 3d printed and I feel it is too light. I bought the lead shots for air-bearing arms. It sits there no other uses. At least, it adds some weight to the base.
The lead shots are not magnetic so I guess they are lead.
Jim
Hi Jim,
Many tks for the clear information, appreciate it very much.
Congratulation again for your nice building TA.
Rgds
Adelmo
Many tks for the clear information, appreciate it very much.
Congratulation again for your nice building TA.
Rgds
Adelmo
Last edited by a moderator:
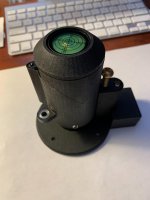
I finished assembly of the base tower. I am not completely satisfied with the mechanism for VTA. But since I have limited capacity with hand tools, I had to let it go.
I use two ball bearings for secondary guide link. Both ball bearings are high quality ones from Baco Bearings. They are originally for my linear arm build. From the video, you may see the ball bearings work nicely. I thought to use needle bearings for guide link as well. However, in order to avoid extra structure, I decided to use ball bearings since it is secondary and all I care about is lateral accuracy.
IMG 2873 - YouTube
Attachments
Last edited:
Jim,
that video is an excellent demonstration of two things: Why that bubble at the top is a good idea and the importance of the vertical axis alignment in PLTs.
Your arm is coming together nicely. I'm looking forward to your report on its fully assembled performance.
It occurred to me that if successful PLTs can be made working just from drawings, the design and construction of PLTs is a fairly mature process.
maturation
Yes. The more people, DIYers and manufacturers, make them, the less intimidating to users. I hope one day it will no longer be anything esoteric and become another genre along with parallel trackers and conventional pivot arms. Not unnecessarily as mainstream or popular as pivot arms but at least the genre can be in the consciousness of analog users and as an option to choose from.
I look forward to seeing further development of Jim's project.
the design and construction of PLTs is a fairly mature process.
Yes. The more people, DIYers and manufacturers, make them, the less intimidating to users. I hope one day it will no longer be anything esoteric and become another genre along with parallel trackers and conventional pivot arms. Not unnecessarily as mainstream or popular as pivot arms but at least the genre can be in the consciousness of analog users and as an option to choose from.
I look forward to seeing further development of Jim's project.
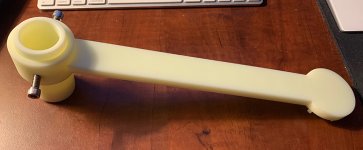
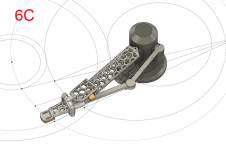
I continue to push the boundary. I realized that the links for a PTL arm can function as a retrieving mechanism for a short arm and a guiding mechanism as well. I am a firm believer of short arm wand. In the meantime, I tried to fully utilize 3d printed parts. The new version is 6C. At this point, no plan has been made to get this arm printed. Here is a video.
PTL Tonearm - YouTube
PTL Tonearm - YouTube
Attachments
Last edited:
short vs long vertical arm
I agree that structurally the shorter vertical arm the better. At the same time the shorter it gets the more it becomes, in abstract, the Thales Simplicity model that the "short" arm becomes just a pivoting headshell a la Thales brand tonearms, except the vertical movement is isolated from the horizontal arm. And the main stationary pivot gets further away from the locus of the Thales circle and skating force will increase (a topic will be verified once the arm is completed and in operation). Structurally you're going in the right direction. And the video looks really cool!
I continue to push the boundary. I realized that the links for a PTL arm can function as a retrieving mechanism for a short arm and a guiding mechanism as well. I am a firm believer of short arm wand.
I agree that structurally the shorter vertical arm the better. At the same time the shorter it gets the more it becomes, in abstract, the Thales Simplicity model that the "short" arm becomes just a pivoting headshell a la Thales brand tonearms, except the vertical movement is isolated from the horizontal arm. And the main stationary pivot gets further away from the locus of the Thales circle and skating force will increase (a topic will be verified once the arm is completed and in operation). Structurally you're going in the right direction. And the video looks really cool!
I found a flaw in an aluminum 3D printed part for 6B arm. The factory promised me to replace the part with a new CNC machined part. So, I am still waiting for the part. I also had to cancel the order for the 3D printed aluminum honey comb arm wand for 6B arm because it is too hard to remove support material from the enclosure of honey comb arm. I looked at Frank's 3D printed arm and am wondering how he gets the arm wand printed in aluminum.
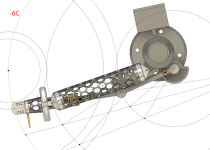
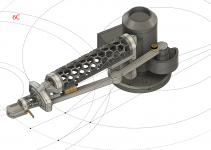
In the meantime, I am trying to refine the design of 6C arm. Here is the latest version. It will be nice to print the honey comb arm for 6C with aluminum, too. However, I learnt the lesson from 6B arm. It is not possible to print the honey comb arm wand in aluminum so I will print the honey comb arm wand in carbon fiber.
I recently switched the software from Sketchup to Fusion 360. Fusion 360 is much more powerful than Sketchup. Love it.
Attachments
Last edited:
I am not familiar with Garrard Zero so I searched online. At first glance, there are two fundamental differences as I can see. Correct me if I am wrong because I have no experience with Garrard Zero.
1. My belief is that NEVER mess around the head shell. Garrard Zero's head shell is a part of guiding mechanism. It is a no no for me.
2. My short arm is independent. It is not a part of guiding mechanism. The arm and guiding mechanism are separated components. Garrard Zero's arm is integrated with guiding mechanism.
I am also not sure if Garrard Zero has same geometry as my 6C. Further study may be needed.
I have no plan to actually make C6 arm for now. I have to see how the 6B arm performs to build my confidence about tangential pivot arms.
Last edited:
ground zero
I'm surprised that you never heard of the Garrard Zero 100. My entire thread, "Angling for 90°", which you long participated antagonistically, was essentially spawned by the Garrard Zero because it is the granddaddy of them all as it was the first or one of the first commercial products and certainly the most well known to use multiple pivots/linkages to achieve tangency. Although I became aware of it due to the appearance of the original Thales brand tonearm about dozen years ago. I do understand most people are not as historically minded or obsessive like I do when it comes to the history of tonearm designs. By the way, I did own a Garrard Zero before but it was too flimsy to be usable. Clever design, poorly built. I gutted it out as a display piece so I did enjoy observing its operation and mechanisms.
Geometrically, the Garrard Zero is the same concept as the 6B. As I said before, if one is to keep shortening the headshell eventually it will become a dot right underneath the pivot point, which is what the Garrard Zero is. The advantage, like Jim said, of the 6B or 6C is in the execution and the headshell or vertical arm is independent from the horizontal arm and guiding mechanism, which has no counterweight to deal with. Arch Stanton is not wrong to suggest it is essentially a Garrard Zero geometrically. But there are many ways to skin a cat, as the saying goes! Notice Garrard Zero has an antiskating device built in which obviates the existence of skating force, a subject will be verified once the 6B is completed.
There's really no need to shorten 6B's headshell anymore and its tangential error is no longer an issue compare to typical parallel trackers. One is curious to see how the 6B will work and sound compare to a parallel tracker in terms of friction, resonance, noise, mechanical grounding, and dealing with skating force like cantilever deflection, etc., etc... Time will tell.
I am not familiar with Garrard Zero so I searched online.
I'm surprised that you never heard of the Garrard Zero 100. My entire thread, "Angling for 90°", which you long participated antagonistically, was essentially spawned by the Garrard Zero because it is the granddaddy of them all as it was the first or one of the first commercial products and certainly the most well known to use multiple pivots/linkages to achieve tangency. Although I became aware of it due to the appearance of the original Thales brand tonearm about dozen years ago. I do understand most people are not as historically minded or obsessive like I do when it comes to the history of tonearm designs. By the way, I did own a Garrard Zero before but it was too flimsy to be usable. Clever design, poorly built. I gutted it out as a display piece so I did enjoy observing its operation and mechanisms.
Geometrically, the Garrard Zero is the same concept as the 6B. As I said before, if one is to keep shortening the headshell eventually it will become a dot right underneath the pivot point, which is what the Garrard Zero is. The advantage, like Jim said, of the 6B or 6C is in the execution and the headshell or vertical arm is independent from the horizontal arm and guiding mechanism, which has no counterweight to deal with. Arch Stanton is not wrong to suggest it is essentially a Garrard Zero geometrically. But there are many ways to skin a cat, as the saying goes! Notice Garrard Zero has an antiskating device built in which obviates the existence of skating force, a subject will be verified once the 6B is completed.
There's really no need to shorten 6B's headshell anymore and its tangential error is no longer an issue compare to typical parallel trackers. One is curious to see how the 6B will work and sound compare to a parallel tracker in terms of friction, resonance, noise, mechanical grounding, and dealing with skating force like cantilever deflection, etc., etc... Time will tell.
DD,
In fact, all the vintage audio equipments turn me off with one exception. At one point, I almost acquired a Studer 810.
I do have reservations about PT arms. First, its design starts on an illogic base. If we want to get from point a to point b, we will walk in a straight line. It doesn't make sense to walk in curve. A PT arm is just like walking in curve. However, due to lack of efficient bearings of linear arms, a pivot bearing is still the golden standard of all mechanical bearings except air bearings. I have owned a Graham 2.2 for more than ten years, but I was never satisfied with the tonearm. So, a PT arm can be a middle ground of regular pivot arms and linear arms. A PT arm has no tracking errors and much less skating if I am correct. Adjusting anti-skating is a joke on a regular pivot arm. A PT arm still employs a set of pivot bearings.
When I built my first linear arm years ago, I immediately realized the potential of linear arms. Therefore, I started to try different versions of linear arms and pushed it upward until air bearing linear arm. I hope the 6B will give me same kind of experience. So, it will give me the reason to build 6C.
Jim
- Home
- Source & Line
- Analogue Source
- Building a Tuthill/Reed 5A Tangential Tracking Pivot Tonearm