Only if I can find a 12" wand for my Graham.
I will, most likely, build it big enough for a 10" Jelco, that will require not too much more room than the Graham with standard wand. I want to keep it (the plinth) as small as possible.
I will, most likely, build it big enough for a 10" Jelco, that will require not too much more room than the Graham with standard wand. I want to keep it (the plinth) as small as possible.
Thanks Poli
Hi, Just caught your reply, thanks for the confirmation, i am ordering the DL 103 this week (from E bay).... so its good to get affirmation that the bits you throw together work😛..what amplification do you use poli? (i will be using Mesmerize pre and a F5 )
regards
Johnny
Hi, Just caught your reply, thanks for the confirmation, i am ordering the DL 103 this week (from E bay).... so its good to get affirmation that the bits you throw together work😛..what amplification do you use poli? (i will be using Mesmerize pre and a F5 )
regards
Johnny
Hi Johnny,
yeah, the DL103 is excellent! Well spent money 🙂
So far I am using a Metaxas Ikarus 2 integrated amp with the Pearl 2, but I am thinking of building a Pre/Power Amp combination. Maybe F4/F5 based but need some thoughts about the Preamp. Maybe Hiraga LeMonstre, but have not decided yet...
Cheers
Michael
The F4 has a very specific preamp requirement... As the power amp is a follower stage, with no voltage gain, all the gain must be in the preamp.
That said, the F4 is a completely fantastic amplifier and well worth addressing it's requirement with a preamp made for it, such as Zen Mod's "Pumpkin" or Stuart Yaniger's "ImPasse".
If you would like a F4 with gain, that's known as the BA-3. 🙂
That said, the F4 is a completely fantastic amplifier and well worth addressing it's requirement with a preamp made for it, such as Zen Mod's "Pumpkin" or Stuart Yaniger's "ImPasse".
If you would like a F4 with gain, that's known as the BA-3. 🙂
Hi 6L6,
thanks mate! I will make up my mind, read the forum posts and then decide...
Probably will ask you some more questions about it...
Thanks for the excellent building tutorials!
If it will be something around the Toshiba JFETs 2SK170/2SJ74, I presume, the only reliable source for the original Toshibas is Spencer at FET Audio | Hi-End Audio Projects, right?
Cheers
Poli
Board died...
One of the boards on a Pearl 2 I just built for a friend quit. The LED is out and P1 is showing -3v. Any ideas what happened? Power into the board is fine.
One of the boards on a Pearl 2 I just built for a friend quit. The LED is out and P1 is showing -3v. Any ideas what happened? Power into the board is fine.
U2 is putting put only a few volts. U1 is showing 24v.
Edit - I powered it back up and it lit up, but put it back into the system and it's dead again.
Edit - I powered it back up and it lit up, but put it back into the system and it's dead again.
Last edited:
What about the unregulated supply?
The supply coming in is fine. I think it's the reg.
Starting Pearl 2, PSU questions
I was so happy with my B1 that I decided to sell my tube line stage; then I thought I'd put my tube phono preamp on Audiogon and see what happened and it sold immediately. So now I "have to" build a Pearl 2. Power supplies scare me a little so I thought I'd start there.
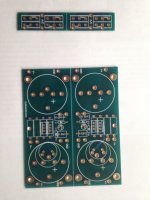
I have a Peter Daniels psu board I'd like to use, like in the photo.
I intend to use this toroid: 50VA Power Transformer
These rectifiers: MUR860G ON Semiconductor | MUR860GOS-ND | DigiKey
And in the spirit of diy overkill, four of these caps: Mundorf MLytic AG MLGO 10000uF 40VDC, Sonic Craft
So, my question is what else do I need to populate the board? What value resistors, and do I use the spots for small components, like C1-4 or R1-4 or are these for other applications? What's a good connector for the power umbilical?
Thanks in advance!
I was so happy with my B1 that I decided to sell my tube line stage; then I thought I'd put my tube phono preamp on Audiogon and see what happened and it sold immediately. So now I "have to" build a Pearl 2. Power supplies scare me a little so I thought I'd start there.
I have a Peter Daniels psu board I'd like to use, like in the photo.
I intend to use this toroid: 50VA Power Transformer
These rectifiers: MUR860G ON Semiconductor | MUR860GOS-ND | DigiKey
And in the spirit of diy overkill, four of these caps: Mundorf MLytic AG MLGO 10000uF 40VDC, Sonic Craft
So, my question is what else do I need to populate the board? What value resistors, and do I use the spots for small components, like C1-4 or R1-4 or are these for other applications? What's a good connector for the power umbilical?
Thanks in advance!
Attachments
The parts you have will work great! Save the m-lytics for the pearl boards, not the raw supply.
The other pads on the PSU are for regulators. Leave them alone. Use 4.7-10 ohm for the filter resistor.
Make sure you buy extra zvp3310, everybody, no exaggeration, blows (at least) one during assembly.
Pm me with your email and I'll be happy to discuss the project.
The other pads on the PSU are for regulators. Leave them alone. Use 4.7-10 ohm for the filter resistor.
Make sure you buy extra zvp3310, everybody, no exaggeration, blows (at least) one during assembly.
Pm me with your email and I'll be happy to discuss the project.
C8 substitutes
I know I'm getting ahead of myself here, but I'm filling out my Mouser order and they don't carry the Murata 3-11pF variable cap. Closest sub is 2-7. Is that adequate? Or is there a fixed value with some consensus behind it?
I know I'm getting ahead of myself here, but I'm filling out my Mouser order and they don't carry the Murata 3-11pF variable cap. Closest sub is 2-7. Is that adequate? Or is there a fixed value with some consensus behind it?
R20
I assume the user picks a value to match their cartridge. Mine is 47K, so the appropriate resistor would be?
I assume the user picks a value to match their cartridge. Mine is 47K, so the appropriate resistor would be?
47k is fine for MM cartridges (and high-output MC). For MC it depends a bit on the cartridge. Many do fine with 100 Ohm, some sound better with a bit more (200-1000Ohm). Rule of thumb is at least 10x the internal resistance of the cartridge.
R20 is a place to add a resistor (of your choosing) to change the cartridge loading if your cartridge requires something different than 47K.
R20 is in parallel with R19 -- And R19 is a 47K, as one would use for MM.
So, for MM, leave R20 empty.
R20 is in parallel with R19 -- And R19 is a 47K, as one would use for MM.
So, for MM, leave R20 empty.
Hello,
It's been a while since I stopped working on this project because of different things and would like to finish it.
I had been getting help by Jim (not sure what his nick is on here). Any who he advised me to build the chipamp.com PSU. I finished it but never got around testing it. Any my question is, concerning the bridge rectifier. I see that it's used in the main post and was not sure if I needed to use one or does the chipamp PSU come with one.
-Thanks,
Fabricio
I'm still here!
If you can post a photo of what you have built, that will be helpful.
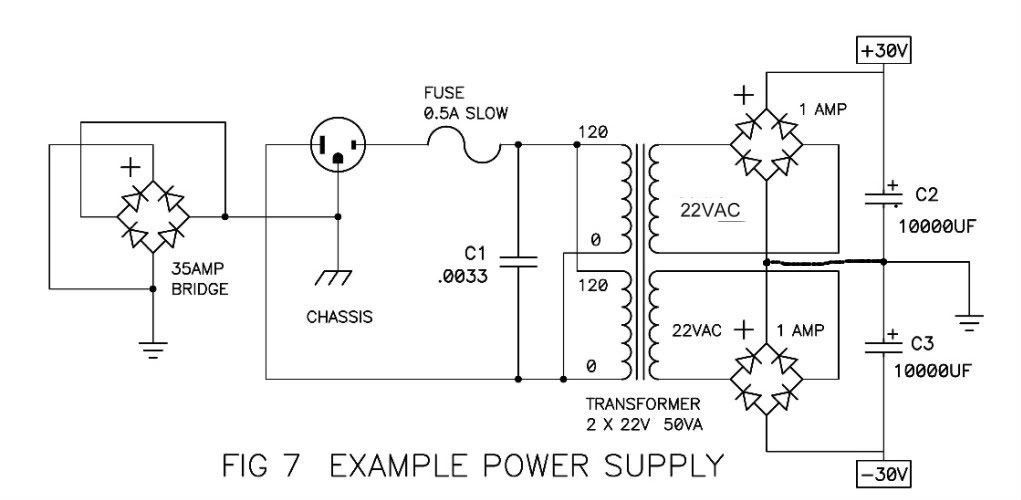
Remember there are bridges used for rectification of the 22V AC into DC, those are the diodes attached to the PCB, and there is a bridge used as an isolation between PSU gnd and AC mains earth at the chassis. (sometimes called a "ground breaker")
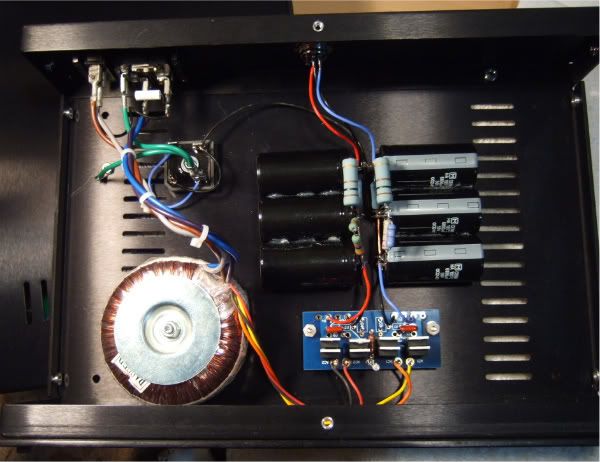
In this photo the blue PCB holds the rectification diodes.
The ground breaker is the black square with the green wires.
In the PSU schematic, the ground breaker diodes bridge is the one drawn at the left.
-Jim
If you can post a photo of what you have built, that will be helpful.
Remember there are bridges used for rectification of the 22V AC into DC, those are the diodes attached to the PCB, and there is a bridge used as an isolation between PSU gnd and AC mains earth at the chassis. (sometimes called a "ground breaker")
In this photo the blue PCB holds the rectification diodes.
The ground breaker is the black square with the green wires.
In the PSU schematic, the ground breaker diodes bridge is the one drawn at the left.
-Jim
- Home
- Amplifiers
- Pass Labs
- Building a Pearl 2