Whatever Crew is Jesus having Birthday Party with, I'm in
Same applies for Resurrection Party
Buddha is everywhere

Same applies for Resurrection Party
Buddha is everywhere

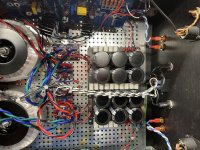
Extra-carefully made set of files, for each of 3 amp iterations
First batch of pcbs, zener above and bellow LT3092
read Note (on schematic) for what I'm finding important in momentary state of mind
First batch of pcbs, zener above and bellow LT3092
read Note (on schematic) for what I'm finding important in momentary state of mind
Attachments
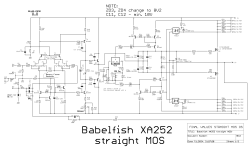
Previously recommended 47R flying resistor on SIT gate HAS to now change to 100R??
Also, should we change R** and R*** to new values?
Also, should we change R** and R*** to new values?
these are not significant differences
47R or 100R as gate resistor - whatever
R** - as long there is 120K-ish in that position (one or two in parallel), you're good
47R or 100R as gate resistor - whatever
R** - as long there is 120K-ish in that position (one or two in parallel), you're good
Okay, thanks. Thought so. Was kind of hoping you’d say something different as now I’m running out of excuses for keeping these from their owner. Think I’ll listen to them for another week….and Blame ZM!!!!
The
Thanks,
Russellc
I kind of wanted to avoid the two power cord thing this time if possible. Silly me, I thought the IEC socket that came with the finish parts kit for precut Deluxe 5U chassis, having two fuses, did put one in each leg. I have been told by others that it just holds a spare fuse! So I guess installing some extra fuse holders will need to happen, and I have plenty on hand. So, besides regular fuse in IEC, put one in each of legs of both transformers like in the fire up instructions?when going dual mono (in one case, logically) - IEC and mains switch are common, then everything else is separate, especially important to mention separate mains fuse(s) for each Donut
"s" in parentheses at fuse(s):
if regs in your neck of wood are calling for one fuse per circuit, go with that
if regs in your neck of wood are calling for fuse per leg ( so fuse in phase and fuse in Neutral) go with that
of course, no one prevents you of going overkill, installing separate IEC and switch for each channel
Thanks,
Russellc
If you are talking about this back panel kit with the Schurter fuse holder, I believe it has one fuse for the LINE and one fuse for the NEUTRAL. The fuse in the NEUTRAL is just an additional safety measure. You can verify of course with a multimeter by pulling out the fuse in the NEUTRAL and seeing if continuity is lost.Silly me, I thought the IEC socket that came with the finish parts kit for precut Deluxe 5U chassis, having two fuses, did put one in each leg. I have been told by others that it just holds a spare fuse!
Best,
Anand.
Yes, that is the panel kit I used, and the same piece. I guess I was right about both fuses being used. Good to know.
As usual, I want to see power supply running proper before proceeding! Then signal wiring and fireup.
I think I can make out the connections....IEC has "doubled up" connections from two cl-60 boards. Fuse is one wire from line side, other to ground pin, same for other neutral side. Now to back downsteam to the CL-60 board and figure them out. I will post what I have wired before throwing any switches.IEC fuse. Then feed a "line" wire to a 2nd fuse holder per donut. Then off to soft start / CL60 per donut, then to donut. So you can pull a fuse at a time and work on one channel at a time. Here's an example:
As usual, I want to see power supply running proper before proceeding! Then signal wiring and fireup.
Russell,
Here's my PSU wiring concept. The amp in the pic adds a front panel switch - that's not shown in this concept drawing.
You're 100% right in testing the PSU before attaching the amp channels!

Here's my PSU wiring concept. The amp in the pic adds a front panel switch - that's not shown in this concept drawing.
You're 100% right in testing the PSU before attaching the amp channels!
Thanks for the analysis work and updated schematics Mighty ZM!
I swapped in 8V2 Zeners. The caps were already OK. Resistors, blown LED, and blown semis were previously swapped. I will cook it overnight, then fine tune bias and offset. Then I’ll put a dummy load on and take it up to clipping.
Finally I will begin a 2 month test before shipping back to SoCal. 😆
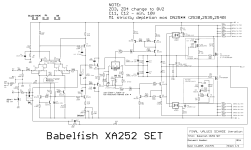
My SET is well behaved. So I will adhere to the wise philosophy of “ain’t broke, don’t fix it.”
I swapped in 8V2 Zeners. The caps were already OK. Resistors, blown LED, and blown semis were previously swapped. I will cook it overnight, then fine tune bias and offset. Then I’ll put a dummy load on and take it up to clipping.
Finally I will begin a 2 month test before shipping back to SoCal. 😆
My SET is well behaved. So I will adhere to the wise philosophy of “ain’t broke, don’t fix it.”
Last edited:
Would you also recommend changing ZD2 and ZD3 for the latest PCBs (with BS170 and R66, R67) pure MOSFET version? At the moment I have 5V6 Zeners from the kit and my amp is still under construction...First batch of pcbs, zener above and bellow LT3092
Would you also recommend changing ZD2 and ZD3 for the latest PCBs
nothing really critical except in (as for now) rare cases with SIT arrangement
feel free to change them, 8V2 or 9V1, whatever you have in drawer
Update.
The overnight cooking of the XA252 SIT with 8V2 Zener is now complete.
Bias is just under 1.7A. Check.
Offsets were 11mV and 2mV. I adjusted the 11mV down a little. Check.
I hooked up my scope, a big dummy load resistor, 2 DMM's to watch input and output Vac, and then a signal generator. My goal was to slowly ramp up to clipping. I stepped up input 0V1 at a time. I got it up to somewhere between 35-40W and the protection kicked in. I never saw clipping. No smoke. Turn off the amp to rest a few moments, turn it back on. Repeat. Same. Switch channels. Same tests, same results. It appears the XA252 updated with the 8V2 zeners is working as designed - fantastic!
The amp is now playing tunes and singing beautifully on my bench. Later today I'll put it on my Tannoys and let it rip on Umlaut Metal and David Hasselhoff. And I'll play some records through the Pearl 3, of course.
It looks like the 8V2 keeps the smoke in the SIT amp quite nicely! Thank you again MZM!!!
What about a 1N4739 which is a 9.1v Zener? I am sure that is a part that is floating around in a lot of drawers. Cheap and you see it in a lot of Pass designs.
What about a 1N4739 which is a 9.1v Zener? I am sure that is a part that is floating around in a lot of drawers. Cheap and you see it in a lot of Pass designs.
.........
feel free to change them, 8V2 or 9V1, whatever you have in drawer
It appears the XA252 updated with the 8V2 zeners is working as designed - fantastic!
hiphiphooray!
thinking to make next batch of pcbs with revised arrangement of protection zeners, specifically connected G-S for each individual part
which involves just one more position (for M1) but then complicating things further - one polarity needed for IRF as M1, opposite polarity for DN as M1, one polarity for Schaded Puck and opposite polarity for SIT in same place ......
beauty of being ZM, trying to resolve Gremlins later
^^ which reminds me ....... this one still empty, present idea being to put my own XA252 in
200C, as perfect to show 200dA
https://www.zenmod.in.rs/babelfish-most-probably-j2-b17-edition-case-for-future-amp/
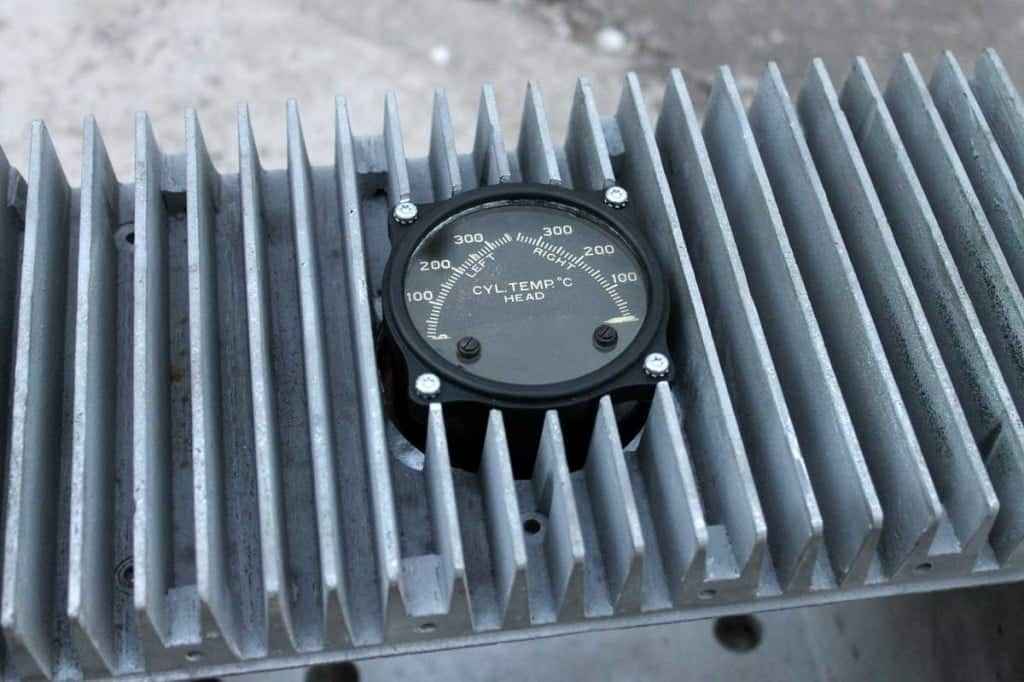
200C, as perfect to show 200dA
https://www.zenmod.in.rs/babelfish-most-probably-j2-b17-edition-case-for-future-amp/
- Home
- Amplifiers
- Pass Labs
- Babelfish XA252 / Babelfish XA252 SIT / Babelfish XA252 SET