I need some guidance on the choose wisely part, I honestly don’t know.common fuse - toss in whatever you can squeeze - concrete power pole, 1m rebar stick, 10cm nail , or 10A fuse
or - if you can wire it at back to omit fuse (some are made as that) , omit fuse
then choose wisely proper values of channel fuses and that's it
Attachments
Donut VA/Mains Voltage = Fuse A
choose closest standard value
if you got often popped fuse during power On, means Soft Start ( whatever it is, I'm using CL60 as Pa) is not soft enough
in that case, increase fuse value to first next standard value
for mains, use Slow Blow, often marked ( in Europe) as "T" , most likely from German Trage (Umlaut at a, can't type that)
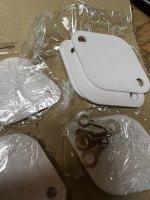

Another silly question, I forgot I bought these ceramic pads. I still use thermal paste with ceramic pads right? Please excuse my ignorance.
yes, goop is essential with Alumina Oxide pads
no need for excuse, ignorance is vanishing thing when you're working on it

though, well known - only ZM's ignorance is equal to Universum Entropy Level ...... just another thing in which I'm wallowing happy as Piglet

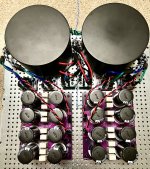
Looking good! 🙂Thanks! Making some progress View attachment 1088675
To be sure, did you end up applying thermal paste to both sides of the pad?
Thanks! Yes to the bottom of the pad, and the bottom of the thf51sLooking good! 🙂
To be sure, did you end up applying thermal paste to both sides of the pad?
Getting started with the M25 Rev.2 🙂 And much inspiration in this thread 
I still would make an external psu, that's why I would like to know, does the psu itself (with 400va donut) generate so much heat that there must be ventilation openings on its chassis? Further, do I need thermal paste when using purple Keratherm 86/82?
Many thanks.
I still would make an external psu, that's why I would like to know, does the psu itself (with 400va donut) generate so much heat that there must be ventilation openings on its chassis? Further, do I need thermal paste when using purple Keratherm 86/82?
Many thanks.
you need some ventilation for PSU
practically - if you mount top and bottom cover with 3-5mm spacers (washer at each screw in between case and cover plate) , resulting in circumference slit for each, you'll have enough air
losses in Donut, dissipation of bridges ......
Keratherm, no goop, torque-meter (0.9Nm) very handy, to control squish
I recently became more concerned with “controlling the squish” when I was swapping out transistors in my BJ2.
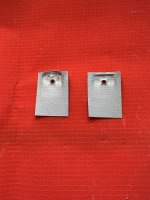
I noticed the Keratherm was distorting and when the IRFP150 were pulled out there was an obvious uneven thinning of the Keratherm to the point where it tore apart in the high pressure area surrounding the mounting screw when I removed it from the heatsink.
I’ve seen others using coins to distribute pressure on transistors. I had stacked a secondary washer of larger diameter to try and help with that. I thought its smooth surface might be better than a coin. However, it doesn’t really seem to help much if you consider what the used pads look like.
I have been using philips head screws to mount with and really just torquing them “Goodentite” thinking that with that type of screw it would be difficult to get enough grip to over tighten them.
I did purchase some M3 socket cap screws to try mounting transistors with. I’m thinking its time to get a proper tool to torque them.
Anyone have recommendations for an affordable well calibrated torque driver for this application?
Attachments

Wera, Wiha, Tohnichi ........
just searched, one of many pages https://www.kctool.com/torque-screwdrivers/
0.9Nm for M3, 1.2Nm for M4 and you did cover all possible transistor cases
screws - if you can't get normal steel ones in declared quality, use stainless ones
edit: Keratherm , if torqued to 0.9Nm, using big washer, ignore uneven/angled squish - it's normal
I've been looking around, its hard to find them at very low torque values.lower range than needed for bikes
Since I'm cheap, and will hardly use this, thinking about trying to kludge something together with a wrench and a spring or luggage scale. Need to see if my luggage scale will work that low.
I have one of these. The '0.2-1.2(N.m)' version.
https://www.aliexpress.com/item/225...Spots_6000687811086.0&gatewayAdapt=4itemAdapt
I don't have another one to compare it to, and I don't know how accurate its calibration is.
However, I bought it without hesitation because I have some Shahe calipers that are excellent and very accurate, at least for my needs as a DIYer.
But I am happy with this torque screwdriver and for the asking price I think it is a bargain.
Maybe a longshot, but wondering if anyone has a drill template for drilling out the heatsinks? To locate the 4 holes to mount the board to the heatsink
I'm ready to make holes, and was going to use the PWBs to mark the hole locations, but thought it would be better if I had a template to use instead.
Thanks
Randy
I'm ready to make holes, and was going to use the PWBs to mark the hole locations, but thought it would be better if I had a template to use instead.
Thanks
Randy
- Home
- Amplifiers
- Pass Labs
- Babelfish M25, SissySIT - general building tips and tricks