
Just glued it up and a 24 hour dry time for the silicone to dry and then tuning the panel.
I ran a stretched fishing line underneath down the center of the magnets to keep the panel sag to a minimum while it drys
This equalizes it somewhat before you stretch it horizontally to keep it consistently straight.
Last edited:
RedAlert, that is correct with regard to tension. I just don't see a way of corrugating it correctly without removing the vertical bars. Was your pair on Ebay in Cyprus a few years ago?
Well done Avwerk. I will try to copy your good work but I doubt I will reach your level of quality. 1/2" Scalloped aluminium rods on the way from DRP Performance Products. Thanks for the tip.
Last edited:
RedAlert, that is correct with regard to tension. I just don't see a way of corrugating it correctly without removing the vertical bars. Was your pair on Ebay in Cyprus a few years ago?
Yep, its the same pair. Let me explain a little more. If I only could figure out how to add photos in here (directly from my pc), it would be much easier. The damaged area is about 10-15cm high area from the bottom bar. And it's only 20cm wide in vertically on the middle of the membrane, so in both sides corrugation is ok. If I take off the upper bottom bar, perhaps using the tiny gap between the under bar and the membrane I could foist in a tool of some kind to fix the corrugation. Thinking for instance special modified wide pincers made just for this job. Maybe it's a very difficult task or even impossible, but we'll see...
Last edited:
View attachment 811064
Just glued it up and a 24 hour dry time for the silicone to dry and then tuning the panel.
I ran a stretched fishing line underneath down the center of the magnets to keep the panel sag to a minimum while it drys
This equalizes it somewhat before you stretch it horizontally to keep it consistently straight.
BREATHTAKING!
 I've also a Duetta pair, and ones bass membrane is destroyed (speaker fall and hit a chair). I bought those very cheap, one speaker is ok. I've years planned to make the new bass membrane myself, but been too lazy I guess. Now when I saw your work, I got new drive. Very good job indeed! Any possibility to get any hints…?
If you go back to post #76 where I started, I detailed everything done to get to this stage and it’s not exactly an easy affair.
Regards
David
Regards
David
If I only could figure out how to add photos in here (directly from my pc), it would be much easier.
You need to have them uploaded somewhere, Dropbox, Google Drive, OneDrive, iCloud etc. You link to the pictures.
Lets see how this succeed...or not!
DivaDint.
DivaDint2
This is the pair I have, the right one is with the dint, left one is perfect.
DivaDint.
DivaDint2
This is the pair I have, the right one is with the dint, left one is perfect.
Last edited:
AVWERK, Is this the same dimension of corrugation rod that you are using. I have now got mine and they are like this: 1/2" Scalloped Aluminum Tube - DRP Performance Products Store . They are 1.250 " Outer Diameter. From looking at the pictures yours looks like having a smaller Outer Diameter
The one I ordered said 3/8” BUT at the bottom of each header description they give the OD which on mine was .557”
I see how you got confused as I almost made the same mistake
Regards
David
I see how you got confused as I almost made the same mistake
Regards
David
Hi Dave, What were the spline count on yours? I wonder if I can find them here in Canada, shipping be expensive due to lenght
Al
Al
There are 9 points regardless of OD.
I asked this question before ordering and the reason for getting the smallest rods
For Dacen on bass panels the bigger OD. might be good enough although not certain of the depth.
Since the bigger OD. spreads out the peaks per inch , I think you will not notice any difference on bass frequency’s. I would still go ahead and use them
The bigger rods will make for easier bearing choices and are more robust due to the bigger
diameters. They might be more accurate and consistent overall.
I am researching an even better way to corrugation and will let everyone know if it works out
Regards
David
OK. I have to do a test run and see how it works out. If not, I will just order the dimension you have. Looks like you are spot on with respect to the original Apogees.
Thanks.
Thanks.
Dave, The rods I was looking at were 3/8" and had an OD of .650, I believe they were heavy duty, HD stands for. now if one went to the 1 1/4" OD with the same 9 spline, the corrugation would be a lot longer spacing far from stock, what clearance did you allow on depth of spline .010 as you would have about .003 to.004 for ribbon thickness. Thanks Al
Also , are you still using the silicone backed kapton?
Also , are you still using the silicone backed kapton?
Last edited:
Al, that HD version was’t available when I purchased mine and it apparently is the same ID
Just thicker wall material to get to 650” OD
Yes using the same siliconed adhesive Kapton
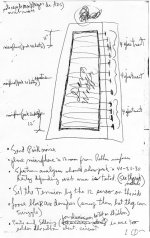
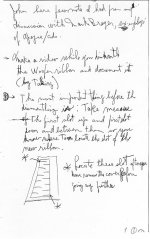
What ever outside diameter you use, you should make test pieces say 2 foot long with your cut traces to get a feel of the shrinkage so you will have a ballpark idea of how to stretch to reach centering of the magnet rows and how to determine cutting dimensions of your traces.
This is another difficult area to manipulate , the vertical spacing requirement ..,
Test pieces are important because you get a better feel and then just scale everything up.
The (ultimate ) way to perfect alignment would be to make your panels first, stretch vertically on a table and adjust the magnets to these dimensions
Regards
David
Just thicker wall material to get to 650” OD
Yes using the same siliconed adhesive Kapton
What ever outside diameter you use, you should make test pieces say 2 foot long with your cut traces to get a feel of the shrinkage so you will have a ballpark idea of how to stretch to reach centering of the magnet rows and how to determine cutting dimensions of your traces.
This is another difficult area to manipulate , the vertical spacing requirement ..,
Test pieces are important because you get a better feel and then just scale everything up.
The (ultimate ) way to perfect alignment would be to make your panels first, stretch vertically on a table and adjust the magnets to these dimensions
Regards
David
Al, the depth of the rods was made to touch each other to work harden as much as possible
the aluminum foil.
These have some slop on the sides, so pressing them together on the peaks was important.
Regards
David
the aluminum foil.
These have some slop on the sides, so pressing them together on the peaks was important.
Regards
David
If one has the old foil available, you should be able to use it as a guide, just flatten it on the big table to get rid of corrugations and measure all essential dimensions, like total height and space between cuts. Or are those measurements already somewhere to get (Graz has those, but I doubt he would tell😉)? I have Duetta, which needs a new bass, and now I'm seriously thinking to do it myself. Old foil is in pieces, but maybe I can get measurements from it, difficult but could be possible. I have Kapton without adhesive, any suggestions what adhesive to use or should I purchase Kapton with siliconed adhesive. When I'm at point to really starting the procedure, may I ask advices from you who have the essential knowledge. If I have understood it right, first you need a glass plate big enough, and foil would be attached to it using somekind of soaplotion. Then you let it dry long enough, then use template of somekind to handcut the foil. But what kind of knife? When the cuts are finished after several days I assume, the you gentle sand the foil, wipe it clean and paste Kapton over the foil. When all has dried you just use water? to release the finished foil as one piece from glass plate. I only need those main principles, when making those test foils you learn the specifics. I really appreciate all of you who are willing to share information about this matter. Thanks in advance.
Regards
-Anssi-
Regards
-Anssi-
Last edited:
- Home
- Loudspeakers
- Planars & Exotics
- Anyone making Apogee bass panels?