Which driver is currently the "obvious choice no.1"? I was first planning to use BMS 5530ND but I'd like to have lower crossover point.
Would DCX464 outperform normal drivers if cost and complexity were not an issue?
BMS 5530ND can be used 600 - 20k:
I've printed, sanded, assembled and tested the 5530ND and here are the spectacular results (as expected 😀):

No smoothing, 6 ms window. With no windowing and 1/6th octave smoothing:

Distortion on axis with 2nd order BW HP at 600 Hz and EQd flat:

Impulse response on axis looks like this:

Probably the best device I've measured. Great work Marcel and everyone else involved!
No smoothing, 6 ms window. With no windowing and 1/6th octave smoothing:
Distortion on axis with 2nd order BW HP at 600 Hz and EQd flat:
Impulse response on axis looks like this:
Probably the best device I've measured. Great work Marcel and everyone else involved!

Celestion CDX1-1720 seems overlooked, but it's a great driver. As for 1" drivers, one of the best for home audio, IMO.
I have no direct experience with DCX464, can't comment on that.
So, there's no obvious choice 🙂
@mabat Would you still like to play with (and maybe try to optimize throat adapter for) the DCX464?
I could order one/pair from TLHP directly to you. And when you are done you'd ship them to me. I'll happily pay for the postage 🙂
I could order one/pair from TLHP directly to you. And when you are done you'd ship them to me. I'll happily pay for the postage 🙂
My suggestion is to make the petals as lightweight as possible, and also use a larger nozzle than the standard 0.4 mm, if possible.
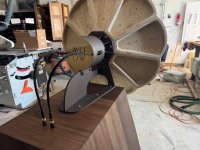
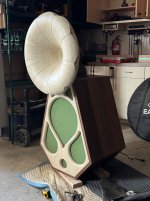
Here's how I printed my PLA prototype of the A520G2:
0.6 mm nozzle
0.24 mm layer
1 perimeter
3% gyroid infill (higher infill near the root the petal)

I really wanted to make this as fast as possible but the acoustic results are not any worse than some my other, much heavier prints (if not better).
This way the whole 520G2 body weights only ~970 g, including a basic coating.
Now I would probably do two perimeters (otherwise the PLA object gets very sensitive to heat - it just needs to be reinforced/coated before exposed to heavy sunlight). You can easily make the base and the throat parts more heavy.
Here's how I printed my PLA prototype of the A520G2:
0.6 mm nozzle
0.24 mm layer
1 perimeter
3% gyroid infill (higher infill near the root the petal)
I really wanted to make this as fast as possible but the acoustic results are not any worse than some my other, much heavier prints (if not better).
This way the whole 520G2 body weights only ~970 g, including a basic coating.
Now I would probably do two perimeters (otherwise the PLA object gets very sensitive to heat - it just needs to be reinforced/coated before exposed to heavy sunlight). You can easily make the base and the throat parts more heavy.
Last edited:
would love to see distortion measurements, for comparabilities sake maybe on the 520 as with onni's.Celestion CDX1-1720 seems overlooked, but it's a great driver. As for 1" drivers, one of the best for home audio, IMO.
Bit of a hectic week, but here's what I measured. I assume the dip at 4.5kHz is a reflection from the top of the baffle (1/2 λ = 38mm), but since these are getting crossed at 7kHz, its largely out of band, and might be able to get EQ'd regardless.Really nice! 🤩 Do you have any measurements?
BTW, below is a DFM-2535 from the new batch (the Group Buy). Maybe a QC issue, I will check more of them later -
View attachment 1435487
(I accidentally deleted data for the old one, so I don't have a direct comparison. This is for a bit higher input voltage than the previous picture.)
I received my pair of DFM-2535's yesterday. Today I checked the FR (via REW) and impedance (via S&L Woofer Tester 2) The results are as above. The first driver tested is the reddish trace in each figure. The drivers are mounted to the baby ATH ST260 horns (I've been waiting for the drivers and final design changes to the dedicated horns before purchasing and printing bigger ones). I assume this accounts for the fast roll-off below 2k.
The drivers differ significantly. There is quite a dip in the 1kHz region in one driver that correlates with the second impedance peak in that driver. In both drivers the dip in the 3k region seems more pronounced than in mabat's sample, and the HF rolloff is steeper (-10dB from 2k to 10k, vs -6.5dB in mabat's test). I have not opened up either driver, but did confirm that the screws are all tight. QC issues indeed?
Bill
That said, it took only one peak cut filter, a big HF boost shelf filter, and a 2nd order BW high pass in the miniDSP to give this result with the first (worse) driver. Target was LR4 @ 1500:

Distortion seems well in control:

I can't exactly call this defective performance, can I?
Bill
Distortion seems well in control:
I can't exactly call this defective performance, can I?
Bill
Last edited:
Just for fun I tried my hand at a passive filter in XSim. I didn't try to correct all of the HF rolloff, but otherwise it looks pretty flat to me. My hearing is dead above 10k anyway!
Not actually built, of course, just a first swipe at it, and no attempt at using real-world components. Ignore the second driver in the xover.


Bill
Not actually built, of course, just a first swipe at it, and no attempt at using real-world components. Ignore the second driver in the xover.
Bill
It does at 80db, take a look again at 95-100db, it may look different.Distortion seems well in control:

I would consider the yellow one OK, the red one rubbing.I received my pair of DFM-2535's yesterday. Today I checked the FR (via REW) and impedance (via S&L Woofer Tester 2) The results are as above. The first driver tested is the reddish trace in each figure.
This is disappointing. I am currently very busy, but if someone thinks about contacting the distributor and/or Tymphany about this, let me know. I will try to assist.
Edit: the saddle in the impedance curve also appears in the manufacturer plot: https://www.diyaudio.com/community/...he-easy-way-ath4.338806/page-874#post-7958415
Edit: the saddle in the impedance curve also appears in the manufacturer plot: https://www.diyaudio.com/community/...he-easy-way-ath4.338806/page-874#post-7958415
Last edited:
That's a different effect, most probably an interaction of the driver with the horn used.Edit: the saddle in the impedance curve also appears in the manufacturer plot: https://www.diyaudio.com/community/...he-easy-way-ath4.338806/page-874#post-7958415
How long was the printtime for one petal with your settings?My suggestion is to make the petals as lightweight as possible, and also use a larger nozzle than the standard 0.4 mm, if possible.
Here's how I printed my PLA prototype of the A520G2:
0.6 mm nozzle
0.24 mm layer
1 perimeter
3% gyroid infill (higher infill near the root the petal)
View attachment 1437698
I really wanted to make this as fast as possible but the acoustic results are not any worse than some my other, much heavier prints (if not better).
This way the whole 520G2 body weights only ~970 g, including a basic coating.
Now I would probably do two perimeters (otherwise the PLA object gets very sensitive to heat - it just needs to be reinforced/coated before exposed to heavy sunlight). You can easily make the base and the throat parts more heavy.
Amazing work 🙂
Hoe did you attach the housing to the CD/throat, is that some kind of snap-in system?

Hoe did you attach the housing to the CD/throat, is that some kind of snap-in system?
I basically replaced the rear cover of the CD with a 3d printed extended chamber that was inspired by something Joseph Crowe had done; I then modified it so that it would bolt through (with a long allen wrench) right to the CD, and created some channels to get the wires through, as well as a support to mount it to the bracket below. The actual wires just attach as normal to the CD with a spring loaded wire connection.
- Home
- Loudspeakers
- Multi-Way
- Acoustic Horn Design – The Easy Way (Ath4)