i contacted bliesma and they were so kind to sent me a dfx file for the t25bAre the T25B and T25A profiles in the screenshots are accurate ?
I would like to use it like a basis in Fusion.
Beacause I don't konw ATH, how to read the contours numbers?
Thanks,
Thomas

But I have to admit that I don’t quite understand what the values marked in yellow represent.
The first two rows are quite clearly x and y.
For the third row, I simply left the default values as they were in the dome.cfg. and the values for arc and line are also from the default settings.
Could someone kindly explain what the yellow values stand for? Thank you in advance!
Last edited:

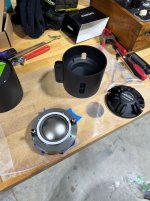
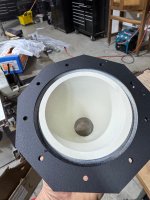
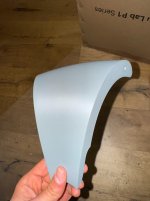
Good job with the idea of the bigger nozzle, about the infill are they empty? How can you fill it up if it has for example a pattern inside?I Didn't see much on how to use the jig so i just ran a lag bolt into this 2x6. Worked perfectly. I printed this in elegoo rapid petg using 1.2mm nozzle, 0.6 layer height, 1.65mm line width. I love using these large nozzles for prints that dont require detail. Not only does it take less time but the prints are much stronger. Bondtech sells a 1.8mm nozzle that ill likely try. All of these petals are hollow with 4 layer walls. If they resonate i will just fill them with plaster of paris mixed with water and pva glue. They will basically be solid stone at that point.
Edit forgot to mention i used liquid nails fuze it to glue this project. Petg is very hard to find adhesive for. I have not tried this yet so hopefully it works. This glue is a flexible polyeurethane glue and it spreads well. Not at all like liquid nails construction glue. Clean up with mineral spirits. I also pre applied superglue on all the edges to be adheared just to give it something more to bond to.
View attachment 1406421
they are empty. i used lightning infill to support the top layers but its not much.about the infill are they empty? How can you fill it up if it has for example a pattern inside?
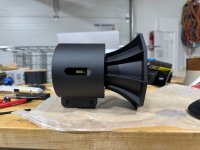
ATH A520G2 + Radian 760NeoPB-8

Usable from 500 Hz (below which the higher harmonics start to show slowly).
This was measured on a stool, with the waveguide just loosely laying on top of the adapter facing the ceiling.
This is for all the three Gen2 waveguides:

A520G2 = red
A460G2 = blue
A400G2 = green
Sounds very, very good. Such clean dynamics of everything is truly captivating.
(The adapter hasn't been published yet.)
Usable from 500 Hz (below which the higher harmonics start to show slowly).
This was measured on a stool, with the waveguide just loosely laying on top of the adapter facing the ceiling.
This is for all the three Gen2 waveguides:
A520G2 = red
A460G2 = blue
A400G2 = green
Sounds very, very good. Such clean dynamics of everything is truly captivating.
(The adapter hasn't been published yet.)
Last edited:
Of course, the adapter uses a ring plug, starting at the phase plug exit (which is roughly ⌀32 mm). The driver is very well suited for that.
BTW, I tried to estimate the compression ratio of the 760NeoPB, and it will be roughly 1:2 (i.e. pretty low indeed). Add a 3" aluminium diaphragm with a mylar suspension and you have quite a nice hifi driver. I'm finally glad I have'em.
I only wonder how would the beryllium version perform...
I only wonder how would the beryllium version perform...
Last edited:
I have a pair of 745neoPB with beryllium diaphragms for sale, for a good price, if you're interested.
I'm a big Radian fan. The 735D is really really good too. I think the ceramic magnet and the alu diaphragm is slightly more delicious sounding than the neo - but lacks the Beryllium subjective resolution maybe. I'd love to try the 636.
I'm a big Radian fan. The 735D is really really good too. I think the ceramic magnet and the alu diaphragm is slightly more delicious sounding than the neo - but lacks the Beryllium subjective resolution maybe. I'd love to try the 636.
I would stick with their 2" range, as I see those as basically 1.4" with more easily accessible phase plug exits. Their low internal expansion seems to go well together with the Gen2 horns, extended a bit (the adapter used above is 92 mm long, starting at the phase plug exit).
- I wonder how the dip at 2.5 kHz originates. I've seen this in various other measurements, it must be the driver. I'm also thinking about trying a different back cover. There's even no acoustic damping inside the original one.
- I wonder how the dip at 2.5 kHz originates. I've seen this in various other measurements, it must be the driver. I'm also thinking about trying a different back cover. There's even no acoustic damping inside the original one.
Last edited:
Sorry, that was a mistake. I measured the I/O areas of the phase plug, I don't know why I reported that as compression ratio (which is phase plug input / diaphragm area). The actual compression ratio will be more like ~ 1 : 9, pretty standard, although Radian promotes it as a "low compression ratio phasing plug".BTW, I tried to estimate the compression ratio of the 760NeoPB, and it will be roughly 1:2 (i.e. pretty low indeed)
Last edited:
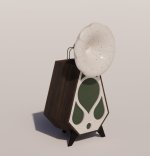
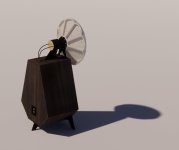
Started printing, painting and assembling some of the parts - I’m using a Bambu 3d printer and with 0 tolerance everything snaps together beautifully
Attachments

Sort of - I took a lot of the work that @mabat had already done, bought the source files for his adapter, then modified it to make the horn larger and adjusted the curvature slightly to get just a little more loading out of the Rosso - so the interior curvature is pretty close to the same. However, I'm going to be making the larger part of the horn out of wood with a slightly different aesthetic (and different fabrication / assembly requirements), so the "outside" of the horn, if you will, is completely different. Here's a rendering of the speaker I'm making with the modified horn on top.You made a custom adapter for the Rosso?
Attachments


Has anyone here used B&C DE780?
It seems to be very smooth through the whole midrange, at least:
https://audioxpress.com/article/test-bench-b-c-speakers-de780tn-8-compression-driver
The photo also hints that the phase plug exit could be noticeably smaller than 1.4", allowing a nice extended throat.
It seems to be very smooth through the whole midrange, at least:
https://audioxpress.com/article/test-bench-b-c-speakers-de780tn-8-compression-driver
The photo also hints that the phase plug exit could be noticeably smaller than 1.4", allowing a nice extended throat.
Last edited:
just for your info i just started printing it, first test , 3% gyroid infill, 3 wall loops. the reason i printed with only 3% is because i am planning to drill it in the highest part of the segment and fill it with something, as resin or some glue, they came flawless, bambu lab p1s, standard settings 0,20mm layer height, 0.4 nozzle, 1.30h of printing time, i will keep the updates soo i will try to help someone else, planning to use this 460g2 horn with the BMS 4554 long adapter, and if anyone has some suggestion on the infill material that i could use like the resin or something else , i will appreciate it because i never done it, thanks
Attachments

Last edited:
- Home
- Loudspeakers
- Multi-Way
- Acoustic Horn Design – The Easy Way (Ath4)