Thank you for this link EricSpeaking of the Tectonic "educational" videos, I realized only recently that there are many more of these than I originally thought. There are actually 21 of them, by my count in the series with Tim and Marco.
https://www.youtube.com/user/TectonicAudioLabs/videos?view=0&sort=da&flow=grid
I take the opportunity to post the 7th update of the history file
... and a link links to other links...
Here a report from Tectonic in a fair in 2016. Perhaps interesting for the one of us having advanced knowledge about composite. There are some views of the side of the membranes letting appear the honeycomb structure.
An other is about Sheetcontrol. Does somebody investigate around what they do?
Last for now: guys from Sheetcontrol post records of their product done with a Tascam DR05 recorder. Seems similar to the Zoom H1n recommanded by XRK971 in 1121 p62. Does somebody has experience, advice about the level, the distance from the panel to give a good result? If I remember from Spedge, the distance used is 1m.
Attachments
Christian.
I found that at 1m from the panels and about 1m between the panels,gave a good impression of how the panels sounded , while minimising the room influence.
Your room might sound quite different, so I would recommend making recordings at 1 2 and 3 m, and then listening with headphones to see how the room affects the sound with distance.
Once you find a distance that sounds good to You , You can decide if You want to swing the panels in a little for better HF.
You don't want to get too close as the sound will start to sound too closed in .
Sheetcontrol are good at hiding the type of exciter they use, and also the type of panel material,
The sound does seem to have a splashy signature to it ? Which could be metal ?
Steve.
JohnnoG,
I am using the size popular on this site, 12x16", although 16x20" is also an option. It doesn't take a large canvas to make a large sound. Use a thin ply wood wafer, about 3x5- 4x6" with rounded corners mounted in about the center on which to mount the exciter. You should paint both sides of the canvas with either 1:1 pva glue or 1:3 or 4 acrylic paint. That thinness of paint still has a deep color character, but doesn't load up the surface, dulling the clarity of the sound. Most people put a spline across the frame behind the exciter to help support it, but with a cushion between it and the exciter, or having it rigidly mounted to the exciter. I have a piece of light foam between mine, to prevent it slapping on the heavy bass notes. The spline makes it handy for central hanging points.
I am using the size popular on this site, 12x16", although 16x20" is also an option. It doesn't take a large canvas to make a large sound. Use a thin ply wood wafer, about 3x5- 4x6" with rounded corners mounted in about the center on which to mount the exciter. You should paint both sides of the canvas with either 1:1 pva glue or 1:3 or 4 acrylic paint. That thinness of paint still has a deep color character, but doesn't load up the surface, dulling the clarity of the sound. Most people put a spline across the frame behind the exciter to help support it, but with a cushion between it and the exciter, or having it rigidly mounted to the exciter. I have a piece of light foam between mine, to prevent it slapping on the heavy bass notes. The spline makes it handy for central hanging points.
I have been reading through the Thread and have now listened to recordings made available from the forum member 'spedge'.
There is enough SQ being picked up through my Laptop to confirm that this speaker design is one I will be very happy to pursue.
The More I read the more I am aware I have access to materials that might not have been tried but could prove to be quite suitable.
I am not a EE minded person, but I do have an eye for structures and materials and this as a project fits in with that side of my interest.
I also picked up on a report of a Exciter getting quite hot when exposed to long periods of Loud Volumes.
Is this a common occurrence, or are there measures that are being used that stop this occurring ?
At present I can have available to myself for free a Temporary used Floor Protection Material, it is available in Sheets of 2400mm x 1200mm x 6mm?
It is a very lightweight and rigid material, with which has two faces and a ribbed separator of approx' 6mm spacing's.
It is quite similar to a Polycarbonate Roof Sheet in appearance, the Fascia and Rib material is from a guess approx' 0.5mm thickness and this material has proven to be very resistant to impact damage, in heavily used routes, it has had machines on it that have been approx' 2 Tonnes and Rib collapse is not noticed.
I have also seen that there are contributors to this thread who are based in the UK.
I am based in the UK and live in Suffolk.
I travel to Cambridge and Nottingham Regularly and the M11 / A406 area of London infrequently.
If anybody would like to try the above material and is not too far a detour off my route, I can make samples available that are in a as as good as new condition to be tried out.
JohnnoG.
Is the material similar to this.
https://www.amazon.co.uk/Correx-Flu...d=1645961809&sprefix=6mm+corre,aps,154&sr=8-7
Steve.
Is the material similar to this.
https://www.amazon.co.uk/Correx-Flu...d=1645961809&sprefix=6mm+corre,aps,154&sr=8-7
Steve.
Christian,Here a report from Tectonic in a fair in 2016. Perhaps interesting for the one of us having advanced knowledge about composite. There are some views of the side of the membranes letting appear the honeycomb structure.
What's the title of the video from the fair in 2016? Your link seems to lead to all their videos.
Eric
JohnnoG.
The exciters I use are only 10watters , which are fine for normal use, but not for when really pushing them to there limits, which is what I did when I made the recordings.
when using 20watt exciters and above there should be no problem.
I was thinking of going back to the art panel to sort out a few problems and see if I can improve the SQ a little more.
I now have a few ideas I'd like to try on this type of panel , and have a stereo matching pair.
You will be surprised how much low end you can get from such a small panel, easily out performing bookshelf speakers and many larger speakers .
but I would always recommend a sub for loud rock and electronic music.
Steve.
Steve, Thank You for your reply.
The Material in the link is a similar material, the material I have access to comes in a pale grey colour, and is looking like it has a resistance to the ribs collapsing, as I have seen quite substantial weight point loading onto it.
I also have unlimited access to a material produced in the same form, but it is about as strong a Corrugated Cardboard, which makes the properties a much less rigid structure, the Brand of this is usually referred to as Correx or Cordek.
I am an audio minded person, and have no concerns about producing structures to work with my interests, it is the EE side where I stumble.
I am a child from the time of HiFi World DIY Supplements and have through these influences created a long history of taking part in Enthusiast Events, Commercial Events and General HiFi visits to the homes of other enthusiasts and EE's who produce bespoke equipment.
Your description of this Speaker Design and how these Speakers can present is even more fuel to my interest, I can't but help feel, a solution has been discovered that will be more than satisfactory and allow for the producing of an Audio set up in the Main Living area that does not present itself in a manner that will be easily identified as an audio system.
My wife knows from prior experiences if she accepts a conventional HiFi System, it won't be long before the room is overwhelmed with HiFi devices.
I am keen to purchase the exciters, preferably ones that are suitable for all types of panel produced.
I am also keen to learn of the assembly of a panel techniques, as I will start with a small panel to be used and then at a later date an alternative panel will be used when established back in the home.
Sorry, wrong copy paste... TECTONIC Flat Panel Resonant Mode Loundspeakers in NAMM 2016 by Rock oNChristian,
What's the title of the video from the fair in 2016? Your link seems to lead to all their videos.
Eric
Hi first post here. Want to share my exciter attachment method. Sorry for my English.
My DML journey started from the youtube videos, I tried the XPS DML and felt quite disappointing. I was impressed by the soundstage but not the tone. I tried surface sanding, round corners and different panel size and exciter position. But the sound still like a toy.
So I've gave up this project and thought it's just another hype train.
Then I visited this forum and thanks for all you guys I pick up the dusty exciter attached on a piece of EPS. I can't believe what I'm hearing! The sound is so smooth and premium. I'm not expect this big different because the EPS seems cheap, or cheaper then the XPS.
So I retry the XPS again and sure that is not a settings problem. EPS sound really far better then XPS.
I further try the canvas and polywood and love the sound also. However I always feel suffered by the exciter attachment process.
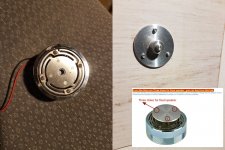
Double sides tape is not the way because you don't know when it loose. PVA is great but difficult to remove and caused quite a damage on the material. So I used hot gun...... until I got this exciter (pic 1).
This exciter has 2 parts, the exciter body and the attaching disk. I can bolt the disk to the panel using 3 bolts. Then joint the exciter to the disk. No glue no damage anymore.
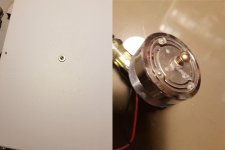
Then I further think can I bolt the exciter on the panel without the disk? So I find a bolt the size fit the exciter center hole. And attach the exciter with one bolt and a metal washer (pic 2). It works really good! Now I can attach the exciter on any panels just by one center hole drilling.
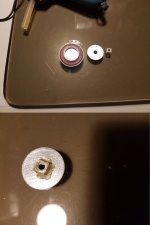
Step further I'm thinking apply this system to other "normal" exciters (pic 3).
I find a metal washer with the similar size as the exciter ring. Then Glue a nut on the washer's inner surface. Then glue the washer onto the exciter's ring.
Now I can attach any exciters on any panels under the same system within seconds!
You can see the pic 4 right side I used a piece of polywood square instead of metal washer, if you can't find the right size washer.
My DML journey started from the youtube videos, I tried the XPS DML and felt quite disappointing. I was impressed by the soundstage but not the tone. I tried surface sanding, round corners and different panel size and exciter position. But the sound still like a toy.
So I've gave up this project and thought it's just another hype train.
Then I visited this forum and thanks for all you guys I pick up the dusty exciter attached on a piece of EPS. I can't believe what I'm hearing! The sound is so smooth and premium. I'm not expect this big different because the EPS seems cheap, or cheaper then the XPS.
So I retry the XPS again and sure that is not a settings problem. EPS sound really far better then XPS.
I further try the canvas and polywood and love the sound also. However I always feel suffered by the exciter attachment process.
Double sides tape is not the way because you don't know when it loose. PVA is great but difficult to remove and caused quite a damage on the material. So I used hot gun...... until I got this exciter (pic 1).
This exciter has 2 parts, the exciter body and the attaching disk. I can bolt the disk to the panel using 3 bolts. Then joint the exciter to the disk. No glue no damage anymore.
Then I further think can I bolt the exciter on the panel without the disk? So I find a bolt the size fit the exciter center hole. And attach the exciter with one bolt and a metal washer (pic 2). It works really good! Now I can attach the exciter on any panels just by one center hole drilling.
Step further I'm thinking apply this system to other "normal" exciters (pic 3).
I find a metal washer with the similar size as the exciter ring. Then Glue a nut on the washer's inner surface. Then glue the washer onto the exciter's ring.
Now I can attach any exciters on any panels under the same system within seconds!
You can see the pic 4 right side I used a piece of polywood square instead of metal washer, if you can't find the right size washer.
Attachments

hkguy6.
This was my suggested mounting method for the Aiyima exciter, hopefully for a better sounding performance ?
Do you have any measurements of the difference in performance of the two mounting methods ?
And any idea of the art panels performance with this exciter ?
Steve.
This was my suggested mounting method for the Aiyima exciter, hopefully for a better sounding performance ?
Do you have any measurements of the difference in performance of the two mounting methods ?
And any idea of the art panels performance with this exciter ?
Steve.
Hi Steve.
Sorry I have no measure tools, just my humble ears.
I didn't find much sound different between 2 metholds. But the bolt methods sometimes will cause noise if the washer not fully attach flat and tight on the panel. On some case the panel material surface not smooth and flat, then I will add one nut between the washer and panel. Smaller attach area will solve the problem. But have to prepare a longer bolt for this extra nut.
The Aiyima (local branded as iLouder) 50mm exciter not suitable for canvas. Because it's too heavy (268g each). It act like a heavy damping on the canvas center. This largely affact the efficiency and sounds dull. I just use it on polywood. Which has the best natural timbre and smoothness sound.
Now I use 3 different model of exciters. The iLouder 10W I think is similar as yours. And also a PUI Audio 20W.
All 3 DOES has sound different on a same panel.
The 10W works best with EPS, they match the speed! But the timbre is not quite natural. Not good for acoustic music.
The PUI sound best on the canvas. And has the most holographic 3D imaging.
hkguy6,Hi first post here. Want to share my exciter attachment method. Sorry for my English.
My DML journey started from the youtube videos, I tried the XPS DML and felt quite disappointing. I was impressed by the soundstage but not the tone. I tried surface sanding, round corners and different panel size and exciter position. But the sound still like a toy.
So I've gave up this project and thought it's just another hype train.
Then I visited this forum and thanks for all you guys I pick up the dusty exciter attached on a piece of EPS. I can't believe what I'm hearing! The sound is so smooth and premium. I'm not expect this big different because the EPS seems cheap, or cheaper then the XPS.
So I retry the XPS again and sure that is not a settings problem. EPS sound really far better then XPS.
I further try the canvas and polywood and love the sound also. However I always feel suffered by the exciter attachment process.
Double sides tape is not the way because you don't know when it loose. PVA is great but difficult to remove and caused quite a damage on the material. So I used hot gun...... until I got this exciter (pic 1).
This exciter has 2 parts, the exciter body and the attaching disk. I can bolt the disk to the panel using 3 bolts. Then joint the exciter to the disk. No glue no damage anymore.
Then I further think can I bolt the exciter on the panel without the disk? So I find a bolt the size fit the exciter center hole. And attach the exciter with one bolt and a metal washer (pic 2). It works really good! Now I can attach the exciter on any panels just by one center hole drilling.
Step further I'm thinking apply this system to other "normal" exciters (pic 3).
I find a metal washer with the similar size as the exciter ring. Then Glue a nut on the washer's inner surface. Then glue the washer onto the exciter's ring.
Now I can attach any exciters on any panels under the same system within seconds!
You can see the pic 4 right side I used a piece of polywood square instead of metal washer, if you can't find the right size washer.
Welcome to the sound of DML! Very interesting your solution!
Despite some quick tests I made, the effect of a mass at the voice coil is unclear for me... Like if we can increase the weight at the driving point without consequence. I have the same problem than you about gluing the exciter. The tape delivered with the Dayton Audio works well (3M VHB) but after it is difficult without permanent glue (I used epoxy for my canvas panels). There is in the posts not very far in the past a proposal for a home made double side tape. I think the link is in the "history file" post 4741. There also substitute to the 3M but clearly all the double side tapes are not good (loosing exciter, no treble...)
About your solution, like Spedge, I am curious to see some measurements if possible. One key point of the attachment technique is the high frequency extension. An other pointing by Spedge is the self noise coming from the spider/voice coil area at the back of the panel. How is it with you solution?
Christian
Hi Christian.
I had the same thought as yours about the extra mass on voice coil. However when i further think about this. The washer mass actual is not on the voice coil when you attach all the parts together. The washer mass is on the panel, or maybe say on the whole system.
Just think this way, when you glue the exciter on a panel. Will you say the panel is adding extra mass on the voice coil? And now you're just add a washer on the panel.
I didn't note noise on exciter, air hole. Except the 10W model which has external wires. If I play loud the wire may hitting the spider to cause noise.
I listen the all panel with the exciter faceing me. And up close to my seat (1 feet). Because i like the holographic soundstage very much! So if the exciter has nose I may hear it.
I can hear noise on the canvas edge, polywood cutting crack, hanging string etc...... so I think my ears can hear noise quite well.
I accidentally typed I amina, and got this ,which I thought was an interesting upgrade to their plastering over the whole surface.
https://uk.aminasound.com/speakers/edge/Steve.
https://uk.aminasound.com/speakers/edge/Steve.
Hkguy6.
If you mount the exciter on a spine ,the canvas does not support any of the weight of the exciter.
the bolt is also pretty rigidly mounted to the panel and coil, as one.
Steve.
If you mount the exciter on a spine ,the canvas does not support any of the weight of the exciter.
the bolt is also pretty rigidly mounted to the panel and coil, as one.
Steve.
hkguy6Hi Christian.
I had the same thought as yours about the extra mass on voice coil. However when i further think about this. The washer mass actual is not on the voice coil when you attach all the parts together. The washer mass is on the panel, or maybe say on the whole system.
Just think this way, when you glue the exciter on a panel. Will you say the panel is adding extra mass on the voice coil? And now you're just add a washer on the panel.
I didn't note noise on exciter, air hole. Except the 10W model which has external wires. If I play loud the wire may hitting the spider to cause noise.
I listen the all panel with the exciter faceing me. And up close to my seat (1 feet). Because i like the holographic soundstage very much! So if the exciter has nose I may hear it.
I can hear noise on the canvas edge, polywood cutting crack, hanging string etc...... so I think my ears can hear noise quite well.
I wonder if there is something else but what?... the washer is an underformable solid, at least very rigid while the panel is deformable so the exciter sees only a small amount of the mass combined with the stiffness like a transmission line.
By the way, I agree with Spedge about the spine. The exciter needs some support to avoid the effect of its own weight and also the weight of the cables.. The spine helps also to reduce the distortion. This is right at least for exciter with a single suspension. Some have a double spider.
Done some prints with GreenTec Pro Carbon (https://www.extrudr.com/en/products/catalogue/greentec-pro-carbon_2410/), and it is definitely an improvement over the BioFusion and PLA.
And with 0.2mm skins over honeycomb they seems to actually become quite sensitive. For example when getting 84 dB on the polycarbonate panel with my uncalibrated measuring mic, same signal to a carbon panel gave 92 dB. I also found a piece of 4mm plywood, and it was somewhere between in loudness.
Conclusions from initial listening is that sound is more focused than both the PC and plywood. However I would also say it is a little bit less open and more boxy. Overall I prefer it of the materials I tried so far. Despite being smaller plate than PC and ply, they can be driven harder it seems before bass start breaking them up.
Analysis of FR confirm a peak around 700 Hz, and quite unsmooth response in general.
Top end also drops off, but less than with PLA or BioFusion.

I will do a proper post eventually with graphs measured at consistent distance comparing the different materials I have at hand as well as some more optimized prints.
What I wanted to get a sense of for now if is the printed carbon seems viable at all, and indeed it seems to be able to produce good sound as well being sensitive. I still have some tweaking to do since I noticed significant differences when it comes to overall thickness, honeycomb density and skin thickness. Both when it comes to sound quality and sensitivity. Also been modifying the ratio to even out the peaks in FR. I do like to maximize the surface area, but the small size seems to create strong modes in the low mid, and using the same ratio as Tectonic on the DML500 makes for a smoother response than the 94% ratio I tried initially by spreading them out a bit.
Still trying to find some XPS to try out, but seems like I have to buy in bulk or manage to cut from thick boards. For those of you having success with EPS, what hardness do you have? Here we have EPS 80, EPS 100, XPS 300 etc which signifies how much pressure it can handle, not sure if that is a worldwide standard?
For fastening the hairspray seemed to work really well. It was about as hard to remove as the PVA gluestick I used before, and held up my 200g exciter shaking like crazy without support for a couple of days without issue. Will try it again to see how it affect FR, but now got a roll of 3M 9088 that been working great. It can also hold my 200g exciters without problem and my impression is that HF response is as good or better than with stock adhesive, but haven't got any measurements to back that up yet. Although the hairspray dries quickly, when moving them a lot for testing I still like the speed of using tape.
And with 0.2mm skins over honeycomb they seems to actually become quite sensitive. For example when getting 84 dB on the polycarbonate panel with my uncalibrated measuring mic, same signal to a carbon panel gave 92 dB. I also found a piece of 4mm plywood, and it was somewhere between in loudness.
Conclusions from initial listening is that sound is more focused than both the PC and plywood. However I would also say it is a little bit less open and more boxy. Overall I prefer it of the materials I tried so far. Despite being smaller plate than PC and ply, they can be driven harder it seems before bass start breaking them up.
Analysis of FR confirm a peak around 700 Hz, and quite unsmooth response in general.
Top end also drops off, but less than with PLA or BioFusion.
I will do a proper post eventually with graphs measured at consistent distance comparing the different materials I have at hand as well as some more optimized prints.
What I wanted to get a sense of for now if is the printed carbon seems viable at all, and indeed it seems to be able to produce good sound as well being sensitive. I still have some tweaking to do since I noticed significant differences when it comes to overall thickness, honeycomb density and skin thickness. Both when it comes to sound quality and sensitivity. Also been modifying the ratio to even out the peaks in FR. I do like to maximize the surface area, but the small size seems to create strong modes in the low mid, and using the same ratio as Tectonic on the DML500 makes for a smoother response than the 94% ratio I tried initially by spreading them out a bit.
Still trying to find some XPS to try out, but seems like I have to buy in bulk or manage to cut from thick boards. For those of you having success with EPS, what hardness do you have? Here we have EPS 80, EPS 100, XPS 300 etc which signifies how much pressure it can handle, not sure if that is a worldwide standard?
For fastening the hairspray seemed to work really well. It was about as hard to remove as the PVA gluestick I used before, and held up my 200g exciter shaking like crazy without support for a couple of days without issue. Will try it again to see how it affect FR, but now got a roll of 3M 9088 that been working great. It can also hold my 200g exciters without problem and my impression is that HF response is as good or better than with stock adhesive, but haven't got any measurements to back that up yet. Although the hairspray dries quickly, when moving them a lot for testing I still like the speed of using tape.
He does clearly say 104 dB with 1w at 1m in the video. But seems like he is confusing some variable since it contradicts all other information regarding sensitivity, both from Tectonic themselves and elsewhere for DML in general.Leob
Being back home, I watched more carefully this video. I don't have the same understanding than you. 104dB is the level they get in their test (and they seem not being very sure of the value). It is not said to be the sensitivity (this in the limit of my understanding of English!). They explain how they answer to the need of power (ie the need for people at 30m), the electrical power that will be applied to the panel (continuous, program, peak). At 1.50' you have the graph below showing a sensitivity around 90dB which is consistent with the documentation.
View attachment 1029147
- Home
- Loudspeakers
- Full Range
- A Study of DMLs as a Full Range Speaker