I haven't connected my laptop to it yet because I bought a video monitor extension cable and it has a female and a male connector and now i need a gender changer to connect it. While I was looking for the model number and the native resolution (which wasn't anywhere in the manual) I did find out the response time was 16ms and these are the following specs for pc mode
resolution mode v. freq. h. freq
1 640 X 480 vga vesa 60 59.94 31.469
2 800 X 600 svga vesa 56 56.250 31.156
3 800 X 600 svga vesa 60 60.317 37.897
4 1024 X 768 xga vesa 60 60.004 48.363
contrast is 400 to 1
model number is 15MF605T
Gary Johnston
resolution mode v. freq. h. freq
1 640 X 480 vga vesa 60 59.94 31.469
2 800 X 600 svga vesa 56 56.250 31.156
3 800 X 600 svga vesa 60 60.317 37.897
4 1024 X 768 xga vesa 60 60.004 48.363
contrast is 400 to 1
model number is 15MF605T
Gary Johnston
I hope it wasn't what I found on the Magnavox site:
http://www.magnavox.com/index.cfm?event=main&cat_id=1&subcat_id=3
There's two 15" models, both 4:3 1024x768 - which, of course, are below HDTV, and aren't better than the 15" LCD monitors out there.
http://www.magnavox.com/index.cfm?event=main&cat_id=1&subcat_id=3
There's two 15" models, both 4:3 1024x768 - which, of course, are below HDTV, and aren't better than the 15" LCD monitors out there.
Have a look at the specs.
http://www.bestbuy.com/site/olspage...t&productCategoryId=cat03004&id=1099389620562
it sounds good to me, hd ready all the hook-ups you need, I think I might get rid of my n6 and get one of these...and it strips good too?
Lesko
http://www.bestbuy.com/site/olspage...t&productCategoryId=cat03004&id=1099389620562
it sounds good to me, hd ready all the hook-ups you need, I think I might get rid of my n6 and get one of these...and it strips good too?
Lesko
It strips real easily. This tv was the fourth attempt at stripping a tv. The "ribbon" cables were just not letting me get the control boards out of the way. I was almost ready to give up when i took a drive to target "I almost missed🙂 ) and saw this one. I asked about the return plicy and he told me there might be a re-stock charge but I took a chance on it and I'm glad I did. I only have an apollo 3000 OHP and I'm very please with the results of it. Like most people I want it to be a bit brighter but I'm really happy with the crispness of the picture. I'm using a 73" window shade for a screen and being a machine tool purchaser (part of my job) I get some samples from the venders and I'm going to try and spray the screen with a product from krylon called refect-a-light. I think it might be worth a try, considering it's free. I've tried to take pictures of the projected image with my daughter's 3.1 megapixel camera but I haven't had any luck yet. I can take a picture of the panel and projectot if you want to see it. I'm not sure if I can post pics on here, I am still under surveillance regarding my posts here.
Gary Johnston
Gary Johnston
Thanks,
I don't want to highjack this thread with posts that don't have anything to do with Hezz. Some poeple don't like it to much. ; )
you can email me at jhanner001@aol.com I have some questions about this panel...
*Sorry Hezz...
lesko
I don't want to highjack this thread with posts that don't have anything to do with Hezz. Some poeple don't like it to much. ; )
you can email me at jhanner001@aol.com I have some questions about this panel...
*Sorry Hezz...
lesko
Ok guys,
A few updates.
Sorry for taking so long to post but my work on the projector has been slow over the summer. I have not been working so I have had lots of time but no money. Been spending most of my time cycling.
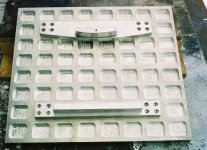
I did get my DIY first surface mirror about done except for the final polishing. Here is a picture of the back of the mirror. It is machined out to lighten it and keep it from warping. The mirror will mount with a hinge on the straight mounting tab at each end. One hole will be a slotted curve so the mirror can be adjusted side to side to get the exact angle dialed in. The other end of the mirror will be held and adjusted with a single bolt that will adjust the up and down angular motion.
Hezz
A few updates.
Sorry for taking so long to post but my work on the projector has been slow over the summer. I have not been working so I have had lots of time but no money. Been spending most of my time cycling.
I did get my DIY first surface mirror about done except for the final polishing. Here is a picture of the back of the mirror. It is machined out to lighten it and keep it from warping. The mirror will mount with a hinge on the straight mounting tab at each end. One hole will be a slotted curve so the mirror can be adjusted side to side to get the exact angle dialed in. The other end of the mirror will be held and adjusted with a single bolt that will adjust the up and down angular motion.
Hezz
Attachments
Here is the front surface of the mirror. At this point I have not put anything on it but a quick polish and I am thinking of trying it without a really high grade polish. My theory is that I will lose some light output but the slight diffussiveness of the mirror will help the LCD to have a more even lighting on it. IF this doesn't prove to be enough light I can always hand polish the mirror to as high a quality as I like.
At this point I can see a blurry reflection of myself in the mirror. Putting a near perfect polish on it will probably increase it's light output by only 3-5%.
Hezz
At this point I can see a blurry reflection of myself in the mirror. Putting a near perfect polish on it will probably increase it's light output by only 3-5%.
Hezz
Attachments

Nads,
Machining was free because I did it myself at school. Having it done by a machne shop would put the cost up to where it would be unrealistic to have done. The size is about 13.5 x 15.5 inches. The Aluminum cost about 35 USD at remnant price. You could make this without machining the back out and it would probably be fine. In fact you could make one with nothing but a drill press to drill and tap straight holes. You could screw square or rectangular bar stock to the back for mounting and bracing to keep it flat.
Hezz
experiment!
It will be interesting to see how it compares to a $2 mirror tile from Home Depot. I don't think it will make much difference on the lamp side of the LCD.
On the image side of the LCD, using a good first surface mirror makes a tremendous difference: I've tried both, and even a very thin second surface mirror gave me visible ghosting in the screen image. With the first surface mirror, I can see individual pixels at 1024 by 768 resolution.
Hmmm.. I think that this is beyond my limited tool availability, but if I take up your idea of using stock sheet metal and square backers to make one to mount a FS mirror on it with the adjusters you describe would be a lot easier for me and it would make sure that the mirror was as flat as it could be.
Has anyone had any dealings with an Acer AL1716s http://www.comet.co.uk/comet/html/cache/571_266302.html as I have one on my desktop and it looks good, but I do not want to rip it apart if it won`t play ball with the ribbons. I have NO idea what the panel part no is, but it certainly looks nice as a display and is 12ms too
Has anyone had any dealings with an Acer AL1716s http://www.comet.co.uk/comet/html/cache/571_266302.html as I have one on my desktop and it looks good, but I do not want to rip it apart if it won`t play ball with the ribbons. I have NO idea what the panel part no is, but it certainly looks nice as a display and is 12ms too
17" monitor
17" monitors all have great resolution, high contrast ratio, and quick response time. Unfortunately, you would have a difficult time getting a projection lens that works well with a 17" LCD.
15" is much easier, and the slightly worse parameters still make a very nice projector.
14" would be even easier, but the response times are too slow: You see artifacts during fast motion.
I hear rumours there's a way to bounce light to make a 17" lcd work
I just joined lumenlabs(bought thier imo worthless box design plans) for access to thier forums, and i'm waiting, well I suspect someone has already used a benq 17 lcd with a mirror-or raising the lcd off the overhead stage to fit within the triplet's ability to easily project from 6-10 foot range.
I hate to wait, and I just broke my benq 567s, so now i am wondering if anyone has used a 17 effectively, i will buy one, but not if this is a pipe dream because the benq 15 is very nice
Also, are these super fresnels(wider than my dukane stock 12x12fresnel) really worth an extra 40$(and are they seperated, so you can use split design?)😕
favorite quote in this forum
'geez u built that!?'
I'm seeing some success with the 17 lcds
Guess this is a touchy subject or something, but i've see a couple designs at lumenlabs that make me wonder if it may be possible to get a 17 to work.
I am very impressed with knowlege they have, and can say it's amazing to browse there.
I still would rather use the OH than build a box, so i'll keep you guys posted after I get the plans, and parts, and final results, cruzer U rule!
Nads,
You could glue a piece of thin aluminum sheet to a 3/4 inch of thicker wood backing plate of MDF or plywood. THen polish the aluminum by hand. THis could make a very good quality first surface mirror for very cheap. At least for the light engine. Building a first surface mirror of high enough quality for the image would be very possible but would run the cost up for better hand grinding and polishing techniques.
Still it could be done for a reasonable cost.
Gregory27,
There is no real reason that you could not modify an existing overhead projector for a 17 inch LCD. YOu will however need to get the right fresnels and lens choice is a little sketchy at this point. The lens I am using will work with a 17 inch but the outer edges will be a little out of focus. This will be less pronounced with a 4:3 aspect ratio LCD and if you are only watching movies things might be OK. If you intend to read text all the way out to the edges then you might have a problem. Although there is supposedly a new pro 500 mm FL lens coming from LumenLabs that will work with a 17 inch LCD. The lens will be expensive. About 299 USD or around there. There are a few 3M overhead lenses that will work with a 17 inch LCD. Check the archives for Cruisers 17 inch projector.
Hezz
Update
Well I finally now have access to a tig welder at school so I have started on the deep dish parabolic reflector. It was a pain to try and hold the panels together to get them started and my TIG welding skills are not that good since it is only my second day with the TIG.
THe reflector will require a little clean up to make it look presentable and I melted thru one of the corners that I will have to patch somehow.
I will start posting some pictures as soon as I can. Since I now have nearly all of the things I need for this projector project I hope to get it finalized and assembled with the next month or so.
THe first upgrade that I am going to make once this thing gets going is a better lens with a slightly longer focal length.
I got an inexpensive digital camera for christmas so I will start posting a few more pictures of my progress. It has been slow but I did get a new manual Dalite 106 inch 16:9 screen.
I ordered it through Dell home office web site for about 110 dollars.
I ordered it through Dell home office web site for about 110 dollars.
Attachments
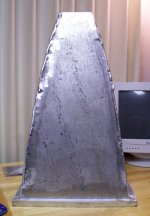
Here is a picture of my partially completed deep parabolic reflector. The TIG welding leaves a lot to be desired but the aluminum was surplus used metal that I got free and I had trouble getting all of the impurities out of the joint. This combined with the fact that I'm just learning how to TIG aluminum.
The picture is not the best but you can see the parabolic shape in the profile of the reflector. Also you can see the pits and dents in the aluminum plate.
The inside is the better side and has been sanded and cleaned up to a large degree. It will still require a lot of hand finishing and polishing to get the inside up to a more reflective surface.
I have yet to weld a flange onto the narrow end of the reflector to mount the bulb reflector/heatsink casing.
Attachments
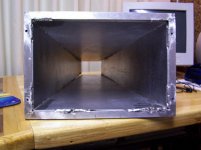
Here is a shot showing the inside of the larger end of the reflector. You can see the inside is a somewhat better finish than the outside.
I still have some joints to run a bead on to seal all of the light in. Also I am leaning on using a large piece of lexan at the wide end to act as an IR filter. I will have it in contact with the aluminum frame of the reflector so the whole thing can act like a heatsink. I'm hoping for fanless operation if possible.
There is a kind of polycarbonate from GE called Lexan solar control. It filters out most of the UV and IR but it only lets about 70 percent or so of the visible light through.
This would seem to be a good IR filter choice except that it is not very efficient and I am having trouble finding anyone who carries it. It is used as a plastic roofing material for sun rooms and skylights and other buildings.
Attachments
LOL
i can tell you are new to welding. I'm a machinist in training myself and man, you make me look like a master.... LOL
tig welding is hard to learn, but once you learn it you can really make the cleanest and best welds with the finest heat control.
you can MIG weld aluminum so i think you should of done that for this project, a beginner can lay pretty nice mig lines..
- Status
- Not open for further replies.
- Home
- General Interest
- Everything Else
- The Moving Image
- DIY Projectors
- 17 inch 16:9 assault on high end project