matched pair
>Is it true that beter results are obtained with a matched pair back to back?
For our projectors, the "matched pair" is really the condensor fresnel and the field fresnel.
In the drawings you may have seen of a matched pair condensor system, the first lens collects a lot of light from a point source at its focal length and refracts it to be a parallel beam. The second lens refracts the parallel beam to a point at its focal length. That is not what we do with our pre-condensor lens.
Instead we are just trying to collect more light by putting it as close as possible to the lamp, and then refracting that light into a cone that matches the cone the condensor fresnel would see from a lamp at its focal distance.
Condenser
Guy,
So, in addition to the 2 fresnells, I need just the one condenser?
Ace was extolling the virtues of dual pre-condensers, but I would thrilled if I only needed the one as the costs of this projector down under (here in Australia) are quite high.
Its crazy - we can't get a coil ballast for less than $200 let alone any of the other technology.
Anyway, a single pre-condenser would be good news indeed.
Regards,
G
Goemon,
Ace was using two condensers in an attempt to improve the light gain in his light engine but it is not a necessary thing nor probably the best thing to do for someone putting together a DIY projector for the first time.
Hezz
Ace was using two condensers in an attempt to improve the light gain in his light engine but it is not a necessary thing nor probably the best thing to do for someone putting together a DIY projector for the first time.
Hezz
Guys,
Today I bought a new Onkyo A/V receiver so that I can integrate the HTPC more full into the system. It has multi channel analog inputs and digital inputs which my old A/V receiver lacked.
Still working slowly on the projector frame. Next I need to build LCD mounts.
Hezz
Today I bought a new Onkyo A/V receiver so that I can integrate the HTPC more full into the system. It has multi channel analog inputs and digital inputs which my old A/V receiver lacked.
Still working slowly on the projector frame. Next I need to build LCD mounts.
Hezz
hi friens;
i never have seen results using 17" and 135 triplet, Nobody knows the FOV of this lens. The only results i have seen, shows it is not posible (or could be a bad configuration but i don´t think this way).
Could someone do a test with this lens? i would like to measure an angle, just a laser is needed (it is not the FOV but we can have an idea of the FOV. Just measure the max angel the laser gets out trough the lens. I´ll do the same with 32cm focal 80triplet. And we can compare the results.
somebody interested?
Rox,
If you are talking about the DIYprojectorcompany 135 mm diameter lens which has 450 mm FL. It most certainly will work with a 17 inch LCD. I have tested it and I believe it will work with a 19 inch also.
Allen has tested the lens with a 17 inch mockup. IF you visit the forums on DIYprojectorcompany you can find the thread with the information. We do not actually know the field of view but this is a somewhat subjective thing because a lens is usually designed for correction within a target FOV but it can still often perform outside it's optimum FOV with lowered resolution at the edges.
The FOV on this lens is quite wide. I would estimate it at 35 - 40 degrees. This is the best lens you are going to get for the money for a 17 inch LCD.
Hezz
Minor update on projector:
I have built the base out of MDF and have the frame mounted on the base. I just ordered my USHIO 250 watt bulb and I fould out as an added bonus that it has UV blocking quartz glass.
I finally figured out how I am going to get the patterns for the deep parabolic reflector made. I found some software meant for boat hull repair or building which can take a solid model and extract a 2D pattern from a curved surface. Actually there are two different programs that do this but the approach is different. One is a Rhino plugin. The other is a dedicated program. I will import an IGES file of the solid model and then create a NURBS surface in the software from the IGES model. I can then flatten out the NURBS surface to get a very accurate flat 2D pattern of each reflector side.
I have been modeling a new two piece reflector/heatsink combination and I need to get the exact bulb in my hands to get all of the measurements that I need to complete the design. Then hopefully in a couple of weeks I will have the final reflector/heatsink designed.
I am planning on using an Edmonds optical piece of heat glass. The lower grade costs 24 USD in rectangular piece that something like 102 x 127 mm in size.
I've also decided to buy a custom first surface mirror and use the aluminum mirror that I started making for the mirror backing plate. I think it will cost more for all the materials to polish the mirror than to buy one. Plus it makes the mounting much easier.
I need to glue the mirror to the aluminum backing plate. I think slilcone would be good.
More pictures are in the works once I get some more work done.
Hezz
HTPC meltdown,
Well it actually happened. I had a heat meltdown of my HTPC. I suspected this would happen when I first bought the Antec Overture case.
Note: I do not recommend this case for a HTPC if you are going to do games or run dscaler.
This is a good looking sleek and quiet case. When I first bought it I needed a quick and resonably priced case for my HTPC that would kind of blend in with the HT equipment. When I opened up the case for the first time I noticed that it was going to have some heat issues under heavy loads but I liked it's quietude so much that I kept building and experimenting.
This case is unusual in that the PS is up front and sucks air in. It seems to work from a low noise perspective but the case fills with warm air from the PS unit. There were to other quiet venting fans so I thought that all would be Ok.
The HD's are mounted near the back exit fan supposedly to cool them. The only problem is that they are being cooled by really hot air from the PS and the CPU which is right next to it. IT's a bad design for cooling issues without some modifications.
After running dscaler for about half an hour the HTPC started spontainiously rebooting. I then think the HD data became corrupted as the OS won't boot at all. I'm hoping there is no hardware damage.
I have decided that I need to take a more industrial approach an build the ultimate long term HTPC case. There is only one case that I would consider and even most 250 USD cases are not adequate in my book.
So I am going to embark on a high end home made design which is a hybrid approach of heat pipe technology and slow turning fans.
Here are models of my work so far. The heatsinks are large homemade units made from machines flat plate and rectangular .5 x 1.5 inch extrusions. There is no HD mount as of yet as I am thinking about how I am going to do that.
Hezz
Attachments
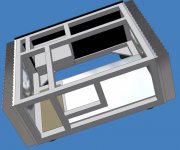
I bought a Antec CS300 at compUSA to serve as a donor case for the rear panel assembly and to get precise measurements. It is an upright tower case which is cheap but well designed and has no PS for 24 USD.
The case will use heatpipes to carry heat to the large homemade heatsinks on the sides of the case. One for the CPU and one for the GPU. The case will have a normal ATX silent as possible PS and one quiet 90 mm fan turning at around 600 - 900 rpm.
The case is completely sealed except for a large open area at the bottom front of the case which draws cool air in and to the back. In my opinion even though the CPU and GPU will need no fan cooling the rest of the system needs a little air movement to keep things long term reliable. Memory and chipset heatsinks work best if there is a little airflow in the case.
Another pic. Frame is from welded .75 and 1 inch tubular steel.
Hezz
Attachments

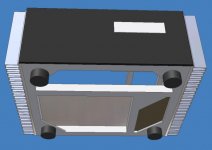
One more shot.
This project should keep me busy for a while as I await more of my projector parts. I'm not sure I want to run my HTPC hardware in the Overture case. I have another use for it in the upstairs music stereo rack with a lower wattage system and some case mods it should be OK.
Hezz
This project should keep me busy for a while as I await more of my projector parts. I'm not sure I want to run my HTPC hardware in the Overture case. I have another use for it in the upstairs music stereo rack with a lower wattage system and some case mods it should be OK.
Hezz
Attachments
Guys,
These last few posts have been a little off topic but I view this projector building project as a total home theater experience with everything that goes with it. Hence the HTPC design models.
Now as with everything else I have changed my mind about what I am going to do with the HTPC. In the past I have always had better luck cooling and quieting hot CPU's with a tower case. While the tower HTPC case will not fit into most equipment racks I have designed what I think for me is a better solution.
There are a lot more choices available for a case with an upright tower case and I like this idea because tower cases will be the dominant platform for well into the future. Therefore, there will always be more and cheaper choices. Using a modded tower case will make it easier for me to get my HTPC back together sooner and for less money.
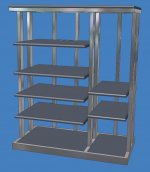
I have therefore decided to redesign my AV equipment rack to take advantage of the flexibility that a tower case has. The new rack will only be slightly wider than the old one and a little taller. Plus the top surface will be free of any piece of equipment so that I can use the space for the keyboard and mouse and remotes.
Here is the design solid model. I had already purchased some of the metal for the first HTPC heatsinks and frame but I guess I can use that for something else. This will be easier to build. With this rack I have enough space for the tower HTPC and it's UPS. Then on the receiver side I have the A/V receiver, the DVD and VCR and the AC line conditioner and the external subwoofer amplifier. I will then have one bottom shelf left over so that in the future I can use an outboard two or three channel amp for the front speakers.
The design is similar to the old one in that the shelves are mounted with hidden mounting bars that give the illusion of floating shelves and make for a less metal heavy appearance.
Hezz
These last few posts have been a little off topic but I view this projector building project as a total home theater experience with everything that goes with it. Hence the HTPC design models.
Now as with everything else I have changed my mind about what I am going to do with the HTPC. In the past I have always had better luck cooling and quieting hot CPU's with a tower case. While the tower HTPC case will not fit into most equipment racks I have designed what I think for me is a better solution.
There are a lot more choices available for a case with an upright tower case and I like this idea because tower cases will be the dominant platform for well into the future. Therefore, there will always be more and cheaper choices. Using a modded tower case will make it easier for me to get my HTPC back together sooner and for less money.
I have therefore decided to redesign my AV equipment rack to take advantage of the flexibility that a tower case has. The new rack will only be slightly wider than the old one and a little taller. Plus the top surface will be free of any piece of equipment so that I can use the space for the keyboard and mouse and remotes.
Here is the design solid model. I had already purchased some of the metal for the first HTPC heatsinks and frame but I guess I can use that for something else. This will be easier to build. With this rack I have enough space for the tower HTPC and it's UPS. Then on the receiver side I have the A/V receiver, the DVD and VCR and the AC line conditioner and the external subwoofer amplifier. I will then have one bottom shelf left over so that in the future I can use an outboard two or three channel amp for the front speakers.
The design is similar to the old one in that the shelves are mounted with hidden mounting bars that give the illusion of floating shelves and make for a less metal heavy appearance.
Hezz
Attachments
Would this work with your projector? I am thinking of building one.
What are the issues when using a laptops LCD like this? Any issues with the WUXGA resolution? How do you get your 1080i signal to the screen?
Bob
INSPIRON 8600 8500 UXGA 15.4" WIDESCREEN LCD COMPLETE WITH COVER, BEZEL AND CABLE.
UXGA-Dell's best resolution screen avaliable!
Technical Specs:
Dell P/N 3U450
Fits Dell Inspiron : 8600, 8500 .
Panel Type: Samsung WUXGA.
Screen Size: 15.4 "
Resolution: 1900x1200.
WUXGA LCD
Using laptop LCDs has limited people in the past to just games or DVDs played on the laptop. If you wanted to also show video, then you needed a really good video input card for the laptop. Most of those kind of cards do not fit in a laptop, so this has been pretty hard to put together.
Now there are a few stand-alone controllers for these laptop LCDs, so you can drive them with any input. They all take VGA or digital signals. Some can accept component video signals. Now the only problem is the price. Cheapest I have seen is around $600 US just for the controller.
There was at least one project to build a custom controller, but I think that stopped when some commercial units became available. You can search here or on DIY Builder Group for WUXGA and Controller, and you should be able to find some more info. But be prepared to be shocked by the prices!
Robmx,
As Guy said, there are basically two approaches. The first requires you to use the whole laptop computer to drive the panel. If you can modify your projector frame to accomodate this approach this is the easiest way to do it. Then you can have an all in one projector PC.
The other approach is to find a LCD panel controller card which can drive your panel. The ones that are powerful and flexible enough are not cheap.
Because your laptop is already hard wired to run that LCD panel you would get good results using that approach. The hard part is integrating the whole laptop into the projector and possibly extending the LCD cables up to 12 - 16 inches to allow for panel placement.
You would also be limited to playing DVD's and the games that the laptop can run. But this might be all that you wanted to do. If you need the HTPC to function for scaling other video signals like VCR and other things. Then the laptop is not usually sufficient.
I think most laptops use a two or four wire LVDS signaling method and you can drive the LCD panel for up to 24 inches without any kind of special cabling scheme. I read this once in a technical article on LVDS.
Hezz
With a laptop, there may not need to be any extension for the FFC, at least the one leading to the display. There may still be FFCs behind the screen (I'd actually count on it). But the cable leading to the display is usually coiled up several turns inside the swivel bracket for the screen, meaning you can uncoil it and have a few inches to work with. Should be enough to get the laptop on the other side of a bulkhead from the projection engine.
Thanks for very good information.
I sort of thought it might be as you say.
I think this rules out my 15" TFT laptop with the broken backlight.
I do have a Samsung 17" monitor/HDTV LTM1775W 1280/768. Is there fresnels and a lense that would work for this?
Would it make sense to just buy an OHP that would work with this?
I don't think I want to actually use the one I have but if I could find one on EBAY that was used at a good price I would like try it.
http://www.thetechzone.com/display.php?i=174&p=2
17" LCD
If you have one of those TVs, I suggest you leave it a TV. Or maybe you could just sell or trade it for a commercial LCD projector!
There is no overhead projector that can fit that LCD panel. The biggest OHPs fit 14" LCDs. People building 17" LCD based projectors are having a difficult time getting a projection lens that works. It would be easier to start with a 1280 by 800 15" panel. (Proview has one of these for about $200 US.) You can find a couple of threads on this forum about using this LCD.
But what about a USB 2 PVR adapter. That would give you video input. Hauppauge make such a product for £69.00gbp in the UK (PCWorld Eekk!), and this would solve Ya problems. A bluetooth Belkin KBD/Mouse would give you access, and if you want to, a USB2 DVD drive extends the ability to get discs into the laptop IF its ceiling mounted, or just stream over a network, which can be done if DIVX. thinking about it I have a redundent Toshiba 3490 600mhz/128mb with a 1024,768 10.4" screen which has no dead/stuck pixels. Hmm my first candidate. And I have a USB2 dvd rom drive.
- Status
- Not open for further replies.
- Home
- General Interest
- Everything Else
- The Moving Image
- DIY Projectors
- 17 inch 16:9 assault on high end project