Thanks Norman.
When I read back post 2024 that you mentioned, I came across this remark from XRK971:
"If you physically offset the tweeter then it needs to go on top of the woofer. Another way is to have a waveguide with 2.4in offset. This will improve polar dispersion as well as preventing diffraction from the hard edge at the step."
A waveguide may be interesting but, depending on depth and width, it partly changes the frequency response that has to be compensated for in the filter. Is there more info on the waveguide?
Just for your info, in the German HH of 2/2012 there was a 2-way design where the 10F was crossed to a Sc. Sp. 26w/8534GOO @ 330Hz, 12db/oct; in 50 + 10 ltr. Supposed to be a good design too.

True.
A seperate box with the 10f slid back, there may be some ups and downs from the diffraction box edges, probably deeper in frequency than felt could help fix.
I'm using a revel 2-way with a waveguide now.
I think they used the waveguide for better integration (moving the tweeter back).
When I used an eminence b102 (wide open) with a single capped morel cat367, if I flipped the polarity, I couldn't tell much difference.
But when I slid the tweet back so the acoustic centers were close (vertically), you could hear a big difference flipping the polarity.
If I remember, ideally in a crossover (different slopes too), you need to slide the tweet a bit back for better integration, so you have the deepest null when wired "wrong"..............
Now the speaker is very good sounding piece of equipment and will be kept by me.Try R1 = 2.7R and R2 = 6.8R. That should brighten it up a bit. Adjust R1 to 2.2R if still not enough.
Very nice work! Great to see yet another example of the TL out in the wild. I’m listening to mine right now.
R1 is 2.56 ohm. I paralleled 4.7 with 5.6.
It has been quite a long while. I haven't given up, I've just been distracted. Learned knifemaking (my first one is in the third picture) and done many other things. But now we're back to working on the speakers. The lumber was cut a few months ago (before I got a commission, made my own forge, finished the commission).
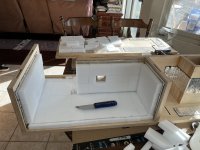
First photo shows a rough estimate for where sponges go, but I forgot to account for the back surface, so I'm a few sponges short.
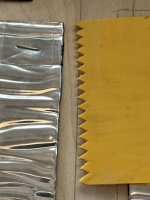
Second photo shows a detail of how I added confidence that the butyl foil would stay put (small bits of 2 liter bottle with a staple in it) and of the scraper to smooth out the construction adhesive I used to attach the sponges
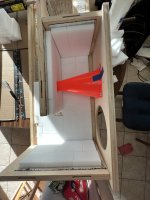
Third photo shows a partially assembled (dry fit) with a line marking excess foam to cut (and the aforementioned knife)
Fourth photo shows a large portion of the upper portion of the speaker and one of the two sides, but note the lack of the back panel or any sponges for it... oops
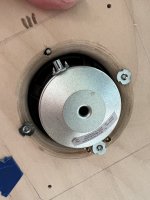
Fifth photo shows the back of the 10F, along with the T-Nuts, which happen to be steel and pointy and stuck to the magnet... Fun!
Sixth photo is the speakers in place on the front panel, looking sharp. For an improved WAF, I allowed her to select the orientation of the screws on the front. Need to find some black-out hardware (shown are stainless #10 and #6 at 3/4" long, both 32TPI)
Progress will be in spurts as time permits, but getting closer to having the first one done! Note that there is still a LOT of mattress foam to be installed in the lower half of the cabinets before gluing (and sealing of inside corners) begins.
A question: what are people using for gasket materiel for removable panels? My local hardware store seems to have a lot of real squishy foam, but nothing like I'm used to seeing for speaker gaskets (which I presume is the kind of stuff we want for sealing the back or any other removable panels). Any tips on what I should be looking for? What worked? What didn't work?
First photo shows a rough estimate for where sponges go, but I forgot to account for the back surface, so I'm a few sponges short.
Second photo shows a detail of how I added confidence that the butyl foil would stay put (small bits of 2 liter bottle with a staple in it) and of the scraper to smooth out the construction adhesive I used to attach the sponges
Third photo shows a partially assembled (dry fit) with a line marking excess foam to cut (and the aforementioned knife)
Fourth photo shows a large portion of the upper portion of the speaker and one of the two sides, but note the lack of the back panel or any sponges for it... oops
Fifth photo shows the back of the 10F, along with the T-Nuts, which happen to be steel and pointy and stuck to the magnet... Fun!
Sixth photo is the speakers in place on the front panel, looking sharp. For an improved WAF, I allowed her to select the orientation of the screws on the front. Need to find some black-out hardware (shown are stainless #10 and #6 at 3/4" long, both 32TPI)
Progress will be in spurts as time permits, but getting closer to having the first one done! Note that there is still a LOT of mattress foam to be installed in the lower half of the cabinets before gluing (and sealing of inside corners) begins.
A question: what are people using for gasket materiel for removable panels? My local hardware store seems to have a lot of real squishy foam, but nothing like I'm used to seeing for speaker gaskets (which I presume is the kind of stuff we want for sealing the back or any other removable panels). Any tips on what I should be looking for? What worked? What didn't work?
Attachments

Hmm, can we improve WAF by asking the wife to decide something about the design? How much more WAF does that give us, in percent?
Nice work Kking85743!
Don’t forget to seal the joint between the cone and the divider panel, and seal the cone to the baffle (caulking). You got the full melamine foam treatment!
I used weatherstripping gasket. Squishy foam with adhesive back.
When I was in 7th grade - I had a really special woodshop teacher. He showed us and encouraged us to make knives from scratch. We used old tool steel like large band saw blades etc. and exotic woods for the handle and we even made the leather sheath from scratch. I still have that knife with a red padouk handle. It was made for my kid sized hand so is quite small now.
You knife looks cool - is that a nylon rope handle?
yes, it's the top portion (without the back) for the 10f/rs225 speaker. just not all the parts, because it's just standing up on its own. When I get a little farther, it will be glued, caulked and stained (wife is looking at a dark blue stain for it).Is this a folded TL Kking?
thanks!Nice work Kking85743!
Don’t forget to seal the joint between the cone and the divider panel, and seal the cone to the baffle (caulking). You got the full melamine foam treatment!
I used weatherstripping gasket. Squishy foam with adhesive back.
When I was in 7th grade - I had a really special woodshop teacher. He showed us and encouraged us to make knives from scratch. We used old tool steel like large band saw blades etc. and exotic woods for the handle and we even made the leather sheath from scratch. I still have that knife with a red padouk handle. It was made for my kid sized hand so is quite small now.
You knife looks cool - is that a nylon rope handle?
Indeed, lots of caulk will be used, this was just a dry fit to ensure clearances. I'm planning the assembly around being able to caulk everything. First step is the glue-up of the top, spine and both halves of the mouth, with jigs to hold it all square and plumb. Once the glue dries, all the inside corners get caulked. Then the lower front is glued, dried and caulked. Then the bottom goes on, and then the upper front (which should be able to be completed via the back or the large speaker hole). The back will be screwed on last (thus the question about how to best seal it). HeHeHe, yep that's nearly all 100 sponges. Why just "do something" when you can OVER DO IT?!!!?! hahaha
By "squishy" do you mean the open foam that's about 1/4 to 3/8 thick for window frames? I was expecting something more like what typically comes with car audio, a thin neoprene-like gasket material, perhaps 1/8 or a bit thinner. Actually, there are probably two use cases, and I am conflating them. For the speaker gasket, the thin, neoprene material may work well. But it probably isn't the best for sealing the whole back. Is the open cell stuff sufficiently resistant to leaks when screwed down tight?
Yeah, a of mine friend had been "heating and beating" (making knives and trinkets) for a few years and invited a couple of us over, and now it's a regular thing. That was my first creation, made from a chunk of coil spring. Due to my big hands, I went with a double thick weave of paracord for the handle. Wood handles always felt slippery in my hands. I'm just picky (and a little bit weird).
That depends on the wife, I presume. She is picking the color for the wood, has asked me to use wood tape to cover the exposed plywood edges and wanted horizontal lines for the speaker screws (equatorial looking), so that way she can say she helped contribute.Hmm, can we improve WAF by asking the wife to decide something about the design? How much more WAF does that give us, in percent?
I am considering painting the throat in flat black, but I'm worried about accumulating dust, so I may go with semi-gloss or similar. Provided I get the OK, that is. She is a real sport for putting up with my crazy shenanigans. Fortunately her brother once owned a high end audio store, and so she understands what I'm trying to do, and knows how much this stuff would have cost in the 80s.
IME, it depends on what her mood is when I ask...Hmm, can we improve WAF by asking the wife to decide something about the design? How much more WAF does that give us, in percent?
to become old and wise, you must first be young and foolish (not mine, can't remember who said).
Yes.. very late to the party..Is there a crossover schematic for a RS225-8 to a RS100-4 within the thread? I just happen to have a pair sitting around.
X I've owned t-line speakers and a few years ago I purchased a pair of Beyma TPL-150 drivers. Would it be feasible to build this speaker given the disparity in sensitivity and maintain a transient perfect crossover? If yes could the Purifi 8" driver substitute for the RS225 as this might be an end game speaker.
I made a transient perfect Purifi TL with a dome tweeter in a waveguide in another thread. It’s quite the speaker. Has almost the punch of an RS225 in a much more compact box. But the $360 price is a bit steep. I later made the same TL with a RAAL ribbon and it was also quite good. The crossover was super simple and crossing high around 3500Hz allowed a transient perfect crossover.

I have not personally used a TPL-150 but from what I have heard from my friends who have used it, it works very well.
If your question is can a TPL-150 work with a RS225 in a TL? Certainly, yes.
Can it work with Purifi in a TL, another certain yes.
You would need to pad down the TPL-150 enormously. But the advantage is that it’s hardly working at all so distortion would be very low.
But if you do this, you are on your own to develop the XO. If you have active DSP setup it’s pretty easy to okay around with it.
Hello.
I've been reading through the thread the last week and this is looking like what could be my first entry into the diy speaker-world. A little torn on which full range to go for though and was hoping for some feedback.
I have the option to go for the 10F/8414 or the B80 due to taxes. I could get the 10F/8424 but it would be around $350-$400 with import taxes just for the fullrange. So in other words I would prefer to get all parts needed from 1 supplier since it would be import tax per purchase.
Unless of course there are someone here that knows of a voec registered supplier in europe?
So between those two options what would be the best? Do they have different pros/cons or is one just better no matter?
The B80 sounds just as good IMO. I think 10F might sound smoother. B80 a little more lively. Still smooth but a tad more top end perhaps.
- Home
- Loudspeakers
- Full Range
- 10F/8424 & RS225-8 FAST / WAW Ref Monitor