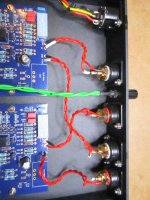
My Pearl 3 worked perfectly without any adjustments except for the load resistor values. I needed a 10K load for my cartridge, a Grado mm, and calculated the appropriate value for the dip switch to get there. I never checked the voltage across R27 or anything else. Sound is WONDERFULL!

How is what possible? You seem to need to adjust the resistor, if you want.
What happens if you don't and run with the higher bias? Do the TTA/TTC heat up & blow up? Do you get DC at the output?
Reminds me, I have forgot to measure DC offset at the output as I usually do!

What happens if you don't and run with the higher bias?
Nothing
Reminds me, I have forgot to measure DC offset at the output as I usually do!
If there is any DC on the output, something is wrong.
If you haven't seen this, and you may have not as it's buried in the thread, post #881 has an interview with Wayne about Pearl 3 and it answers a lot of questions.
Here's a preview of the 'interview' portion of the Pearl 3 article. Enjoy!
...
This is a new phono stage from the mind of Wayne Colburn, the gentleman responsible for all of the line-level creations from Pass labs over the past 25 years. In the PassDIY tradition, this continues Wayne’s DIY phono stage series with the name Pearl 3. We had a chance to discuss with Wayne and record some of his design ideas and goals for this project.
What’s new about this Pearl?
Compared to Pearls 1 and 2, there is more gain in Pearl 3, it has greater drive on the outputs, has non-inverting output...
Great read, 6L6. Offers so much explanation and useful suggestions. Like the idea of close sk209 matching allowing for lower (or no) R source values. And he explains a little of the harmonic values that can change with different opamps. This appears to be one of the reasons why opamps can sound so different.
Will be spending some time with this and Thanks again.
Will be spending some time with this and Thanks again.
Good read! I have confirmed the ~60mA based on the PS 5ohm res drop.
Also learned, as I suspected, that the P3 is likely to sound different and perhaps IMO better with high gain setting due to lower feedback.
BTW I found that the V drop across one of the 5ohm res in the PS, maybe the + side?, was a little more 0.29 vs 0.36v. Strangely. I attributed that to the extra red LED. At the time I said screw it, closed everything up connected everything and put an LP on. I may go back and try to identify where the extra current is drawn from.
This is normal.BTW I found that the V drop across one of the 5ohm res in the PS, maybe the + side?, was a little more 0.29 vs 0.36v.
I remember user Algar_emi on his pcb´s made room for a 1.5K across the negative 15 volt. It´s only purpose was to even the current draw
from the pos. & neg. supply, if you suffer from CDO (OCD with letters in correct alphabetical order) 🤣
Thank you for the offer, but I already bought a couple of resistors from my "local" store, only cost me € 0,80 and a stiff bicycle ride. We Dutch just love to ride our bicycles 😆 Desoldering and resoldering was pretty difficult (a don't own an electric desoldering pump). Not my best work 🙁.Send me 5 Euros for the stamp/postage, and I´ll send you a nice little variety of resistors
But now there is something really wrong: almost no sound from the left channel and a lot of hiss and some hum, with both the shield of the power cable connected and disconnected to the RIAA box. Switching the opamps had no effect, and switching the outputs moved no sound to the right channel. As mentioned before my build was completely according to the manual, and all the SMD jfets tested fine. I'm really a newbe with electronics; I have no idea what could be wrong... I did melt off a corner of C26 on the left channel bourd while struggling with desoldering, afterwards I could see a tiny bit of metal. I put a drop of glue on it. But I suppose that will not be the problem?

@stereonutty The current is still a little high at 5.1 mA -- that is why I suggested 680 ohms. That is not the cause of your problem, however, which sounds like a loose solder joint or cable. Check all those first. The board worked OK before the R27 adjustment, right?
Uhm, I did not test that, so I don't know...The board worked OK before the R27 adjustment, right?
That's different then. You will have to check the common culprits. Typically it has been the 2sk209 smds. Others here can discuss your C26 issue. Is the led bright and stable on the left channel?
Have one P3 where the right channel blinks once at startup and have found it is related to the opamp connection. When loose it will cause this. Check all 4 smds carefully for continuity to their next circle -- this is easy. Do this and the wire/solder joints first.
You mean like in the video of Step 17 of the online build guide?Check all 4 smds carefully for continuity to their next circle
- Home
- Amplifiers
- Pass Labs
- Pearl 3 Burning Amp 2023