

What’s insane is that’s about half of the collection. I really need to pare down…😖That was one helluva collection! A small forest of differently sounding music spices. Obviously Totally and fully insane. But cool. 🙂👍
That FR is a stunningly great cartridge. IIRC, the first pure silver coils? Needs a very low mass arm to keep the resonance down in the 10-12 Hz zone…and thus i’ve always wanted to try one on my Infinity Black Widow (yes, i collect arms too. What a mess.)
Let me know if you would like to trade for something!
Let me know if you would like to trade for something!
Wow! You just jogged my memory, totally forgot that I had 1 of these way back when!I've only ever had the one cartridge, a Fidelity Research FR-1
That FR is a stunningly great cartridge. IIRC, the first pure silver coils? Needs a very low mass arm to keep the resonance down in the 10-12 Hz zone…and thus i’ve always wanted to try one on my Infinity Black Widow (yes, i collect arms too. What a mess.)
Let me know if you would like to trade for something
Let me know if you would like to trade for something
Well, you know i love that Grado, but it’s on the block…i’d love a Blackbird, but will need to sell off a few of the very cartridges i’d like to try on it! It would be a blast to compare it with my own fantasy arm, a Schroeder Reference. The Allaerts is typically mounted on that arm, on a slate Lenco L75/PTP 6. In the meantime, i’m slinging solder to get the P3 running, as my Air Tight ATC-1 decided to give up the ghost…@spoiler
until the recent Supatrac Blackbird the only other arm for which I ever had a hankering was the Grado.
And maybe the Eminent Technology linear tracker.
Dynavector doesn't get any love here. In older ones they could be too detailed, but not so much in recent years. Was just listening to an 20X2 low output, and on a quick listen it is perhaps not as deep a soundstage as I am used to but otherwise very nice at $1250.
Some of the more expensive models are outstanding.
Some of the more expensive models are outstanding.
Nothing wrong with Dynavector, except maybe the output voltage. 0.25-0.3 mV requires more gain and thus a noisier phono stage than 0.5 mV cartridges.
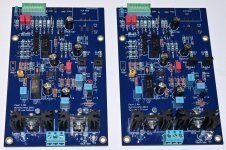
Soon two more boards to be tested.
Boards needs a flux-cleaning. Then I will use a lab-supply set to 2 x 18 VDC with current limiter to startup the boards and check DC-levels. If they look OK I will mount boards in the chassis and wire everything and hope AC also works.
I found an octet of 2SK170 I ended up using. They are not tightly matched. Idss between 7.5 - 7.7 mA.
I used 2 x ZTX 851 (instead of ZTX 457 which was in the kit).
The Sparkos regulators took a bit too much space so they will be for another project. I used 7815/7915 from kit.
I have a bag of 1000 pcs. of the blue KEMET 100 nF so spent some time getting eight close to 100nF (from 99.8 - 100.2).
I also tried to pair as best as possible the kit-resistors if there were more than two of each.
The Vishay SRF seems to be OK looking at spec.....in terms of low noise but "brown stuff" tighter to nominel values which is good for the filter part.
Just for fun I use Charcroft 47k Z-foil for input resistor.
ADA4898 as opamps. Interesting if they will work in the circuit as it is not one of those that has been tested.
Still a lot of work to do before everything is finished.
Also need to drill up the 3mm hole for chassis screw as I always use 4mm screw for this purpose!
Attachments

M12 is difficult.......I may have had some before I "cleaned up" some time ago.
I found M10.....maybe a good compromise?
Think I can find shims etc.....and I have some thick copper foil I can use as "solder pads".
M10 drill also and then file up a bit so screw fits nicely?
Then I have to look for the Unbrako hex key that fits the M10 screw head......
What is recommended torque for M10?
Attachments

When you build your P3, place and solder the 1uF bypass caps around U1 first!
Running it through her paces tomorrow, but hat tip to Wayne!
Running it through her paces tomorrow, but hat tip to Wayne!
When you build your P3, place and solder the 1uF bypass caps around U1 first!
Complete agreement, smallest things first.
@6L6 used a strip of tape to hold the little buggers in place and his soldering iron.
I used little dabs of solder paste and 375 degree hot air. The hot air tool feels familiar like a torch in my hand
@jackinnj did you toast yours in your toaster oven?
Thanks DT
I also have a new pair of glasses that focus about 10 inches in front of my nose. You know watchmaker kind of distances. My eye doctor ask why 10 inches? I said, "I solder"
Last edited:
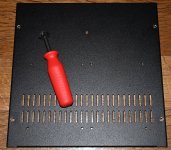
And now with 4.1mm hole for the M4 chassis screw. Hand-drilled so I saved some electrical energy!
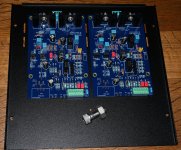
For the two P3 chassis I removed paint in the holes to mount top and bottom steel covers for better electrical contact with screws (for overall better electrical contact will all chassis parts). Removal of the paint also helps the screws catching the nuts as screws sits just a little bit deeper.
For the two P3 chassis I removed paint in the holes to mount top and bottom steel covers for better electrical contact with screws (for overall better electrical contact will all chassis parts). Removal of the paint also helps the screws catching the nuts as screws sits just a little bit deeper.
Attachments
- Home
- Amplifiers
- Pass Labs
- Pearl 3 Burning Amp 2023