The confusion is all mine, and of my own making. :-(
Your questions, myleftear, made me realize that TungstenAudio was thinking of a different cable configuration.
I will use the KISS approach for now.
@flohman: thanks for the wiring clarification and the XLR feedback...up until now I've hesitated to think about incorporating them because I was under the belief that being balanced, they eliminated the second harmonic...but that's probably incorrect; more correlated with the amp design. Thanks for mentioning the Euroblock connectors; I'll put them into the order.
Great post, yet again.
I read below as a bit strong and "scary". That may not have been your intention.
"Ideally, you should have no input signal wires connected ...you don't need them for initial testing, and you don't want an accidental short if the ends are exposed and touch)."
There's no harm, and a number of people intentionally short the inputs for biasing and nulling the offset. It's 6 of one and a half-dozen of another.
Thanks! I guess I was scared -- I'm generally careful not to short anything, so your insight is valuable new knowledge for me! I will revise.
Shorting the outputs on most amps or preamps is generally a bad idea that can lead to pain, suffering, and release of the magic smoke.
But shorting the inputs is ok, and sometimes even helpful as ItsAllInMyHead mentioned.
But shorting the inputs is ok, and sometimes even helpful as ItsAllInMyHead mentioned.
The confusion is all mine, and of my own making. :-(
IMO, no need for 🙁
You didn't cause any confusion. You stated you were considering using a coaxial cable you had in your inventory (possibly based on the fact that someone else said they had achieved good results by using a coaxial cable).
As MyLeftEar pointed out, often other cables are described as coaxial when they are not. That's why I wanted to confirm what type of cable before providing any recommendations re: wiring. I should have just answered your question, but there was a non-zero chance you were thinking of another type of cable. You were correct that it was in-fact a coaxial cable. 🙂
You asked the correct question, and you thought it through before asking.
re: KISS
FWIW, it is very simple to wire up the XLR; probably even easier than RCA. My recommendation would be to choose what fits your system, and build it that way from the start. If you know you'll never use XLR, then just wire RCA.
But.....
The "most simple" that fits all scenarios would be to permanently wire it to XLR inputs only. Then, if you have the need to use RCAs; buy ready-made RCA to XLR cables/adapters. They are not terribly expensive. They're usually cheaper than buying the parts and wire to assemble them yourself.
Here's why I recommend that route:
You don't have to remember anything ever again about the jumpers for your inputs. Wire it once and be done. 3 wires; 3 holes.
You can solder the wires without worry, which arguably could be a better connection. You can put the money from the Euroblocks toward RCA to XLR adapters.
You most likely save money over buying two sets of input jacks.
You don't have to drill for another set of input jacks.
If you don't set up your chassis for two sets of input jacks, then you don't have to swap input jacks and input wiring, when you want to run RCA inputs.
When/if you run RCAs, you don't need to remember to put in the temporary jumper between pins 1 and 3. You won't have to remember which pins are 1 and 3 on the back of your amp or find them in a dimly lit space. It's almost error-proof. Once it's built, you can't plug your inputs in incorrectly and wonder why you're not getting music.
To me... that's KISS.

Edited to reduce any confusion. RCA to XLR is more correct vs. XLR to RCA. RCA from pre => adapter => XLR input on the amp.
Last edited:

Unless they've rewired it again from previous pictures, Mkane77g did not use coax for input wiring. The only reason I call that out is you cited the post, so it may have influenced your decision.
Either way, what specific Belden cable were you thinking of using? I don't see a 28AWG except in their standard hook-up wire, but I could have easily overlooked something.
Are you using RCA inputs, XLR inputs, or both?
I did use coax for input wiring. Only because I had it already.
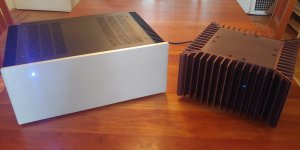
I'm liking this amp. Tomorrow I'll give it a whirl with more sensitive speakers.
Saw this somewhere in another forum. Apparently staged, but funny!
Even funnier -- the Aleph 3 is running at around 110 degrees F, while my Aleph J is 125F on the heat sinks. So the J is even better at egg frying! ;-)
Interestingly, tho, the reason the Aleph 3 needs service is because it has a giant sorbothane puck under the transformer (not true for all units, but apparently standard for a few years of production), which has now started melting unevenly under 30+ years of pressure and heat. This means the transformer and attached filter cap board are now heeling over like the Tower of Pisa. It still works, but I worry the shifting will eventually pull the hookup wire connections free on one side. DC offset is 20mv in one channel, 8mv in the other. I'm assuming that's fine, but I will let Pass Labs decide when they give it the once over. 🙂
Attachments
So, you did rewire it after the pics you posted. Cool. Enjoy the amp!
Suppose I must have. Twisted & shortened everything as well.
I've posted the next (and maybe last!) installment in the n00bs guide blog:
Building: Chassis Assembly and Final Adjustments
As always, comments, suggestions, corrections welcomed!
I've also gone back to the amp boards build post and mentioned the possibility of front panel LEDs, to save people the bother of doing what I did, desoldering an LED and replacing it late in the game. I've also added four blue LEDs to the saved Mouser cart. For less than a dollar, I think it makes sense to just order a full set of red/green AND blue LEDs, so the builder can decide as they go which they like.
Suppose I must have. Twisted & shortened everything as well.
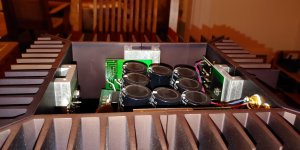
And this morning relocated the RCA to keep input & output wires from crossing & added a CL 60 from PS gr. the star ground. Still waiting on Mouser order for more CL 60's.
I still can't get over that sweetness can come from something so simple.
Ah, the journey ends. I've found it and this thread super helpful. I just stuffed the PSU board. Just need to start wiring it up.
I've posted the next (and maybe last!) installment in the n00bs guide blog:
Building: Chassis Assembly and Final Adjustments
As always, comments, suggestions, corrections welcomed!
I've also gone back to the amp boards build post and mentioned the possibility of front panel LEDs, to save people the bother of doing what I did, desoldering an LED and replacing it late in the game. I've also added four blue LEDs to the saved Mouser cart. For less than a dollar, I think it makes sense to just order a full set of red/green AND blue LEDs, so the builder can decide as they go which they like.
Ah, the journey ends. I've found it and this thread super helpful. I just stuffed the PSU board. Just need to start wiring it up.
Good for you! Please let me know if you find anything that could be improved or made clearer. Also, you might want to re-read the earlier posts, as I've made minor edits. I also changed the saved Mouser cart to add a couple additional things, like a pot trimmer and 4 blue LEDs in case you like Pass blue better than red/green. 🙂
Happy holiday building!
It’s been a while since I read this thread, so pardon me if it’s been worked out. But I was looking at that the last blog post and the xlr pin connection to chassis jumped out immediately. Shouldn’t that be connected to the board? And when XLR is not in use it should have a jumper for. The amp is “floating” about 10 ohms from chassis ground thanks to the CL60 from psu ground to chassis. This xlr connection on the blog post goes to chassis/safety ground, not audio ground.
It’s been a while since I read this thread, so pardon me if it’s been worked out. But I was looking at that the last blog post and the xlr pin connection to chassis jumped out immediately. Shouldn’t that be connected to the board? And when XLR is not in use it should have a jumper for. The amp is “floating” about 10 ohms from chassis ground thanks to the CL60 from psu ground to chassis. This xlr connection on the blog post goes to chassis/safety ground, not audio ground.
Great question! Can any of our experts chime in here? I went with pin 1 to chassis based on discussions elsewhere on the DIYAudio forums (for example, here), and articles like this one. In other words, I tried to do my research, but I may have misunderstood something...
- Home
- Amplifiers
- Pass Labs
- Aleph J build guide for noobs