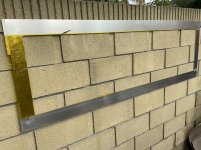
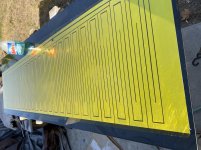
The laminating process is the white knuckle time since your trying to lay a big
Sticky sheet 20” x 72” on top your traces without disturbing anything and also trying to
Prevent air bubbles.
Another issue with this silicone adhesive Kapton is unrolling. It takes about 10 minutes to pull to 72” in length as you dont want to tear the film.
The edges of the roll can not have any nicks whatsoever as it will tear from that point.
The first go at this I sprayed liquid on the aluminum and wrapped the Kapton sticky side around the edge of glass and started pulling and realized this isnt to work and stopped
Right there.
Because this stuff starts sticking rather quickly regardless of having a fluid film between layers, you need to slightly stretch the film - before - laying it on top of the fluid. It wants to start sticking right away and you dont have alot of time...
I made a picture frame of 3” wide pieces of aluminum where the inside border is 1/4” smaller than the outside dims. of the Kapton for the purpose of being able
To stick the sheet to it , so as to have a taunt film before positioning over the aluminum
Sheet.
You lay the kapton stickiy side up on a big table and place the “ picture frame “ on top and
Press down around the edges.
So now you have a workable and taunt film ready for placement..
To be continued
ok yes I too put the film on a frame under just enough tension to flatten out. Lay down over the foil, and work from center out to avoid bubbles. Care taken to work it all in a gentle way that doesn't move or stretch anything until all is down and no bubbles . Then can go back and rub down with more force
Because you dont know the amount of fluid the problem becomes trying to move too much
Liquid in certain areas.
This is where I did it in 2 stages meaning if you try to squeegee too fast, that “Wall of liquid”
Will start folding or wrinkling your Kapton against this wall of liquid. The stuff is .001” and cant compete with too much force
I took a small diameter Paint roller (7” 1” dia foam ) and first you move at right angles (your flushing down the traces of aluminum ) out to edge.
Your trying to equalize as much fluid as you can before using a squeegee. You wind up with small ripples ready for the squeegee
Important that you relieve and round the rubber corners with a belt sander or something
because that sharp corner will ripple your Kapton and your toast.
Spray or wet the squeegee side with Windex or water and start looking thru the film and you,ll get the picture on fluid exiting out to the edge.
Right angles work best against the traces. Keep pressing hard until you see no more liquid
Coming out the borders.
Then take the whole shebang out in the sun and let cook a little to dry out internally
What is amazing is the silicone adhesive and how immune it is to anything.
Even though I used WD-40 to hold down the aluminum foil and traces of it were on the
Glass, I still had to pull it away from those center sections— incredible stuff
BTW - I put in a call to see if the same seller has anymore of this Kapton foil
Regards
David
Even though I used WD-40 to hold down the aluminum foil and traces of it were on the
Glass, I still had to pull it away from those center sections— incredible stuff
BTW - I put in a call to see if the same seller has anymore of this Kapton foil
Regards
David
Last edited:
You amaze me Avwerk, look's like a nice ribbon, although no corrigation yet, I ruined 27 atempts to get 1 scintilla foil, I just gave up!!!period!,,,but now you got me thinking again,,,but you not finished yet,,now the corrigating, 2 splines 2" in dia 26" long, gear driven would be the perfect solution,,but would cost a fortune to get made, kapton like all other plastics has memory,it wants to pull the corigation flat again,,,an ideal way of getting around this would be to heat the splines to 400 deg F and the kapton would retain the memory,,,just a thought, maybe all nonesense.
Al
Al
Best Quality Heat Resistant Kapton Polyimide Film Tape 500mm*33M BGA PCB | eBay
[3DMakerWorld] Kapton Tape for 3D Printer Platform 12" x 100' (305mm x 30.5m) 712324578829 | eBay
a couple of 1 mill kaptons with 2 mill silicone adhesive. These are quite good prices BUT its quite thick IMO
Dave what "fluid" are you using to help with Kapton install? I usually use distilled water with a little soap and some alcohol mixed. Sort of like Windex but I know whats in it
Last edited:
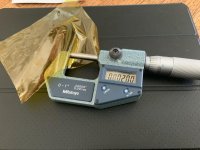
Same seller 33 meters
This silicone adhesive is the honey badger of glues and there is no comparison
With thinned sprayed glues
This is factory quality this side of etched panels as that would be the best IMO but another different process altogether.
On test sheets I tried distilled water and 2 drops of dish soap and it worked well.
I did use Windex as the layer. I had 3 cans of CRL window cleaner that lost it pressure so poked a hole in some spent cans and mixed it in with some windex
So its not all windex but close enough..,
I sprayed the glass section pc and the upright Kapton sheet before placing it over the table
If you buy from them make sure you tell them to pad the corners as there was a small shipping ripple that had to be watched when un rolling.
Seriously, any nick on those edges will spoil your day- protect them at all costs
On the thickness of .002” ( glue and foil) you do need some material strength as it is under tension for bass
Last edited:
thanks Dave
BTW the elasticity of Al foil is far less than the Kapton, wich means most of the tension is actually on the foil. However laminating these materials to the Al foil makes it much more durable and resistant to stress.
I have made diaphragms out of .0007" Al foil laminated to .00025" mylar and it held up just fine.
In another design I used thin strips of the .00025" mylar only over the Al foils cut out slits. This was an experiment to hear what a true ( or close to it) Aluminum Only bass diaphragm would sound like and if it would last. It didnt sound any different ( below 500hz anyway) and it cracked at the terminations in under 4 hrs of hard use. It was about 1 db more sensitive however
Good insight Lowmass
I see Grainger has .0007” foil for milk money but its soft temper and not for bass panels
I will more than likely make some mids or twt ribbons down the road and see this as better damped for this application.
Sanding it down while on the glass will reduce it even further
What material did you use for those ?
Regards
David
well I have built many MRTs
backing from .00025" to .001"
adhesives from .0001" to .002" all sorts from cheap to extremely expensive and I have access to profilometer and have developed a method to cheaply get .0001" layer of adhesive. sorry cant give that one away.
foil from .00015" to .001" from dead soft to full hard
and many of all those Al thicknesses in "FO" foil only ( no backings at all)
Flat, corrugated ( in many directions and have been awarded a patent on that one),
etc etc
I went on a 2 year obsession at one point making only super thin ultra lowmass mRTs from FO .00015" Al foil to a bunch of laminated ones as well
In the end the super lowmass thing lost its attraction once I learned how to tame the resonant issues of the heaver units and I actually like a well developed "heavy" MRT more than the supposedly technically better super thin versions.
A word on foil softness and damping. There is no difference with Al foil. In fact many dont realize that dead soft and full hard actually have the same stiffness up to the yeald point of the soft stuff. Hard just feels stiffer because it takes more force to get it to its higher yeald point
Getting a ribbon to behave well has more to do with shape and size and to a lesser extent the adhesives and backings. You have to play with them all till your hands bleed to get a trully great one.
Watch for issues between 3 and 7 khz , get the wiggles out in this area and the rest is easy. I cant tell yall specifically what to do here as I would be giving secrets away I plan to profit from in future, BUT I will tell ya this much.
In FOs , .0005" thick is optimum for sensativity. lighter and heavyer will be lower sensativity.
.0005-.0007" foil is a good all around performer to use with adhesive around .0005" and backing around .0005". This gives good balance of mechanical properties with readily available materials. .001" backings lower sensativity and deaden the high freq sound even when they measure good out to 20KHz.
Apogees beloved MRT in the Stage is .0007" foil, .0003" adhesive, .0003 " kapton. Good place to start.
AND hard temper foil is a must if you want it to last. Soft temper will go slack quick.
Alot of good info Lowmass and thanx for giving us more depth to understanding
The nuts and bolts of these ribbons
———-
I would like to know what you think of the - wave vs straight cut - versions that were on the grand versions
Early on I was going to have an installer do the work but just about had a stroke on the price and I did ask them about these versions
One was adamant about it being worse than the straight version and a european rebuilder said the same thing.
I did contact Graz but he gave me a commercial response but never told me which was better
His wave version is an etched panel and really nicely done and not likely to be made here..
Now people are asking this right ? When they spend well over 4k to have this work done and it is a reasonable question...what to use ?
I dont like it for technical reasons feeling it crosses over into a weak field between magnets
And on the other hand like it for keeping the foil flat since this straight area tends to stand up with wear and interleaving might keep it down.
The other consideration is when it comes off the corrugator the adhesive tends to stick somewhat and a wave would allow it to release easier.
I havent tried wax paper just yet to solve this minor issue but its there nonetheless
Is there any superior technical reason for the wave other than my speculations ?
Last edited:
Ah yes the waves.
I built a few bass and mrts that way. Yes about the only benefit I personally see was in the corrugation process and the way it sort of structurally stiffens the slit sections and they hold shape a bit better.
Then on the MRT it has the effect of stiffening the ribbon across its width just a bit more than straight slits and maybe the ribbon will resist curl better??. The MRTs bending mode issues may have been better served by wiggly rather than straight slits??
I honestly did not see, hear, measure anything significant BUT I haven't compared Apogees waves to their straight cut slits, only my own versions. I can tell you that sometimes very subtle changes can make useful improvements and I cannot speak for how much work Graz may have put into this and maybe it has some advantage. His work is very good and he has put a huge amount of time into it.
There are two things that come to mind however on this.
First is the effect of foil outside the best magnet field on planer diaphragms. People get all wacked out about the parts of the foil going out of the ideal magnet field area. First off it inst as bad as it seems on paper. Yes the forces are not perpendicular out there BUT in practice the effect isn't nearly as bad as it would seem AND foil out in that section helps with damping especially in mids.
Second, Symmetry can amp up resonances and non symmetry can actually help with damping. Symmetry tends to produce a subjectively more dynamic sound BUT non symmetry tends to produce a smoother freq response.
The waves may be an attempt to help damp some issue but not sure if all that effective. Certainly doesn't hurt IMO.
Now this non symmetry thing will worry some. They will say "its best if perfect uniform drive". My experience with heavy diaphragms is that too much symmetry causes more problems. Again its all about finding the optimum balance and capitalizing on every little thing you can without overdoing it.
For instance look at Apogees bass diaphragm and then look at the magnet array behind it. Both are shaped and or set in place to produce non symmetry. The magnet array leaves a long V shaped area of diaphragm UN driven. This will result in a smoother bass response.
Once I built a full range planer 12 inches wide BUT only center 3 inches driven. Smoothest midrange I ever had from a planer. Drive the whole diaphragm and yea you get a more dynamic sound BUT mids not as good
Last edited:
The good old impulse response would shed some light on whether any control is being lost
If one could examine both versions side by side.
I know Magnepans ring like a telephone with extra cycles throw in for free under this test and it adds a euphonic flavor that some like but accuracy its not
The red flag came up on inquiry and since either version has the same installation procedure, I didnt see any skin in the game for the info.
I might make a version with a transition just enough to cross over the width of the cut and no more than that.
If you look at the total bottom to crest height its easy to tell its bigger than the slit width on there version
Maybe a good compromise would be between this..hmm looks like another template is in my future
The bending modes you mention on the mids and up make sense and I dont see any downside issues there.
In the end it looks like there is mechanical benefits to a wave pattern in construction and just another diy adventure.
Regards
David
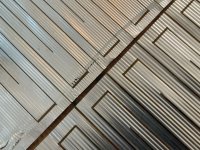
So here is the corrugation and its not like you can find an abundance of choice out in the market on what will work.
We do want a cheap solution to work with.
Even though it doesn’t match exactly, the actual height is in comparison is the same although it looks higher.
My cuts are bigger and that will more than likely result in less output but every frequency graph I have seen on Apogees shows huge bass gain relative to the rest of the spectrum.
The Scintilla being one of the worst at 10 to 15 db so maybe a good thing in the end.
Time will tell and a new template with thinner cuts is possible.
This is the first panel attempt I made so go easy
We do want a cheap solution to work with.
Even though it doesn’t match exactly, the actual height is in comparison is the same although it looks higher.
My cuts are bigger and that will more than likely result in less output but every frequency graph I have seen on Apogees shows huge bass gain relative to the rest of the spectrum.
The Scintilla being one of the worst at 10 to 15 db so maybe a good thing in the end.
Time will tell and a new template with thinner cuts is possible.

This is the first panel attempt I made so go easy
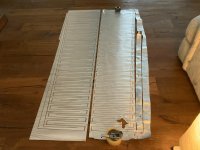
First panel attempt and it should pull taunt when pulled horizontally
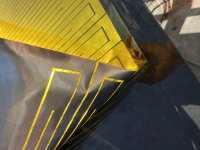
Although its hard to see, near the top the Kapton got a small diagonal ripple I mentioned earlier in application
And when stretched it might be an issue. I will have to apply heat when doing this, so as for now , I will consider this panel a fail and might remake it.
I have my doubts on this one
The second panel was no problem and was able to equally squeeze out evenly
You live and learn...
Regards
David
Impulse response is all you need BUT over time U can see much just from freq response
In my latest small ribbon design I worked for a loooong time to get rid of all the wiggles and stored energy I see in just about all commercial available ribbons. Its a unique construction and I simply could not get this good a waterfall plot with standard laminated or foil only ribbons that have corrugations. wavy slits or not you will likley see issues with stored energy somewhere between 3 and 7 khz.
The easy way around these issues is to use a "flat" architecture such as RAAL.
Thats fine above about 2 Khz BUT if ya want to take a ribbon, especially a small ribbon down below that then flat will self destruct
Your corrugations look pretty good, nice work really.
The thing about corrugated bass diaphragms is this. You can get a surprising amount of performance even from a less than perfect corrugation, However when it comes to that final precision in tuning, only a super rigid and very precise corrugator will do it.
The reason is if the corrugator is flexing even a very small amount you dont end up with a perfectly even corrugation depth everywhere. This means that when the diaphragm is tensioned on frame it will have sections that are looser than others because the diaphragm is bowed slightly in those areas. This makes it impossible to adjust the tuning as accurately as a near perfect diaphragm.
Dont get me wrong, you can still get great sound from a slightly less than perfectly tuned diaphragm but bass perf can be better if corrugator is built like a gold plated tank
- Home
- Loudspeakers
- Planars & Exotics
- Anyone making Apogee bass panels?
