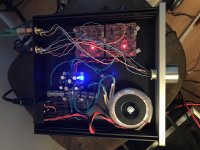
Made really good progress with my build yesterday. Casework is basically done. Using a 1U 230x230 Galaxy with aluminum covers and 10mm faceplate from the store. Using an Antek AN-0215 25Va, 15V dual secondaries and a mini-CapMx board from a Mark Johnson/Prasi colaboration (thanks guys!). The CapMx gives a pretty steady and clean 18V +/- supply. I'm also using some stripped down CAT5 cable for my signal connections and an ebay, el cheapo, DACT stepped attenuator.
A note about my construction, I smoked a BD139 on one rail of my CapMx. I tracked it back to the purple boards and the standoffs I am using to try and secure the board to the chassis. I found that the standoffs scraped through the solder mask and shorted the V+ rail to the chassis. So don't rush things like I did and skip the plastic corner board mounts for the purple boards. OR, make sure you have a way to mount them that avoids potential shorts. I quickly made some plastic "washers" from the Burger King fountain drink top I had for lunch! Did the trick. No more shorts!
I haven't had a lot of time to listen yet but so far this linestage sounds very nice indeed. I'm switching from a WHAMMY on my ALPHA 20W amp. Compared to the WHAMMY, Wayne's Linestage sounds more detailed but maybe a touch thinner on bass. Will try to get more listening in tonight.
Thanks for a great design Wayne! And thanks for the kit, Jim!
Attachments

it is good to ask
then think
then ask again
then think again.
I'm doing it all the time ........ only forgetting sometimes to think
I agree except at my age, 70, after a few days I then forget.
Can anyone recommend a reliable supplier for a pair of KSA1220s. Mouser, Digikey and Allied have none in stock.
Take a look at TTA004B & TTC004B from Toshiba.
Very good hfe linearity up to 100mA (unlike KSC2690).
Very complementary.
Available at Mouser.
Cheers,
Patrick
Big Outputs
Thanks Patrick, This sounds like a nice option and possible upgrade at low cost, however if fine tuning is required to properly bias this stage I will need help on circuit design. I will be using a Broskie bipolar LV regulator at + & - 18volts.
Thanks Patrick, This sounds like a nice option and possible upgrade at low cost, however if fine tuning is required to properly bias this stage I will need help on circuit design. I will be using a Broskie bipolar LV regulator at + & - 18volts.
to EUVL #644
Very interesting BJTs. And TOSHIBAs.
I didn't know them. Thanks for this tip! 😉
Greets
Dirk
and a happy relaxed Easter weekend to all of you!
Very interesting BJTs. And TOSHIBAs.
I didn't know them. Thanks for this tip! 😉
Greets
Dirk
and a happy relaxed Easter weekend to all of you!
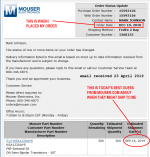
A couple months after seeing Wayne's presentation at Burning Amp 2018, I placed an order for 300 pieces of the NPN and 300 of the PNP "Big Boy" output transistors in TO-126 medium power packages. The NPNs arrived quickly but the PNPs are on backorder. Here is the latest information from Mouser.com (screen capture image below); they won't ship until September at the earliest. Cowabunga!
_
_
Attachments
Hey, thanks for the foresight and the effort! I was originally going to build mine with the headphone option, but decided against it for this very reason. Hopefully others didn't do what I did: order everything but the LEDs and trim pots. D'Oh!!!
Hey, thanks for the foresight and the effort! I was originally going to build mine with the headphone option, but decided against it for this very reason. Hopefully others didn't do what I did: order everything but the LEDs and trim pots. D'Oh!!!
I guess you didn't use 6l6's pre done Mouser cart?
Mouser Electronics
Russellc
Nah, placed my order just before that post. 😱 No big deal, as I needed parts for (yet) another project...
Last edited:
Nah, placed my order just before that post. 😱 No big deal, as I needed parts for (yet) another project...
Yes.....There is always that....the never ending parade of projects can always be shopped for!
Russellc
Very interesting BJTs. And TOSHIBAs.
I didn't know them. Thanks for this tip! 😉
Greets
Dirk
Just search at Mouser for Toshiba, and take time to read datasheets.
There are many interesting (new) devices not under the usual 2SA 2SC names.
Don't get scared by SMD, especially for small signal.
I almost don't use anything else, apart from Sanken for TO220 and above.
Some Zetex has lower noise, but also lower hfe and higher capacitances.
And not very constant hfe vs Ic.
Patrick
Mounting Question
I was able to successfully power up and test the preamp. Now I need to put them in the enclosure and was wondering if there are any suggestions on how to mount the boards?
Thanks
I was able to successfully power up and test the preamp. Now I need to put them in the enclosure and was wondering if there are any suggestions on how to mount the boards?
Thanks
I was able to successfully power up and test the preamp. Now I need to put them in the enclosure and was wondering if there are any suggestions on how to mount the boards?
Thanks
Yes, earlier in the thread 6l6 posted some parts for that. Mine are currently floating in air, held up by wiring with a sheet of thick cardboard underneath.
My idea is to either get the parts 6l6 shows, or mount two standoffs to chassis floor, and pinch the boards between a third on opposite side. Be careful to place them where screws don't interfere, and I will use nylon non conductive stand offs to prevent shorting anything to chassis.
Russellc
I was able to successfully power up and test the preamp. Now I need to put them in the enclosure and was wondering if there are any suggestions on how to mount the boards?
Thanks
Board Edge Mounting Kit - Pack of 4 ID: 1116 - $2.95 : Adafruit Industries, Unique & fun DIY electronics and kits
- Home
- Amplifiers
- Pass Labs
- Wayne's BA 2018 linestage