Without revealing any proprietary details of interior of the MTMs, quite a difference there as well.
Oh yea. PAWO with FR125 did not work all that well, it did work with FE127 althou not as well as Mileva which was “designed” to be the same form factor but with proper sims.
dave
dave

Something I was wondering about is how the supposed 45 degree waveguide on the front baffle will affect the sound? I was thinking of gluing a 12mm + 18mm plywood boards to the 23mm front baffle to time align the drivers better. So, total depth of the waveguide would be 53mm, which to my calculations would align the 10F/8424 pretty nicely with the SLS 12. In the end it would leave me with a waveguide that is 53mm deep and nicely rolls off to the front baffle.
If nothing else, plywood waveguides are gorgeous 🙂
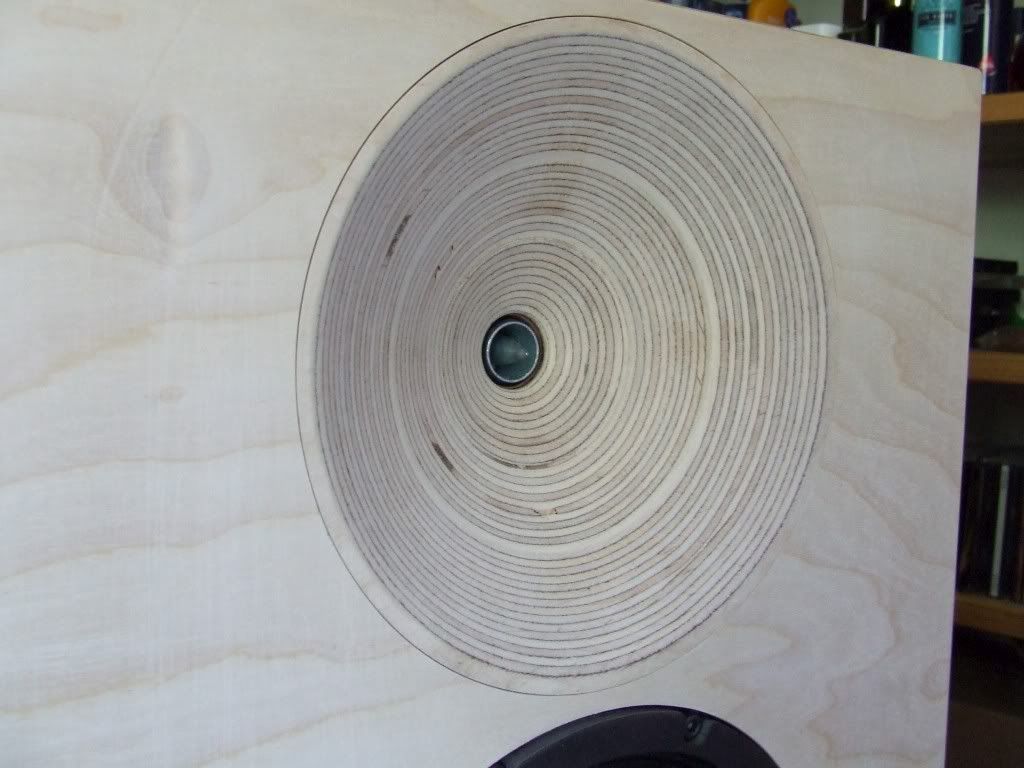
If nothing else, plywood waveguides are gorgeous 🙂
Progress update!

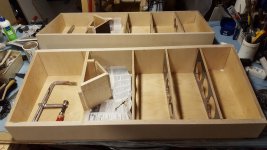
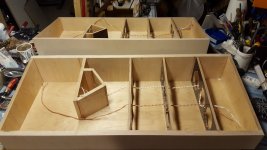
I cut the boards with a circular saw to accommodate for the angled front baffle. It had to be cut without a guide due to difficult shape. After that, it was just sanding, sanding and even more sanding to get the board edges as straight as possible. I succeeded reasonably well in this.

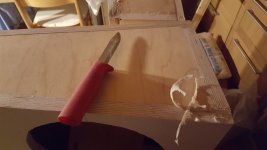
Next it was cutting the holes to the braces. I grabbed a can of paint and drew a line according to the bottom. Very sophisticated and high-end.

Cutting the holes. Either my router bit was extremely dull or this batch of plywood packs some extra punch, but damn it was hard to cut them. Had to use quite a bit of force to make the router move on the plywood, and as you can see from the end result it's a bit choppy. Doesn't matter, it's all going to get hidden inside the speaker. As long as the air flow isn't blocked on the inside, it's all good and well.

Gluing the boards for the first speaker. It's just the sides getting glued together for now. After that, I'll glue the front baffle to them. The back side will be attached with screws, I want to have the possibility to open them later for service.
Tomorrow it's going to be time for the front baffle. Hole for the subwoofer and designing and building the waveguide for the full range. I also updated the first post with current plans.
I cut the boards with a circular saw to accommodate for the angled front baffle. It had to be cut without a guide due to difficult shape. After that, it was just sanding, sanding and even more sanding to get the board edges as straight as possible. I succeeded reasonably well in this.
Next it was cutting the holes to the braces. I grabbed a can of paint and drew a line according to the bottom. Very sophisticated and high-end.
Cutting the holes. Either my router bit was extremely dull or this batch of plywood packs some extra punch, but damn it was hard to cut them. Had to use quite a bit of force to make the router move on the plywood, and as you can see from the end result it's a bit choppy. Doesn't matter, it's all going to get hidden inside the speaker. As long as the air flow isn't blocked on the inside, it's all good and well.
Gluing the boards for the first speaker. It's just the sides getting glued together for now. After that, I'll glue the front baffle to them. The back side will be attached with screws, I want to have the possibility to open them later for service.
Tomorrow it's going to be time for the front baffle. Hole for the subwoofer and designing and building the waveguide for the full range. I also updated the first post with current plans.
Thanks thanks. I have a week-long holiday, so I'm making the most of it 🙂
Also these big build phases like cutting, routing and coarse sanding create a lot of dust and noice. I much rather hurry and try to get them ready now when I'm in the countryside than try to tinker in my city apartments 2x3m balcony...
Also these big build phases like cutting, routing and coarse sanding create a lot of dust and noice. I much rather hurry and try to get them ready now when I'm in the countryside than try to tinker in my city apartments 2x3m balcony...
Yesterday night I was tinkering around with Hornresp and trying to find out the effects of the waveguide when the penny finally dropped. What if, instead of the waveguide, I'll just flip the drivers the other way so the bass is on top. Just as xrk did on his cabinets a couple pages ago. So, I took the distance measurement, and lo and behold, the distance difference was 4cm. This along with flush mounting the driver is enough to time align them. They also sit closer together which is always nice.
So I went back to work, and a bit of pulling and hammering later the internal supports are in position to accomodate for the new driver alignment. This saves me a ton of trouble with the waveguide.
So I went back to work, and a bit of pulling and hammering later the internal supports are in position to accomodate for the new driver alignment. This saves me a ton of trouble with the waveguide.
More and more updates! I think people are growing tired of this project, last 3 posts are mine 😀

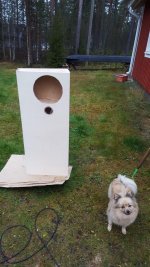
Starting from the basics, I measured the holes to be cut on the front baffles. Only got one try at this, so it's got to be perfect on the first go. The subwoofer is going to be at top, the full range at bottom.

And there we go! Both holes for the subwoofer are cut. The hole was too large for the circular hole jig, so I had to cut it with free hand. Not the smoothest cut, but doesn't quite matter. It's going to be hidden inside the enclosure. The subwoofer is made for surface mount, so I'm going to do exactly that.


Here is my DIY hole & flush mounting jig all set up for cutting the 97,25mm 3,5mm flush mount for the 10F/8424. It's actually very exact wen you adjust it correctly, I can use it with about 0,25mm accuracy. The hole ended up being just a tiny bit larger than the 10F/8424, but just enough for a slice of paper to fit in.

Front baffles are ready! Or at least the holes are, still got much work to do 🙂

Last pictures for today. I screwed the back board on instead of gluing it. The glue part will come later, after the front baffle has been attached. This is simply due to not having mounting terminals with me. Should have thought of this before I came here, but nothing I can do about it anymore. Need to do it later.

They look like coffins 😀
Starting from the basics, I measured the holes to be cut on the front baffles. Only got one try at this, so it's got to be perfect on the first go. The subwoofer is going to be at top, the full range at bottom.
And there we go! Both holes for the subwoofer are cut. The hole was too large for the circular hole jig, so I had to cut it with free hand. Not the smoothest cut, but doesn't quite matter. It's going to be hidden inside the enclosure. The subwoofer is made for surface mount, so I'm going to do exactly that.
Here is my DIY hole & flush mounting jig all set up for cutting the 97,25mm 3,5mm flush mount for the 10F/8424. It's actually very exact wen you adjust it correctly, I can use it with about 0,25mm accuracy. The hole ended up being just a tiny bit larger than the 10F/8424, but just enough for a slice of paper to fit in.
Front baffles are ready! Or at least the holes are, still got much work to do 🙂
Last pictures for today. I screwed the back board on instead of gluing it. The glue part will come later, after the front baffle has been attached. This is simply due to not having mounting terminals with me. Should have thought of this before I came here, but nothing I can do about it anymore. Need to do it later.
They look like coffins 😀
They look like coffins
Perfect, in time for Halloween!
Man, please resize your pictures. Those monster sizes make it almost impossible to read the thread.
Those holes looks very ragged. It won't show when you put the drivers in, of course, but the way you use your jig creates all those mini edges... unless that was the plan?
Mayuri,
Following your build - but as perceval has already said, please resize your pics or ask the mods to help out.
Good progress - waiting to see the end result!
Following your build - but as perceval has already said, please resize your pics or ask the mods to help out.
Good progress - waiting to see the end result!
Better yet don't post pictures at all -- post attachments. Then all that appears in your post is a set of thumbnails. The reader can then open the thumbnails or not.
Bob
Bob
Those holes looks very ragged. It won't show when you put the drivers in, of course, but the way you use your jig creates all those mini edges... unless that was the plan?
The subwoofer hole is quite jagged. It was done by free hand, without the jig. On the full range hole, it was to flush mount the driver, so the edge of the driver matches the front baffle 🙂 Unless you meant something else?
Ah, I was wondering about that. My browser automatically resized the images so I assumed it looked normal. Checked with another browser and it looks horrible. I'll resize them right away.Following your build - but as perceval has already said, please resize your pics or ask the mods to help out.
I'll do this in the future. It's more work for me, but at least the images stay in here if someone wants to look them up later.Better yet don't post pictures at all -- post attachments.
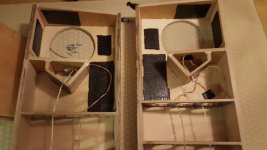
In other news, the enclosure for the 10F/8424 is ready. It's not a dagger type TL as I was thinking earlier, but it has one other trick on it's sleeve. It hasn't got a single parallel wall, all are angled compared to each other. It's a bit larger than I planned, about 3l, but it shouldn't make much of a difference. According to simulation, this enclosure should have -3db at 180Hz and -6db at 110Hz.
Attachments
Last edited:
Today was a short day with the build, as I'm literally waiting for glue to dry.

First off the full range enclosure needed some extreme makeover to fit inside the subwoofer enclosure. The extra bits came off easily with a hand saw. Then it was time to put the internal wiring inside. I use only premium quality true audiophile cable (it has copper in it and a rubber protective sleeve). However, thing I usually do with the speaker cables is that I check it has a low DC resistance (discontinuances are bad) and twist them. On the off chance I ever listen to these inside an MRI machine, the electric field won't mess with the signal that much. Plus, I know some studio monitors get build this way, so it probably has some science behind it. The connector isn't in place yet (still don't have them), but I'll use Speakons.

Skip to the last thing I did today, which is gluing the front baffles. The fit was not perfect, so I mixed fine sawdust with PVA glue to create a non-runny hole filler susbtance that I applied generously to all inside edges in contact. Due to the shape of the enclosure, it was impossible to use clamps to pressure the baffles very tightly together. Had to go for the next best thing. I did it the ultra-fine way of first walking and bouncing on top of the enclosures with my old man to squeeze the extra glue out, then piling as much junk on the enclosures as necessary to keep the seams closed nicely. The other enclosure has bags of concrete on it, the other an extremely heavy old-time arc welder. My method doesn't seem much, but hey, if it's stupid and it works, it ain't stupid 😛
First off the full range enclosure needed some extreme makeover to fit inside the subwoofer enclosure. The extra bits came off easily with a hand saw. Then it was time to put the internal wiring inside. I use only premium quality true audiophile cable (it has copper in it and a rubber protective sleeve). However, thing I usually do with the speaker cables is that I check it has a low DC resistance (discontinuances are bad) and twist them. On the off chance I ever listen to these inside an MRI machine, the electric field won't mess with the signal that much. Plus, I know some studio monitors get build this way, so it probably has some science behind it. The connector isn't in place yet (still don't have them), but I'll use Speakons.
Skip to the last thing I did today, which is gluing the front baffles. The fit was not perfect, so I mixed fine sawdust with PVA glue to create a non-runny hole filler susbtance that I applied generously to all inside edges in contact. Due to the shape of the enclosure, it was impossible to use clamps to pressure the baffles very tightly together. Had to go for the next best thing. I did it the ultra-fine way of first walking and bouncing on top of the enclosures with my old man to squeeze the extra glue out, then piling as much junk on the enclosures as necessary to keep the seams closed nicely. The other enclosure has bags of concrete on it, the other an extremely heavy old-time arc welder. My method doesn't seem much, but hey, if it's stupid and it works, it ain't stupid 😛
Attachments

Last edited:
My holiday is over so speakers will now take a third priority in my to-do list, right after studying and my wife 🙂 Saturday morning was the last day of building, and I got almost everything done I planned on doing.

Gluing the front baffles was a success. Few places had some unevenness and shortages, but I knew that was going to happen anyway. I already planned on routing a small cut around the front baffle seam which I'll fill with black elastic glue. It will give a nice finished look with a smooth black line going around the baffle. Here's my dried glue removal tool, very simple and efficient.

Here's the right speaker with a helper woofer. After this picture I routed the baffle seams and packed them up.
Next update when I get time to work on the speakers again 🙂
Gluing the front baffles was a success. Few places had some unevenness and shortages, but I knew that was going to happen anyway. I already planned on routing a small cut around the front baffle seam which I'll fill with black elastic glue. It will give a nice finished look with a smooth black line going around the baffle. Here's my dried glue removal tool, very simple and efficient.
Here's the right speaker with a helper woofer. After this picture I routed the baffle seams and packed them up.
Next update when I get time to work on the speakers again 🙂
Attachments
Thanks thanks 😀

A small update. I did some very simple knuckle testing of the enclosure, and it seems the open area around the bass driver could use some more internal bracing. I added a couple bitumen 4mm mats to dampen it a bit, but they alone don't do much. Internal bracing is where it's at 🙂
A small update. I did some very simple knuckle testing of the enclosure, and it seems the open area around the bass driver could use some more internal bracing. I added a couple bitumen 4mm mats to dampen it a bit, but they alone don't do much. Internal bracing is where it's at 🙂
Attachments
Update again. I haven't been working on the speakers much, only did the baffle edge rounding for them along with light sanding. Not much to show. On the other hand, I finished my bass trap!

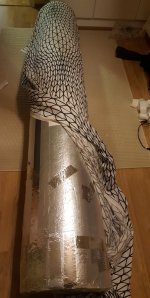
Here's the bass trap in the making. The aluminum tape is to mask texts etc in the wrap, because they show through the fabric. Low frequencies will pass them like nothing anyway, so it's purely aesthetics. The fabric is from IKEA. I went to the easiest way of attachment, just tape it on the tube.

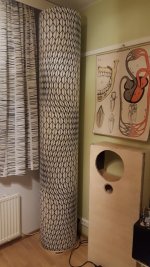
Here is the bass trap on it's place in the corner, finished. The tray under it is also from IKEA. It's handy for dragging it out of the corner for cleaning, but serves virtually no other purpose. It turned out to be better than I originally thought. WAF should be alright too since wife actually chose the fabric and helped me wrap it.
Here's the bass trap in the making. The aluminum tape is to mask texts etc in the wrap, because they show through the fabric. Low frequencies will pass them like nothing anyway, so it's purely aesthetics. The fabric is from IKEA. I went to the easiest way of attachment, just tape it on the tube.
Here is the bass trap on it's place in the corner, finished. The tray under it is also from IKEA. It's handy for dragging it out of the corner for cleaning, but serves virtually no other purpose. It turned out to be better than I originally thought. WAF should be alright too since wife actually chose the fabric and helped me wrap it.
Attachments
Bit of updates again. I'm doing everything aside from speakers at the moment for a very simple reason: Every time I come home from university it's already dark and usually raining. When darkness falls after 5 pm, there's not much to be done outside, and I don't want to fill my apartment with sawdust by sanding inside. Only time I can work on the speakers during daylight hours are weekends.
On the other hand, that leaves me time to work on the room and audio sources!

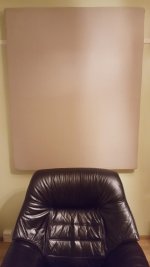
Here is my listening chair with the finished acoustic panel behind it. The panel itself has 1500x1200x100mm dimensions. The cover is light beige flax linen. Looks very nice and calm in the room. With a simple on-off listening test it seems to bite reasonably deep into the midrange. Measurements will come later.

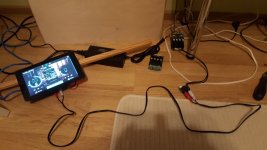
My audio source, which is a Raspberry Pi 3 with a Hifiberry DAC+ Pro along with the Raspberry Pi Touch Display. It is running Volumio as the OS. Very handy, and works nicely. The DAC sound quality is excellent. Still need to figure out how to run FIR filtering with it. The amplifier is Sanwu TDA7498, the model without the RCA inputs and volume pot. I won't be needing either of them. I checked under the heatsink, and both amps seem to be running the real 7498 chip, not 7492 like someone mentioned. My PSU for the amplifier is only 24V, so I'm not using it's full potential.
On the other hand, that leaves me time to work on the room and audio sources!
Here is my listening chair with the finished acoustic panel behind it. The panel itself has 1500x1200x100mm dimensions. The cover is light beige flax linen. Looks very nice and calm in the room. With a simple on-off listening test it seems to bite reasonably deep into the midrange. Measurements will come later.
My audio source, which is a Raspberry Pi 3 with a Hifiberry DAC+ Pro along with the Raspberry Pi Touch Display. It is running Volumio as the OS. Very handy, and works nicely. The DAC sound quality is excellent. Still need to figure out how to run FIR filtering with it. The amplifier is Sanwu TDA7498, the model without the RCA inputs and volume pot. I won't be needing either of them. I checked under the heatsink, and both amps seem to be running the real 7498 chip, not 7492 like someone mentioned. My PSU for the amplifier is only 24V, so I'm not using it's full potential.
Attachments
Last edited:
Bit of a verbal update. I'm still surprised how much room acoustics make of the sound quality. I mean, I always knew how much the room plays on it, but to actually hear the difference of proper acoustics is one of the biggest mindbogglers I have ever heard in audio. My old modded Wharfedale Diamonds (replaced the tweeter with an older alnico paper cone tweeter, rigged crossover, braced enclosure) I use as placeholder speakers in the listening room really sound good in there. I've already spent quite a few hours listening to my favourites with them.
- Status
- Not open for further replies.
- Home
- Loudspeakers
- Full Range
- Hi-End Full-Range project