I hope not 150Lbs but I will weigh them when done.Yep -- I've built 150lb subs before....
Thanks its all good exept the slivers and glue.Good progress.
You could measure its DC resistance to start with. But like I said before, you don't have to worry.Ya how would I know? I orderd my in December. Andy
OK Is that why you asked if we could measure our speakrs? What would the differance be?You could measure its DC resistance to start with. But like I said before, you don't have to worry.
Andy
Yep, I was hoping those DC results would provide reliable results enough to determine its version...OK Is that why you asked if we could measure our speakrs? What would the differance be?Andy
I hope not 150Lbs but I will weigh them when done.
Thanks its all good exept the slivers and glue.
It's all good -- well, except the glue... getting PL off your hands is about impossible.
BTW -- Just check the date code.
3015lf changed? - Techtalk Speaker Building, Audio, Video, and Electronics Customer Discussion Forum From Parts-Express.com
I heard from one of the eminence distributors that eminence blew through their 2010 sales goals early in the year -- they got absolutely hammered with orders. I can't imagine any old stock surviving -- I was getting speakers with month old date codes middle of 2010...
Is thare a number on the speaker or box?Yep, I was hoping those DC results would provide reliable results enough to determine its version...
you did tape off your edge before primer, so that the glue to hold the 2nd side will adhere to wood -- right?
Back where I used to live, we have appropriate words for occasions such as this...
Bugger!
Typical!
and of course ****! , ****! ,etc.
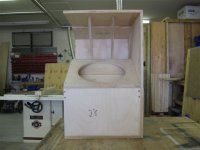
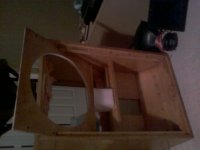
Of course, this would make an incredibly smart cut-away to show people what the box looks like on the inside.
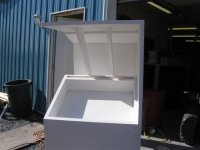
Is primer enough on the inside of the cabinet, to prevent damp from affecting the wood?
Regards, Ben
you did tape off your edge before primer, so that the glue to hold the 2nd side will adhere to wood -- right?
Bugger!
Typical!
and of course ****! , ****! ,etc.
Of course, this would make an incredibly smart cut-away to show people what the box looks like on the inside.
Is primer enough on the inside of the cabinet, to prevent damp from affecting the wood?
Regards, Ben
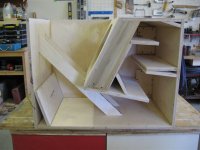
whats the reasoning for the removable baffle? and are the side slats just there for installing the baffle? or reducing throat volume?
you did tape off your edge before primer, so that the glue to hold the 2nd side will adhere to wood -- right?
Yep, that's the plan. After testing the foam will be removed and the edges sanded with a belt sander for gluing.Looks to me he needs sandpaper 🙂
Andy
I hope so. The boxs will be used out side in July.Is primer enough on the inside of the cabinet, to prevent damp from affecting the wood?
Andy
I made the speaker baffle removable mainly to make it easier to make changes to the throat and for painting. You could add more baffles to work with differant speakers. I may glue them after testing.whats the reasoning for the removable baffle?
All of the above but thay started as an assembly aid. See my 1st pics. The hole thoat is a box and vary solid.are the side slats just there for installing the baffle? or reducing throat volume?
Andy
Last edited:
Bugger!
Typical!
and of course ****! , ****! ,etc.
Of course, this would make an incredibly smart cut-away to show people what the box looks like on the inside.
Is primer enough on the inside of the cabinet, to prevent damp from affecting the wood?
Regards, Ben
You could paint the inside with something like this:
Everbuild 90805 Everproof DPM 908 5L: Amazon.co.uk: DIY & Tools
No need for primer either and can be used to glue damping materials where necessary.
be carefull with the beltsander.Yep, that's the plan. After testing the foam will be removed and the edges sanded with a belt sander for gluing.
Andy
it eets away a few millimetrs in no time.
next time put some tape on it.
i like the way you conected the back to bottem pannel.
keep it up 🙂
Last edited:
Hi 4pyros,
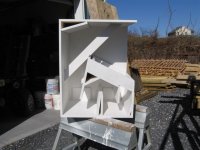
"...speaker baffle removable..." Nice touch, that'll allow you to play around with the throat configuration. Great to see you making progress.
Regards,
"...speaker baffle removable..." Nice touch, that'll allow you to play around with the throat configuration. Great to see you making progress.
Regards,
Take care how and where you attach the removable baffle.
You can easily make for an impossibly awkward tool access.
I've done that stupidly when I thought I was being careful.
I sunk metal threads into the wood for repeat abuse, but
neglected to angle them away from the sides enough to
get a power tool in there. Now having to use hex wrench
with very short handle... Almost no room for fingers.
Don't make the same mistake!
Maybe a pocket hole jig could help?
Attachments
Last edited:
- Home
- Loudspeakers
- Subwoofers
- Single sheet TH challenge