Seeking advice upon embarking on Adcom GFA-545 restoration journey

Hello all,

A few months back I asked the fine folks here about good amplifier candidates for a restoration project and got a lot of good suggestions. I finally settled on the Adcom GFA-545, specifically the first version as I didn't want to deal with the version II's bias servo sub-circuit just yet.

Despite my initial aim to repair a "for parts or not working" unit, I have chosen to buy a working one and received my exemplar today. The plan is to live with it for a while and get a feel for its sound unmodified, with the caveat that electrolytics capacitors in there are not in their prime. Then perform restoration bit by bit - I'm in no hurry on this.

Tomorrow I'll be opening up the case, do a general inspection, check fuses, blow dust with low-pressure compressed air, then take documentation pictures before I fire up the thing. I'll first power it while hooked to a "dim-bulb" limiter and ramping on variac from 1/2 mains voltage to nominal, while connected to inexpensive speakers and old iPod as source. I downloaded the service manual from hi-fi engine.

Now I'd like to know if there are other checks or recommended steps specific to this model that I should do beforehand. I'll try to make as many voltage measurements as I can and compare vs schematic annotations. I seem to remember reading it's a good precaution to replace thermal paste on the TDS-C201 thermistor compensators related to the output stage bias spreader. Any warning signs I should pay attention to when powering up?

Also if anyone has suggestions on the upgrade path I'm all ears. I only did caps replacement once on vintage gear and I generally went from the parts most exposed to ripple, large to small, going towards low level signal ones - e.g. PS filtering for output stage, then input stage, and finally signal/bias. Should I use the same approach? Note that I will consider the nice offerings from Hoppe's brain down the road.

I'm excited about this project as this amp looks like a serious piece of kit and I'm told it has great potential.

Thanks in advance for any insights.
- Joe

Creating a cir file

I have this text published by Walt Jung to create a Laplace cir model. How do I create it?

RIAA34LP: 34 dB gain RIAA preamp with AD845
*
.OPT ACCT LIST NODE OPTS NOPAGE LIBRARY
.AC DEC 10 10 100KHZ
.LIB D:\PS\ADLIB\AD_RELL.LIB
.PRINT AC VDB(5) VDB(56)
.PROBE
VIN 1 0 AC 1E-3
VCC 52 0 +15V
VEE 53 0 -15V
* ---------- V(5) = idealized RIAA frequency response -----------------
*
  • Uses Laplace feature of PSpice Analog Behavioral option
  • for frequency response reference.
  • ENORM = ideal U1 DC gain = 1+(R1/R3) Use ideal values for R1, R3
  • T1 - T3 are time constants desired (in μs).
  • Input = node 1, Laplace Output = node 5
.PARAM ENORM = {490.7}
.PARAM T1 = {3180} ; Reference RIAA constants, do not alter!
.PARAM T2 = {318} ; Reference RIAA constants, do not alter!
.PARAM T3 = {75} ; Reference RIAA constants, do not alter!
*
ERIAA 5 0 LAPLACE {ENORM*V(1)}={(1+(T2*1E-6)S)/((1+(T1*1E-6)*S)(1+(T3*1E-6)*S))}
RDUMMY5 5 0 1E9
*
* ---------------------------------------------------------------------
*
* (+) (-) V+ V- OUT
XU3 1 21 52 53 55 AD845
* Active values Theoretical values
R1 55 21 97.6K ; 97.9k
R2 21 8 7.87K ; 7.8931563k
C1 55 8 30NF ; 30nF
C2 21 8 10.3NF ; 10.2881nF
R3 21 0 200 ; 199.9148
C3 55 100 10E-6
R6 100 0 100K
R5 100 56 499
C4 56 0 3.0000E-9
.END
Figur

Denon DP-59L speed control

I have one of these with a flickering speed lock light and audibly high wow&flutter. I’ve replaced all the electrolytic caps as well as two notorious 2023 transistors but still have the problem. I can’t seem to get steady motor control behavior on the oscilloscope, and I have a soft rubbing sound when the motor is on (don’t get it when spinning the platter by hand). Anyone have suggestions for what to try next? Thanks much.IMG_0472.jpeg

Driver for B&O CX50 (3.25l cabinet)

I have a shabby pair of B&O CX50 speakers here. For anyone not familiar they are a small 2 way in an extruded aluminium cabinet. A 100mm paper cone midwoofer and 27mm tweeter with a simple 1st order series Xover.

The Foam rots on these drivers and I'm considering a replacement driver rather than refoam, I don't give a monkeys' about originality. I'm probably going to load a small class D amp board (TPA3116 based in all likely hood, MA12070P or Icepower if I'm feeling fancy) into the back of the enclosure. These are aiming to be small portable speakers, so nearfield/desktop mainly, but with a bit of punch as they may occasionally be small room speakers (may end up in the kitchen to be honest). I'm not looking for 110dB critical listening though.

The cabinet is internally 110mm wide, 155mm deep and 190mm high, 4mm thick aluminium, so 3.25l. I'll chuck some pics up later. The main driver is 90mm dia cutout, 4x110pcd fixing (with some wiggle room) and a square chassis with 98mm sides and 124mm corners. The baffle is a steel bonded in affair so changing it is possible but not straight forward.

So without much thought, I'll probably start looking at:

The 4" dayton drivers RS100, ND105
The Tectonics 65mm BMR

Other drivers people could suggest? I'm happy to consider either full range or 2 way, sealed or ported alignments (for a full range I could port through the tweeter cutout with a suitable PVC tube).

Any thought on other drivers I should be considering, the Markaudios all seem to be for larger cabinets.

Laochen/Oldchen 845-A 3 pairs of trim pots help

I'm somewhat familiar with tube amplifiers, but normally only use ones that are under 500 volts.
Trying to help a friend with an Oldchen 845-A amplifier, the only information about the trim pots in the owner's manual sates:

" ·This device has an internal resistor to adjust the value of the tube bias, there are two adjustments to the
midpoint of the 300B electron filament, you are not recommended to adjust by your own."

The amplifier is only a few months old and one 845 is bad, so a new matched pair is arriving soon.
Tubes used 6SN7 - 300B - 845
I don't have the amplifier on hand so a couple of pictures from purchase place is the only thing I can provide for clues.

Hum balance - I'm not too concerned about other than confirming the (near) blue pots for the 300B tubes are for hum balance?
The other (far) blue pots I assume are for hum balance on the 845 tubes, but can't see where they are in the circuit in these pictures.
Maybe they serve some other purpose???

Bias - The 2 large pots? - any clue on where to measure and what value?

Thanks for any help,
Lin


Oldchen 845-A wiring.jpg Oldchen 845-A wiring 2.jpg

NAD 3140 Input Hum

Hi all, thanks for having me in this forum, it’s been a long time since I was actively set up with my system. I have a Thorens turntable and Pioneer CD player connected into a recently purchased NAD 3140 amp. The turntable is great through the phono input. My CD player is fine through either Tape 1 or Tape 2 input but when connected through the Aux input, which is where I expected to connect it, there is a hum through both speakers. The hum increases according to the volume control and is the same volume in each speaker. It is a great amp and I have both Tape inputs for a CD, cassette etc so it’s not urgent to fix but what do you suggest could be the issue on the Aux input, how to locate the fault and how to fix it ? Thanks

cleanest reasonably priced small midrange line array driver ?

let's say from 1.5 khz and up the array uses Radian:

https://radianaudio.com/collections/ribbon/products/lm8k-wide-band-planar-ribbon-transducer

and below 250 hz it uses 12" woofers:

https://www.eighteensound.it/en/products/lf-driver/12-0/8/12ntlw3500

and you need to cover 250 hz to 1.5 khz with something ...

this is a fairly important frequency range and i wouldn't want to use something that isn't clean ...

so far the best i could come up with is this:

https://lavocespeakers.com/single-product/?id=135

steel basket keeps price down to $55 making it viable for array use, and manufacturer provided FR is very clean through intended range but there is no information about distortion for example ... also the driver doesn't seem to have demodulation rings or caps which makes me question if it's high enough caliber to work with the drivers i mentioned that it would cross over to above and below ...

it seems demodulation rings are used mostly to extend HF response in "full range" drivers with lowering of distortion being just a welcome side effect ... nobody seems to bother to put demodulation rings in a driver if that would take an already flat response and make it a rising response ...

the other issue i am facing is that essentially all small drivers ( 3" or less ) are "full range" which means they prioritize bandwidth over midrange quality ...

true midranges do exist of course but the smallest i was able to find are 5 inches and also they are very expensive ( $150 or more ) for array use. pretty much no matter if you use Faital, B&C or Beyma or any other dedicated prosound midrange they are all $150+ ...

the reason i would like a smaller driver like 3" is because then i could flank the Radian ribbon by midranges on both sides and have nice symmetrical directivity ... but after seeing 20% THD on a peerless full range as tested by Vance Dickason i am worried if full range drivers may not be clean enough for this application ...

on other hand dedicated mid-range drivers are too big and too expensive ...

thoughts ?

Hello good folks and thank you for having me

Well i am simply an independant music producer, audio & mix engineer for the past two decades or so now and before that i was a dj on the side.
My interest in music and audio gear was immediate from first contact and come to think of it my first job was in a mid to high end hifi store, although hifi is not my field of expertise.
Studio gear has been my main thing for the past two decades and i still use racks full of outboard hardware in production, and i always hoped to have the time to begin building my own gear and modifying, but life has been pretty dam crazy for me to say the least.
I have always used a modded Quad 405 mk1 paired with Yamaha NS10s for my monitoring and i have yet to find a reason to change that !
(aside from speakers costing insane amounts of money, money which somehow continues to allude me)

ESP preamp, shield the transformer?

Hi,

I am building a Rod Elliot ‘Hi-Fi with tone controls preamp’, project 97. The power supply will be inside the chassis along with the amp board and phono preamp board, and consist of a +/- 15V from a toroidal transformer + bridge rectifier and filter caps.

In addition to locating the transformer as far as I can from the inputs and amp board, should I insert a steel or aluminum separator , like I see in so many pictures of preamps?

Rob

PM-AB2 MOSFET amplifier with error correction and low distortion

Hello all, years ago I posted at DIYaudio a thread about my MOSFET amplifier with an error correction (it was called PM-AB1), see
https://pmacura.cz/pm_ab1.html
The amp was working well and dozens were built by DIYers, without any major issues.This is another attempt with a different circuit solution of error correction. Basically it is a mosfet output stage with error correction that is placed inside feedback loop of the opamp. The circuit is simple and it shows very good simulated parameters. The circuit shown is a basic one and it would be provided with voltage regulators for opamp rails and possibly input coupling cap to block DC failure from input signal. I think I may build a sample and look how the real circuit would work.
Attached is a basic schematic, THD vs. power simulations at 1kHz/4ohm and 10kHz/4ohm and a simulation file, this time in MicroCap11, which I prefer to LTSpice, mainly because of the abilities to plot THD and THD+N vs. level plots and also because of the models used. So here we go.

P.S.: idle current of the output stage is 80mA, considerable reduction compared to PM-AB1, so it is not any "room heater".
================
1st sample built 05/20/2022 and measurement are and will be added

Attachments

  • PM-AB2_413_118_simplsch.png
    PM-AB2_413_118_simplsch.png
    20.8 KB · Views: 1,708
  • PM-AB2_distsim1k.png
    PM-AB2_distsim1k.png
    8.6 KB · Views: 1,553
  • PM-AB2_distsim10k.png
    PM-AB2_distsim10k.png
    8.9 KB · Views: 848
  • PM-AB2_413_218.ZIP
    PM-AB2_413_218.ZIP
    9.4 KB · Views: 281
  • pm-ab2.asc
    pm-ab2.asc
    5.2 KB · Views: 238
  • PM-AB2_thdnpower_4R_1k.png
    PM-AB2_thdnpower_4R_1k.png
    19.2 KB · Views: 626
  • PM-AB2_thdnfreq_4R_10W.png
    PM-AB2_thdnfreq_4R_10W.png
    17.4 KB · Views: 1,351

  • Locked
Transistor power dissipation

Hi all,

I have been trying to work out the power dissipation of transistors.
With a purely resistive load this can be calculated quite easily.
For peak power:
Ptrans = (Vsupply - Vpeak_output) / Ipeak_output

It gets trickier with adding a loudspeaker load, due to it having an electrical phase angle.
I read that a good worst case phase angle is 45° as this would double the transistors dissipation and half the power for the loudspeaker.
And I read that the worst case output voltage is 0.637 x the supply voltage.

So I simulated an amplifier driving a load that introduces a 45° lagging phase with a Z of 8.5 ohms.(960uH in series with 6ohms)
Vout = 0.637 x Vsupply = 19.11V
I then simulated a purely resistive 8.5 ohm load. I see that the transistor is dissipating about twice the power at a 45° phase angle but I don't see that the load power is being halved.

1740600347262.png

fig.1 Simulation.
Tr_dis_45deg.jpg

fig.2 Transistor power dissipation with a reactive load.
Tr_dis_resistive.jpg

fig.3 Transistor power dissipation with a resistive load.


I read most of the info I used on https://sound-au.com/patd.htm.
And because I know Rod must be right, my conclusion is that I must be doing something/everything wrong/stupid.

Thank you in advance!

Attachments

  • 1740599948712.png
    1740599948712.png
    45.2 KB · Views: 26

JLH Class A headphone amplifier

Hello

Please find some pics of my recently completed JLH class A headphone amplifier. The unit uses volume remote control, and all mains power wiring are hidden under the suspended chassis .. I done this to try and make the wiring more neater. I will be upgrading to burr dog agapters with better omp amps soon. The panel has been laser engraved on the back, the feet I made myself etc, the sound is 1st class.

DSC00525.jpg


DSC00527.jpg


DSC00526.jpg


DSC00529.jpg


DSC00530.jpg


DSC00531.jpg


DSC00532.jpg


all the best

JamesFeline

Parasound HCA-3500 with blown outputs

New to diyaudio and my first post, thanks in advance for any help and advice. I just picked up a Parasound HCA-3500 amp with L channel out and was hoping for an easy fix. After doing some research and basic troubleshooting, I discovered all of the Sanken 2SC3264/2SA1295 outputs (MT-200) are testing blown in circuit. It looks like there are no longer new replacement outputs available and only a small number of working ones are out there on the used market if you can find them. Did not know this when I took it on as a repair project.

I removed 2 of the 2SA1295’s and one tested bad and the other good, though both tested bad in circuit, so probably need to remove and test all to truly know the extent of the damage to the outputs.

I am not sure if this is a restore I would want to take on considering the discontinued output transistors/lack of good sub and the complexity of the design, and I am just a vintage restoration hobbyists with a couple dozen or so repairs/restorations under my belt and not a trained technician. I am thinking of passing this amp on to more qualified hands but just wanted to check with the group first if anyone has experience with this type of amp with output transistor issues and advice on my predicament?

Attachments

  • IMG_8186.jpeg
    IMG_8186.jpeg
    998.6 KB · Views: 191
  • IMG_8185.jpeg
    IMG_8185.jpeg
    1.1 MB · Views: 156
  • IMG_8179.jpeg
    IMG_8179.jpeg
    736.5 KB · Views: 159
  • IMG_8182.jpeg
    IMG_8182.jpeg
    891.8 KB · Views: 162

Extending the AEM6000 design to ppm THD

I've built a number of amps over the years based on David Tilbrook's AEM6000. They've all been really good, reliable, low distortion, quiet amps. With the newer ones I've started departing a little from David's topology, initially by dispensing with one side of the VAS, which I built as a set of 50W modules that work very nicely, and now by realising that by dispensing with one side of the VAS, I can use current-mirror loads for the preceding stage, increasing the load impedance for that stage significantly and allowing for significantly better distortion performance.

I started discussing this in this thread http://www.diyaudio.com/forums/solid-state/288479-aem-6000-ready-build.html. Chalky pointed out that my VAS current wasn't well defined, being set from one side of a current mirror, so I've been working since then to get a handle on how to stabilise the VAS current without throwing away the gain. This initially involved using current sources and sinks tied back to the previous stage's tails, and more recently using a resistor across the mirror to define the collector voltage on the mirrored side at the cost of some gain.

While at it I changed out some of the VAS and preceding stage transistors, using the KSA1381/KSC3503 for the VAS, and IMX8/IMT4 duals for the preceding stages. Tail currents are provided by the cheap and cheerful MJE340/350.

I think I've reached a reasonable compromise with this, and I'm working now on layouts.

Here's the simulation schematic:

VirtualBox_Windows%2BXP_30_12_2016_09_16_40.png


My goal with this is 1ppm THD at 1KHz/50W/8R, without huge supplies. I've set a somewhat arbitrary limit of 100mA bias for the LatFETs.

I've achieved this and then some. With gain set to 20dB, THD at 1KHz simulates at 0.4ppm, at 10KHz I achieve 3.5ppm, and even at 100KHz THD is a manageable 0.04%.

So, an explanation of how things work. The first stage is a completely conventional matched JFET (SST404), with cascode provided by an IMX8 dual and resistor loads. Tail current is set to 5mA, of which 3.5mA is used to bias the cascode and the rest flows through the JFETs.

The second stage is where I depart a little from David's topology. It's a symmetrical differential pair. Rather than the resistor loads of the AEM6000, I use a pair of current mirrors. Tail current for the differential pairs is set to a healthy 9mA. Dissipation is low enough that I can continue to use the IMX8/IMT4 duals both for the differential pairs and the current mirror loads, which is nice, as I really need a good match here, not to mention that these little things are lovely and fast, with plenty of gain at just the right current. I just use MJE340/350s for the tails as I don't need speed here but do need some dissipation.

Note R30 & R31. These 47K resistors waste some gain in this stage to ensure the collector voltages of Q17 & Q18 reasonably closely follow their mirrors. This allows us to define the VAS current by noting that the collector voltage here is defined by one Vbe + the current flowing through R18-22.

The current in the VAS is set by two mechanisms. The first is that for the VAS transistors (KSA1381/KSC3503 - Q14 & Q15). This is set by their emitter resistors. They have constant current loads (Q19 & Q20), whose currents are set by their emitter resistors, recycling the reference from the preceding stage tails.

The loads must be set at a lower current than the VAS transistors, to ensure current flows through R28, and hence the bias for the final stage drivers is set. I chucked a diode in here (thanks PB2), because if the VAS transistors and loads aren't biased correctly there was otherwise nothing to stop current from flowing the wrong way through R28.

I run the VAS transistors at 10mA, and the loads at a tad over 7mA, leaving the balance of a little over 2mA flowing through R28. This is then tweaked to give me 100mA driver bias.

Compensation is straightforward. A couple of caps across the VAS transistors, some RC across the first stage diffamp, and normal phase-lead compensation at the feedback point. I can push the gain all the way down to 3 (1ppm at 10KHz!) without it taking off, so I'm confident that it can be reasonably easily stabilised at more usual voltage gain levels.

Anyway, I think it's cool. I'm gonna build a couple, and I'd appreciate critique, especially of my logic around the VAS current stabilisation mechanism, as this is the area where I'm least confident.

TDA 1541A Class A power supplies (Audio g-d)

Like so many projects these didnt see the light of day and havent for a few years. The guy from Adio-gd set these up but they are adjustable. Please dont ask how because I have no clue and would of forgot by now anyway! I used to do a lot of work on TDA players and build my own supplies for all the crucial parts but for some reason I purchased these, must of been for a special favorite. Disclaimer. I have never put power to these. The solder on the inputs is from him setting current. I know these arent going to apeal to anyone but people like me so hopefully if they sell you can check the voltage is correct by looking at resister values, my days of DIY are long over.

£20 plus post to any country for the lot.

Edit: I found the label in the box, the missing one is +5v 100ma

Attachments

  • TDA Power.jpg
    TDA Power.jpg
    1.1 MB · Views: 180

Film capacitors i.o.f Electrolytics icm LM78xx regulators: Minimum Value required?

Hi there all,

I own sinds many years, a Cambridge Azur 840C Cd Player/DAC , which has shown quite some problems, mostly due to poor quality Chines Electrolytic capacitors (the problems All being located at the power lines of the DAC's (AD155 's) the Op AMP's and the Muting circuit.
The digital sections have so far worked flawlessly.

I would like to address this problem of poor electrolytic capacitors in All powerrails once and for all, instead of having to repair it about every 3 years.
(Once it works, it sounds very nice, hence I'm still holding on to it).

MY question:

There are a total of 21! voltage regulators (Type LM78xx, LM79XX, LT1761, LT1763, LM1117, each with a 10uF 35V capacitor at the Input and Output.

These 10 uF 50V capacitors have a short lifetime expectation due to poor quality, but also because they are mounted immediately next to hot heat sinks (a clear design error) and also due to poor ventilation possibility (due a suboptimal enclosure design), resulting into high operating temperatures inside the enclosure.


Better quality capacitors (e.g Rubycon 105 deg. C) typically behave better, but I am contemplating to cure this problem Once and for All, by using film capacitors e.g. 2.2 uF or 3.3. uF 50V WIMA MKS Polystyrene capacitors.: MKS2B043301H00KSSD WIMA - Capacitor: polyester | 3.3uF; 30VAC; 50VDC; Pitch: 5mm; +-10%; MKS2-3.3U/50 | TME - Electronic components


In view of space limitations, I cannot use higher values (I already have to install them at the bottom side of the board).

Could you please confirm whether such a lower value (3.3 uF film capacitor instead of a 10 uF electrolytic could work ( I have read somewhere that they are only used to suppress possible oscillations of the voltage regulator).

Please note that the 5 main power supply rails are each buffered with 4400 uF 50v (each 2x 2200 uF capacitors).

Appreciate your opinion / feedback!

Micro-component speakers

Hi,
I bought these pair of Japan made surplus speakers. I intend to use it for my DIY amp. However I didn't realize that it comes with 2 pairs of wires. Is there a way to convert them for single wire use? something like parallel or maybe series parallel combination.
Thanks!

Attachments

  • IMG_20240913_141908.jpg
    IMG_20240913_141908.jpg
    398.8 KB · Views: 115
  • IMG_20240913_141942.jpg
    IMG_20240913_141942.jpg
    395.5 KB · Views: 108
  • 1726223844358.jpg
    1726223844358.jpg
    202.2 KB · Views: 110

Preamp Control - Volume, input, mute, remote

A preamp is usually a combination of a couple of sections, a gain section and a control section to connect audio components to the amplifier. Try finding a very good controller for the preamp, there just aren’t many available. This project is a control system for a Preamp. It does away with knobs and potentiometers in favor of digitally controlled relays and not much else in the signal path to add noise to the audio signal.The parts that the audio signal pass through are chosen for best sound quality without breaking the bank. You have the option of replacing the volume resistors with Caddock if you so wish but the Dale/Vishay resistors used were chosen for very high-quality sound, that is, they do not add much in the way of distortions to the audio signal. All parts add or subtract something from the audio signal so picking a component that minimizes it is the quest.

At minimum, the control of the audio system includes the volume, up and down, input selection, and it would be nice to be able to mute the sound without having to turn the volume down then having to turn it up to the perfect level you had it before.

I started this project when a friend who has an audiophile company wanted to add a preamp to his affordable audio line; he already has a great no holds barred, cost is what it is, line of very high-end products. He is a great analogue guy but he had a digital volume, input selection, and mute circuit control board that had some issues so being a digital guy in my past jobs I looked at the problems to see what could be done.

The control board was stereo single ended unit but could do balanced audio with a second add on board making the setup a little costly but not outrageous, it had a couple 7-segment LED readouts for volume and input, and it came with an infrared remote. It used an R2R resistor ladder (if you don’t know what that is then search it on the net, the design is interesting) for the volume level control with 6 bits from an 8051 microprocessor controlling relays for 64 volume steps. The resistors were metal film but not audiophile quality so the sound quality at lower volumes suffered just a bit, and when muted you could still hear a tiny bit of signal coming through the speakers. I wanted to look at the code in the processor and see if it could be modified for how it controlled the input, volume and mute relays. First problem was having to buy a fixture to read and program the 8051 on-chip memory. The chip is so old that finding drivers and a programming environment to work in for it was next to impossible. I could use a new, smaller, more powerful microprocessor and design a new board around it but I didn’t like the idea of a megahertz clock signal for the processor anywhere near an audio circuit. Later I had an email conversation with Jan Didden about some of the new processors and that they could go to sleep, shutting down the oscillator, then wake up when a button was pushed. I started thinking about if I could design a board using discrete logic chips to do all the same things, with better sound quality, and at an equal or lower cost than the current board. Even a slightly higher cost would be acceptable if it had superior sound.

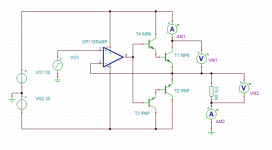
All the input switching, volume control and muting could be done with switches and pots but sonically good volume pots for balanced circuits with really good channel tracking, and motorized for remote control, are expensive and can become noisier as they age, and it is just not an elegant solution. I looked around at what had already been done on the market and I own a Nelson Pass Aleph P preamp which had very neutral sound so I decided to go with a similar design for the control board, but where Pass Labs used a microprocessor I would use discrete digital chips. The idea behind using discrete digital chips is: no programming required, easy to trouble shoot, and no digital electrical switching noise to affect the sound when the control buttons are not being pushed. Any onboard oscillators could be isolated from the audio side of the board and decoupled to prevent noise in the audio.

In all designs there are decisions to be made and this one included several but one was the question of where along the signal path to put the attenuator, before the preamp gain circuit or after. I have seen it both ways and seen arguments for both. Putting the attenuator after the preamp moves any items that might add noise until after the amplification so you don’t amplify the noise, the down side is the output resistance to the amplifier will vary with the volume setting. After looking at the thermal noise specs of resistors used in audiophile designs I decided it was a very small concern. Another downside was the power dissipation in the resistors at the output side, audio signal already amplified now needing attenuation, but the voltages and currents are small so that doesn’t pose a real problem. Putting the volume control before the preamp meant having the preamp gain buffer closer to the output and able to drive interconnect cables better, so that is how this board is designed. This control board is for fully balanced audio, input to output, for four of the six inputs. It can be used single ended for all inputs by connecting the negative input to ground input pin. The two inputs which are single ended can be modified on the board to full balanced with four cuts and direct wiring as they are only single ended by a ground line added to one side of the relay.

I began with the volume control section. The first design decision is how many bit, four bits is easy to display but only gives 16 volume level steps, too few, eight bits give 256 volume level steps, more bits is not as easy to implement for displaying the volume level but gives sub-DB per step, so eight bits were chosen.You need one button for Up and one for Down, which needs to be de-bounced. You wouldn’t want to have to push the button 256 times to go from zero to full volume so a helper circuit needs to be added. And finally, you need to step up to 256 and stop so you don’t roll over back to zero, and on the down side you need to stop at zero and not roll over to 256 which could be jarring and potentially destructive to your speakers.

The Input selection circuit was next. How many inputs do you need? I chose to have six inputs controlled by one button, again de-bounced, and scroll one to six and rollover to one again.

It would also be nice to have a mute button so you can silence the system instantly for a phone call, or whatever, and be able to un-mute to the same volume. I like to disconnect the volume control section from the gain section and ground the input to the gain section for absolute quiet while muted.

And finally, a remote control would be extremely nice. Never having worked with infrared or RF transmitter/receivers I studied advantages and disadvantages of each and since it is an indoors system where most audio systems are used, and a short distance, infrared is much simpler and cheaper. With four different signals, volume up and down, mute, and input selection, an encoder and decoder chip set would be necessary. So much for the design decisions, on to the actual design.
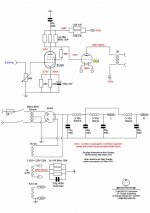
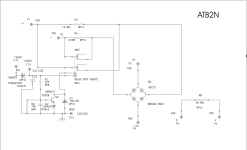
Main Board:
The main board contains the power supply for the control circuitry which consisting of a double primary and double secondary winding transformer, T1. The double primary windings can be paralleled for 115v or used in series for 230v, set with the switch S2 (you can use jumpers if you like to save a dollar). The secondaries are in parallel for the higher current output. The AC voltage and current is rectified by a bridge rectifier, D1, and fed through a fuse to the fixed voltage three pin 5.0 volt regulator, U1. There is a current storage capacitor before the regulator, C1, and one after, C2.

There is a reset controller, U9, that reads the voltage at startup and sends a reset pulse out when the voltage has reached the operating point so the board comes up in a known state: the volume at zero, no input selected and the mute not active. The output pulse of the reset controller is sent through two inverter gates, U12, in series so a positive and a negative going pulse can be directed to the chips which need to be reset with the appropriate polarity pulse.

There is an oscillator made with a 555 timer chip, U5, running at 15 Hz, its output is ANDed by U2 with the volume up and down signals to step the volume up or down while holding a button down on the remote or display board. There is a third input to the AND gates, U2, for the volume up/down inputs which is from the enable/inhibit (E/I) circuit created with U10, U11, U13, and U4, and reads the eight output lines from the 2 counters, U6 and U7. When the output from the two counters reaches maximum volume, 255, the output of the E/I chips is ANDed by U13 and inverted to proper polarity by U4, goes low to the Up AND gate so it will not accept any more input and thus not roll over from maximum to zero. Likewise, when the two counters reach zero the output of the E/I chips, U10 ANDed by U13 and inverted to proper polarity by U4 goes low to the Down AND gate, U2, so it will not accept any more input and not roll over from zero to maximum.

The output from the volume counters is fed to the volume display control circuit, U14 and U18, and the output lines from the counters also drive a transistor per line to turn on a relay to control the volume resistors. The resistors that pass the audio signal were chosen after reading an article in Linear Audio showing the distortion levels in different types of resistors. The Dale/Vishay RN60D resistors were listened to and then used in the design. There are four of each value and are matched to better than 1%.

The volume display control circuit is made up of U12, U14, U15, U16, and U18. Two gates of U12 form an astable oscillator which clocks the counter U14 and the display counters on the display board at 5 kHz, C5 provides the oscillator with a tank and R3 sets the speed of oscillation. U15 and U16 are two 4-bit comparators, ganged to form an 8-bit comparator. This compares the output of the binary counter U14 with the binary output taken from the volume counters U6 and U7. When the comparator inputs are equal, pin 6 of U15 goes high, triggering the monostable U18, which outputs a brief pulse to the latch control line that goes to the display counters on the display board. When the counter U14 reaches a value of 256, the link between pins 11 and 12 resets the chip and sends the reset pulse to the display counters on the display board also.

The input selection signal from the display board is inverted by U4 to drive the counter input of U8s clock; one press of the input selection button clocks the counter up by one. The three output lines are in BCD, and go to a BCD decoder U17, a high current device, which is capable of driving the input selection relays directly. The outputs from the counter are ANDed together so when all three are high, a seven, it outputs a pulse which is inverted by a U4 gate to the correct polarity to clock the Load input of the input selection counter whose inputs are set to load a one. The outputs from the counter also go to the display to be decoded to show the input selected. So, the input counter starts at zero at power up, counts up to 6 and resets to 1 in a loop of 1 to 6 back to 1.

The mute control signal from the display board sets and resets a flip flop, U3, whose output goes to the mute control relay to mute the audio and the output of the flip flop also goes back to the display board to turn on and off the mute LED.
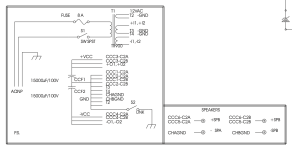
Display Board:
The display board has an infrared photo receiver, PH1, operating at 950nm and 38 kHz modulated signals, capacitor C1 makes sure the receiver has very clean power. It demodulates the signal back to the code sent by the remote, but it is inverted so it is sent to an inverter, U1, then to the decoder chip, U2, which decodes the pulse train input which then raises one of its four output lines for the code received. The outputs are for volume up and down, input selection and mute control. The decoder output is ORed with the user push buttons by U3.The input from the user buttons are “debounced” by a network between the push button and the OR gate. The input to the inverter, more gates of U1, are held high by a pull up resistor, and charges the capacitor, which keeps the inverter output low. When a button is pushed the capacitor is discharged through the resistor in parallel with the diode, when voltage reaches a low enough level the inverter switches to a high output. When the button is released the capacitor is recharged quickly through the diode in parallel with the resistor, at a high enough voltage level the inverter switches to a low output. The inverter is a Schmidt trigger type so it cleans up the input wave form from the user. These control signals go across the ribbon cable to the main control board.

The display board also receives control signals from the main control board over the ribbon cable.

The mute control signal turns on and off the transistor, Q1, which drives the red LED D5, R9 limits the current to the base of the transistor and R10 limits the current to the LED, increasing the value of R10 will reduce the brightness of the LED.

The three control signals for the Input control are BCD, Binary Coded Decimal, and are fed to U4 which decodes the BCD in to signals to drive a 7 segment LED display directly through current limiting resistors (U4 requires a common anode 7 segment LED).

The volume display is driven by three control signals: a 9 kHz clock signal, a latch signal, and a reset signal. The counter/display driver chips, U5 – U7, each drive a 7 segment LED display directly through current limiting resistors (U5 –U7 requires a common cathode 7 segment LED). The counters are daisy chained so that the first counter U7, or ones place digit driver, is fed the 9 kHz signal to its clock input, when it reached its maximum count it outputs a clock pulse from its carry output to U6 clock input, when U6 reaches maximum count it outputs a clock pulse from its carry output to U5 clock input. The count of the counter is not displayed until the latch control signal on each counter is pulsed by the common latch signal, the counter then outputs the decoded count to drive the LED segments. When the maximum count is reached the reset line is pulsed by the main board resetting the count to zero. The latch signal refreshes the display approximately 9 times per second. Whatever count is latched remains on the display.

Prototyping designs:
For a visual display of the volume level I started with eight LEDs, five green, two yellow and 1 red LED in a line to display the volume as binary data, it looked neat to an engineer but not really good for a consumer product so seven segment LED displays were chosen, and to display 256 requires three. To drive the display for eight bits would require a dedicated circuit as only 4 bit display drivers existed. I looked around for an idea on the web and found a circuit that looked interesting and when tried it worked but required some debugging. (This is a more detailed explanation of the info above). The circuit, most of it on the main board, uses two 4 bit comparators, U15 and U16, tied to the outputs of the counters, U6 and U7, and compares with the output from another free running counter, U14, driven by a nine kilohertz oscillator, U12, which would update the display 9 times per second and which also clocks the counter/display driverchips, U5 – U7, on the display board. When the counter output, U14, matches the volume control output, U6 and U7, it triggers a mono-stable one-shot, U18, which pulses and latches the count on the display drivers, U5 – U7, on the display board. It worked but the display would flicker at certain volume counts due to a race condition between the volume output lines and the free running counter, one moment it would display one number below the volume number and the next moment the actual number. A different resistor value on the mono-stable one-shot pullup resistor, R4, was needed to makethe circuit more stable, then on the second revision a capacitor, C7, to ground on the one-shot input circuit was needed to stretch the latch pulse long enough to stop the flickering.

The Input selection circuit was next. It also would use a binary up/down counter, U8, but only one button input to count up 1 through 6, when it hits 7 an AND gate enables and resets the counter, which is set to load a one into the register so it starts at one again. The output from the counter goes to a Binary to Decimal Decoder, BCD, U7 on the main board, which drives the input relays directly, (hicurrent output). The lines from the counter also go to the display driver and another seven segment LED display.

The mute circuit uses a flip-flop, U3, that toggle between on and off to drive a relay that disconnects the volume section from the preamp and grounds the input to the preamp to remove any possible noise on the output. It also drives an LED as a visual display.

All was coming together but testing showed an issue with the circuit coming up in random states on power up so a reset chip, U9, that sends out a reset pulse at power on is used to reset everything to a known state.

The last thing needed was to design a remote control. Linx Technologies makes a couple of sets of encoders and decoders chips as well as RF remotes in key FOB cases and RF receivers but after pricing RF antennas and cables I decided on infrared as the way to go, read less expensive. For a receiver I tried a phototransistor but ended up with a TSOP 38 kHz IR receiver and since it was most sensitive at 940 nm wavelength an IR LED was chosen at that wavelength for the transmitter but the output of the encoder had to be modulated with a 7555 timer to the 38-kHz carrier frequency so the IR receiver could pick it up. Since I had never worked with IR LEDs I did a lot of testing but I am still not 100% positive that I am not overdriving the transistor driving the IR LED. Different TSOP IR receivers were tried as they have automatic gain control, AGC, built into make them less sensitive to a noisy environment such as strong fluorescent lighting, but too much gain control and you can lose data so an AGC2 chip worked best in testing. The receivers are also made for short burst data and long burst. The output of the encoder could be considered long burst so that left two part number options in the TSOP receiver and either worked well.

The power supply for the controls needed to be 5 volts for the logic chips and relays. After estimating the worst-case current for all the chips and relays it might need 3 amps so I found a 6.3 volt transformer with 5 amps capability, passed through a bridge rectifier, a capacitor, then a 5 volt fixed regulator for three amps then another storage capacitor. When all was done I found the average current drawn was under one amp, for 5 watts of power on the board. The first revision of five circuit boards used the larger, heavier, more expensive transformer, the next revision used a more appropriately sized transformer and bridge rectifier.

Remote Control:
The remote uses a four-input encoder chip to encode the four user buttons: volume up and down, Input selection and mute. The encoder chip stays in low power mode until one of the user buttons are pushed taking that line high, the encoder outputs a code for as long as the button is held. The output of the encoder is tied to the reset pin of a CMOS version of the 555 timer. A high bit from the encoder turns on the timer which outputs a square wave of approximately 50 percent duty cycle at modulated 38 kHz, set by C2, R5 and R6. The output of the timer drives the base of a transistor which turns on and off the infrared LED which operates at 950nm wavelength. Resistors R1-R4 keep the inputs to the decoder low until a button is pressed. Resistors R7 and R8 are used to limit current and R9 develops a voltage across it to bias on the transistor a little quicker. Capacitor C1 is current storage buffer for the timer though it may not be needed on the CMOS version of the 555.

Capturing the Schematic and laying out the PCB:
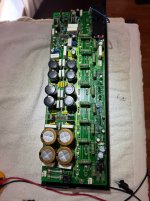
The next step in the design effort, after testing and debugging bread boarded circuits, was to draw the schematic in a software package to layout a printed circuit board. I found a free trial version of a nice package from DipTrace but the schematic grew beyond the free version of the software so I purchased a version that could handle 400 nodes. There was a learning curve on using the software but patience had a full schematic for a main board, a display board and a remote controller schematic done with time. After determining the space available in the preamp chassis, 7” x 12”, and the rear panel layout of the connectors and the front panel, 6” x 1.75”, for the display and control buttons I started the main board layout. The software places all the parts on the board but you have to drag them around to their optimal positions. You then run the automated router which turns the schematic lines to traces. Keeping the digital traces away from the analog and changing audio signal traces to extra wide kept me busy drag traces around and rerouting traces for quite a while. It seems that laying out a printed circuit board is as much art as it is engineering skill, there are many things to check on and make sure nothing is missed. After everything is double checked with a full sized printout of the circuit board, I then had a board house turn out five high quality sets of circuit boards.

Building up one set of boards went quickly and amazingly it came up and worked but with a few issues. I found the first problem of the input selection relays on the board were mirrored in the layout so they had to be placed on the bottom of the board so they worked correctly (corrected in version 2). The display flicker was solved by the afore mentioned capacitor on the display latch chip. Another problem took a little longer to find, when the input selection button was pressed the mute circuit would activate. The problem was finally found in the ribbon cable from the display board to the main board where the routing software had the two lines side by side in the ribbon cable. I knew that digital signals are supposed to be separated with alternate lines being ground lines but forgot to check for that (Also fixed on version 2). Then I removed the fuse and measured the current draw of the board this is when I found it needed less than one amp of current so a much smaller, less expensive, transformer could be used (another change in version 2 PCBs). A second version of the circuit board had all the bugs worked out but I forgot the display flicker Capacitor but that was easy to solder to the backside of the circuit board.

One thing to be careful of when assembling the display board is the seven segment displays are different for the volume and input display one is common anode and the other is common cathode, don’t get them mixed up. As with any build, carefully observe the polarity of diodes, LEDs, capacitors, transistors, and logic chips when inserting them in to the circuit board.

So how does it sound? I thought it to be very transparent, neutral, but not trusting my own ears since I, as the designer, might be biased I had my audiophile business owner listen to it and he thought it to be very transparent also, which is really the best you can wish for in the control system.

The Bill of Material, BOM, spreadsheet gives component reference designations, manufacturer part numbers, Mouse and Digikey part numbers, and my preferred vendor for each part since pricing can be different or a part not available for one vendor. The pricing used for the total price is for buying some of the parts in volume. If you buy PCBs in Lots of 100 you can get the price in the BOM but you also must pay a $150 per board design NRE charge, about $1.50 per board on the original order of version 2 boards. I don’t even want to remember the price on the original version 1 boards at five pieces each plus the NRE charges. I can supply gerbers and the drill file if anyone wants to turn their own boards but to make things easier and less expensive over all, my audio business friend said he could supply sets of PCBs from his stock for $120, it covers material costs and shipping. I also have five of the version 1 boards with the bigger power supply, built and tested, for $400 per set, includes the remote control.

You can use this controller in your personal preamp, and I don’t even mind if you want to use it in a commercial design, I just ask that if you make any improvements you feed that back to the group so we all can benefit. Hint: the first thing I would change is the transistor in the remote, instead using a FET for lower standby losses. (Note: This was fixed in Remote version R2c) So the only other thing that could change is I ever turn the Main board is updating the one-shot U18 kluge design to a real one-shot chip, although it works fine as is.

Updates: ************************
Since the first posting it was discovered that the Linx Tech LS series Encoder and Decoder chips have been discontinued. In the later posts there is new schematics, gerbers and BOM for the later Revisions of the Remote and display board with the new Linx Tech Encoder/Decoder chip. All Board Gerbers and Schematics are in post 150, The last version for the V5 main board are in post 179, schematics are in post 165 are not recommended as the one shot timing is too finicky and the volume display can flicker.

Since the first design of the volume board used paralleling resistors in a digitally weighted design, it was found that the input resistance would drop to 162 ohms, loading most sources too much, so the resistors were changed so the load only dropped to 300 ohms. The best values were 20K, 10K, 5K, 2.5k, 1.25k, 625R, 312R 156R.

***********************************
So the design started to morph, instead of a set of push buttons for volume up and down someone wanted a rotary encoder so that started at new project. Then a ladder resistor scheme which has either a constant input or output impedance was looked at and I chose a 10k input impedance. So starting at post 225 the design started to take shape. It has a power supply board, a Digital board, a Display board, an Analog board, and a remote controller board. The first design was done with only logic chips, to clean this design up a bit I used an EEPROM to hold data for the display on this design. Sonically the first listening tests were excellent so I proceeded to work the bugs out and improve the design with forum input.

The latest of the second design are:
Schematics - Post 280
Faceplate CAD - Post 282
EEPROM Data File - Post 282
Digital Board 3.0 - Post 278
Display board 3.1 - Post 352
Power Supply board 1.1 - Post 326
Analog board 1.3 - Post 326
Remote Board 2.0c - Post 150
BOM 3.1 - Post 330
Build Instructions - Post 287
  • Like
Reactions: manniraj

Audio Opamps

This is a summary of my approach to designing discrete-transistor op-amps for audio. These op-amps favor open-loop linearity, bandwidth, and PSRR over gain.

IC op-amps are invariably designed for the highest possible open-loop gain (>=100dB) so that the closed-loop gain is almost entirely determined by the feedback network. IC op-amps are well-suited for precision applications up to frequencies of about 100Hz. Above that, the gain must be rolled-off and performance deteriorates.

In addition to audio being fast by op-amp standards, the feedback networks used in audio are always linear and often time-invariant. Audio can tolerate errors of 1% as long as the errors are linear and time-invariant.

The special properties of audio give rise to a new (old) approach - design an amplifier with good open-loop linearity, bandwidth, and PSRR, and apply moderate feedback. An amplifier with 60dB of open-loop gain can come out ahead of an amplifier with 100dB of open-loop gain if the starting point is 40dB better. Keep in mind that we are not trying to beat IC op-amps on all metrics, just the ones that matter.

Naturally, I have omitted all details. This approach is applicable to class A amplifiers where distortion can be made arbitrarily low through an appropriate choice of operating point.
Ed

ETA: I added a graph in post 63 which illustrates the idea.

Good Area!(From China)

Humm, to be precise, I am not a professional audio development engineer, but an amateur-I saw more strange ideas in DiyAudio forum than in China, and I thought it worthwhile to discuss these ideas, so I participated in it.

For amateur purposes, our production may be irrational, non-cost-optimized and incomprehensible. PCB is my drawing board-I hope to have a good communication result on a compatible platform.

Hum & Protection Diagnosis advice - D.A.S. audio P 900 PA amplifier - preamp board issue

Hi, I'm currently servicing a PA amp, K.C.S PS-900 (it is a DAS P-900 on the inside, just rebranded outside).

EDIT after running several tests:
The relays don't click. There is one in the psu and one for each channel.
The PSU one tries to flick, there is a tiny movement but not enough to close the contact.
The ones on the output have no movement at all

If I disconnect the PT (about 100V AC) from the rectifier/ relay board all relays work.

If I leave it connected and manually close the output relays they stay closed and I have sound...so I don't know what I'm supposed to look for.
It also had a hum on the output once relays were closed but that is pretty irrelevant for the moment I think.

I replaced the amp board relay driver transistors and electrolytics on one board as it was cheap, i also checked the power transistors just to be sure. Amp side should be fine. And since it is a problem that interests both channels its definitely something happening above.

Attachments

  • DAS Audio P series.pdf
    DAS Audio P series.pdf
    243.3 KB · Views: 101
  • Screenshot 2024-10-31 at 01.16.04.png
    Screenshot 2024-10-31 at 01.16.04.png
    613.7 KB · Views: 113
  • Screenshot 2025-02-14 at 13.35.44.png
    Screenshot 2025-02-14 at 13.35.44.png
    232.7 KB · Views: 63
  • Screenshot 2025-02-14 at 13.36.39.png
    Screenshot 2025-02-14 at 13.36.39.png
    129.6 KB · Views: 58

Yamaha K720 (K-720) Cassette Tape Recorder

My tape deck - same model as to find under
Le forum de Vintage Audio Laser • Afficher le sujet - Remise en état d'une platine cassette Yamaha K-720
produce sometimes unwanted stop while "play" mode (resp. change the direction after activiating the auto reverse function).
Fast-forward and fast-rewind are fine.
Take-up reel pulses while in playback are present.
This issue is mostly to observe, if the cassette tape goes a bit too stiff (C90, C120)
A second tape recorder device, which is the same model, shows the same unwanted effect. By the use of C 60 cassette tapes the effect is much less frequently.
Those reel, that winds up, remains through stopping reel motor. The other reel, driven by the active capstan, unwinds for a second longer, and then comes the stop-mode or the reverse mode.
The behaviour is the same as to observe, when the cassette to an end is, i. e. the tape is completely unwound at one side.

The question is, which current flow goes in the reel motor in good working condition (the maximum permissible value before the reel motor driver goes shut down and stop the motor).
If I know this value, it is possible to determine, whether the electronic components or the motor itself is the reason for this unwanted effect.
Thanks for your help in advance.
Maybe it is possible to upload a schematic diagram.

Playing Around with Linaeum Dipole Tweeters

Discovered that the Linaeum dipoles from some Optimus LX5 nest nicely on the top of the ADC MS-650. I’ve been listening to them and have been pleasantly surprised how well they add airy-ness. I’ve crossed them using a 6.8 uF cap at about 3,900hz which is a little lower than what they were originally (6.2 uF).
What have others done with the Linaeums? Any pointers?

Attachments

  • IMG_5400.jpeg
    IMG_5400.jpeg
    1.2 MB · Views: 51

3D design software?

I am redesigning a QUAD ESL 63 speaker and I need to draw some 3D parts so they can be manufactured (probably 3D printed).
What kind of software should I use for that, I assume AutoCad DXF output should be available?
I don't mind paying a (small) fee but it should not have a steep learning curve, and the parts I need are relatively simple.
I'm not designing the next space station.

Any recommendations?

Jan

Cut Your Own Vinyl Records at Home

I thought I'd share this article about Ulrich Sourisseau, a maker of DIY vinyl cutting lathes.
It’s a great addition to the big commercial record companies where small bands sometimes have to wait a year to get a handful of records pressed.

https://www.theguardian.com/music/2025/feb/25/vinyl-carver-lathe-cutters-home-cutting-records-craze

https://www.vinylrecorder.com/

Quantasylum QA402

SOLD ! Sorry to all that PM me

Hello,

I have a QA402 in perfect shape and working condition I bought directly from Quantasylum for a project never completed. So I'm selling it. I am located in France so I would prefer to sell it to a European guy. Price asked 250 € + shipping.
Feel free to pm me if any question
Jean Claude

Attachments

  • QA402_2.jpg
    QA402_2.jpg
    361.6 KB · Views: 71
  • QA402_1.jpg
    QA402_1.jpg
    384.3 KB · Views: 70
  • Like
Reactions: poseidonsvoice

Cheers from Zagreb - Croatia

Hello diyAudio community,
Finally I registered at this site, deliberately didn't say joined as for last couple of years I read several threads here throughout as observer, so I already feel like part of it.
Particularly I liked 10F/8424 & RS225-8 FAST / WAW Ref Monitor from Xrk and DLH Amplifier: The trilogy with PLH and JLH amps from Diego. This is just to mention few of my liking, there are 100's of great posts here. The size of this community is overwhelming for me, it seems that everything is already digested, maturated and answered in every possible way . So much experience , knowledge and innovation!. Ill stay humble with my things, I know something, but by far not a master in this subject.

I started this hobby in 1980's as teenager (I'm 56 y.o. now) by dismantling parents audio devices for parts. Oh Lord how sorry I am that I destroyed radio from 50's with EL34 output stage and 3 x 8" paper cone speakers then. Radio was mono and I needed stereo, it was also only AM so no use for anyone... But amp was great, and speakers could be also if the moths didn't eat membranes while laying in garage...😱
In early 1990's I quit my university (mechanical engineering) and got job from necessity, some money allowed me to continue without scavenging for parts, this book was something available and as you can see from picture, read over and over many times..

IMG_20240210_110606.jpg

Then I learned some high end stuff about opamps. Bought my first OP27, SSM2017, TLE2027 and NE5532. But there were few misconceptions that I learned about later; they teach about ground planes as solution for all ground issues (while its not) and encouraged my addition to tantalum condensers, which also proved wrong with time.
At that time, 1993 - 1994 , I bought KEF construction kit and built preamp, 3x24db/octave xover and 6 channels of amps (4 were standard 3 stage (bass and mid) based on MJ802/4502 transistors, and for highs I made double LTP x one more double LTP + IRF530/9530 mosfets for tweeters) . It worked!

End of 1990's and beginning of 2000's the internet became a blessing, I started to read articles from Nelson Pass and became religious , not that I am religious other ways in any way 🙂. At the same time my financial situation was great, so:
  • I bought my Sonus Faber Signums, I have serial number 18. Still my reference when I want to check my sanity.
  • Built fully differential preamp based on IRF610 LTP and 24pole rotary switch volume control , inspired by Nelson's Balanced Zen
  • Build what I was always dreaming off; a proper turntable. here are 2 pictures, from design phase, and finished (white mass is limestone):
DSC01145.JPG


IMG_2314.jpg

  • Built an super quite fully balanced passive RIAA preamp to match also newly acquired Benz Micro Ruby 2 naked.... by the way this cartridge is awesome and still with me after 20+ years.
  • And final effort was Nelson Pass inspired amplifier, its some 300 w fully balanced monster based on IRF610 LTP and IRF240/9240 x5 (total 40 IRF's for stereo) . Its only 2 gain stage (LTP + output) and I never seen it done like that. Here are few pictures from 2005:

IMG_1463.JPG


IMG_1464.JPG

This is still my reference amp, even I measured it just lately and THD is not very impressive, but slave rate definitely is.

Since then, until few years ago, audio was in big competition with life and other hobbies which are many. I was happily listening to what I have and said I will never build speakers again as its too much for me.
But since Covid, many things changed. My professional occupation (management consultant in packaging industry) slowly went down the drain, last job in 2010 gave me burnout an now I have 8 y.o. son (which is blessing), We went from city center to stand alone house on the hill and I finally have place to disassemble all my hobby boxes.
Due to those circumstances, now finally I read Douglas Self book, many articles here, lot from Elliot Sound products (great guy, sorry he argues with Nelson, both views are legitimate) , Rane and so on... and started again.
Here is latest , still in fine tuning project; 10" woofer in a reflex tube + Visaton B80 in a ball, active amplification of course;
IMG_20230202_132124.jpg


I would like to contribute DiyAudio by one article (to open subject about what I did, with hope for improvement ideas from the group) as I cant write all at once.
What do you think would be best for start, please let me know:
1. Limestone plinth and plate turntable with super heavy bronze bearing + fully balanced MC + passive RIAA phono stage
2. Nelson Pass inspired (not his design, its mine but I had him in mind) fully differential 2 stage amp AB class
3. FAST 10" ala sonotube (but this one is from sewage pipes) + B80 widerange in a ball (made from Ikea salad bowls)
4. Rebuilding an amplifier; one PA 6 channel amp is on my desk now in process of upgrade. While it was decent product in itself, I counted over 40 changes I made. This is not about circuit diagram on a PCB, but about mechanical things, wiring mains, wiring PS, transformer, various connectors,,,, wiring ground (I said it, I see many heat about grounding here) .. So its an guide for starters.
5. Sounds as off subject, but forum is called "audio" and not "hifi"; and audio radio for elderly, visual impaired or blind people. My mother (she is 95 and last 20 years suffers from macula degeneration) inspired me to make blind friendly device to read audio books, Not an easy item to find. For other listening sourpusses I bought her 2 Tivoli radios and that does great job. But how blind person reads audio book... Is this an subject?

Pls let me know if anyone wishes me to start any of this?

Many thanks,
Dražen
  • Like
Reactions: Draki and Vix

Discrete low to hi Z transformers for Mic input on a budget

I've been fooling around with my old Shure M67 four channel mixer. It sounds pretty good really. It lacks headroom and has too much gain in some circumstances like micing drums. I like the fact it plugs into the wall with a permanent power cord, has a master VU, mic input transformers, and individual master and channel volume controls. I also have a place in my heart for discrete preamps and their low noise characteristics. However, I'm thinking of gutting it and addressing the shortcomings with a new PCB of my own design. I would improve the dynamic range by using the 34volt PS that's present rather than the 14v one it uses. Also ESP has published a lovely two transistor preamp with great noise/gain/distortion figures. It requires a mic input transformer to get the gain up to reasonable levels though and to be noise free with long cord runs.
I would reuse the transformers already in the M67. I have no clue how they rate against modern types.I can easily check the bandwidth with my signal generator and O-scope. When do they saturate is another question. I suppose I could check that too by overdriving. Apparently the sonic gurus like the sound of mic input transformers for the compression affect.
On the other hand I could leave that piece of vintage gear as is and remake the whole thing using a mic input transformer available commercially.
Looking at mic input transformers I'm bowled over by the prices.
Neutrik advertises a mic input transformer, the NTE10/3. It's only ~$15.00, a far cry from the 3 to $500,00 you can pay for others.
Anyone have experience with it?
What's so special about the expensive types?

Panasonic UB9000 - discussions, mods, improvements

Well, Oppo it concluded their players production. So, now one should look for other directions in this field. I appreciate the Panasonic UB9000 as a such possible direction…
This device is in the same price class as last Oppo devices. I decided to take a closer look on this model, appreciating about possible improvements.
I would like to expose here some of my personal appreciations about this device and its functionality, so as it is, out of the production line (and maybe some comparatives with former Oppo models).
I have to mention that I was a little bit unlucky with this UB900 I bought, as it had already and fabrication fault (not powered multi-channel section). I had to spend some time to find out that it was about a abnormal functionality. Quite confusing, when examining for the first-time a (supposedly good functioning) new device. Well, this incident is history now…

First about this model, I remark the very solid mechanical construction. Thick solid steel chassis and enforcement. At least very heavy for its dimensions. The bottom of the chassis is made of a steel plates sandwich, with a total thickness of approx. 3mm. Solid like a tank. Good!

The switching power supply is divided in two sections: one 12v for digital stage, only filtered, and another section of +/-12v for audio section processing (regulated power). The SMPS is a very good quality (in contrast with one of former Oppo models). The HF noise on outputs is very low indeed, for both power sections. Surprisingly, the raw +12v rail for digital section is very well filtered, and its noise is very low. I have not seen before a such low-level HF noise on the outputs of a consumer device SMPS… The +12v for audio section it has a little bit higher noise level, comparing with the other ones (see pictures hereby). The dual +/-12v rails it uses (after a good filtering), two linear standard regulators (7812/7912). These rails it powers the DACs inside and the whole post DAC circuits. However, I can see m any designed places for filtering caps on DACs circuits, which it was not planted… Not good!
Well, Panasonic has chosen a particularly design (nonstandard) for the connection of their SMPS to the main board. Why? Maybe to prevent installing of a different (eventually linear) power supply in their devices… They have maybe seen what happened with Oppo players, and so many models LPS types manufactured for that players. It seems to me that the SMPS connectors for these Panasonic players, it was special designed, to not fit any other standard products or components existent on market.
However, their trial to make unique a such connection, or intention to prevent modding of their devices, is now success less… My LPS for this UB9000 it will have the right connector to fit perfectly into the Panasonic special designed receptacle (user friendly installation) …

The main board of UB9000 is quite small, as the components on it. The main board it includes also two DACs: one for stereo output and another one for multi-channel. What is particular about audio and DAC systems, is the extended use of local linear regulators, for all the power rails of the DAC chips. The digital section it uses small local SMPSes, as standard design also.
The both AKM DAC chips are planted on the downside of the board, which it makes difficult the eventual improvements/measurements. The DACs it are clocked through the digital signals. There are only two clocks on this device: the clock of the main processor (25Mhz oscillator), and a resonator for video chip (HDMI outputs). This resonator is extremely small, I can say.
The main processor is cooled by a quite small heatsink (my opinion), and a fan is also part of the cooling design. This fan is controlled by the thermal circuit build inside the processor. Same bad design as for Oppo 95… The fan is not spinning, but only when the temperature of the whole processor it come up to a certain level. I would like to have the fan running for a much lower temperature level… The processor it works at at above 40 deg.C (measured with open chassis), and the fan is not spinning at all at this temperature. I read in the manual, that the device it has designed and over temperature protection, and therefore it stops functioning if it become too hot. If the fan should run at a lower temperature level, this it will prevent a such overheating protection to stop the whole device. Well, not good in my opinion such functionality.
My already first improvement for this model it was the mounting of a larger heatsink. The fan functionality it will be also modified, but later on…

The small audio board it has on it only post DAC circuits. It is a so-called analogue board entirely. The audio analogue signals coming out of the DAC chips it goes into this audio board. Transistors mute circuits for all outputs. Panasonic it uses lot of film capacitors in the design of the audio section, which is very good also.

On the main board of UB9000 (at least the one I have), is to be seen a designed foot print for a 64 pins chip, which it seems to me in connection with audio stereo stage functionality. A kind of DAC chip maybe, for future upgrades… however, it is not an ESS Sabre chip. This chip is not planted yet on board.

Some impressions about the signal quality out of this device (my perceptions). The picture is very good, comparing with the Oppo stock devices. I am thinking that with the planed improvements, the picture quality issued by this model it can be indeed of an exceptional level.
The sound of the stock device is quite detailed, good sound scene, and good resolution as well, but quite lower output level in my opinion. It seems to me a lack of dynamic somehow, or not as I may prefer also. I know now that AKM DACs it can sound just amazing, so I am very excited to proceed to the necessary improvements to reach the max potential of these DAC chips. Well, the available space for adding components, or replacements, it is a little bit challenging. However, some improvements it is very possible to be implemented.

In my opinion, the software could be better designed (user interface). There are some obvious limitations as I can see, about the versatility of UB9000, comparing with Oppo players, software functionality, user interface, and the more many other files playback compatibilities.
I appreciate the start-up sequence of UB9000 as a pain. Too slow and too many “Please wait”, as other unnecessary messages in between. Oppo said only “Hello”, and the menu screen it was studently up… I expect Panasonic it will improve somehow the firmware, but it seems they are not working or prioritise very much the improving of the software in their last models. Last firmware version is now a whole year old…

The main improvements I can see after a preliminary examination of this device, it may be first an LPS, a better cooling approach, and some extended improvements on audio section/board. I think I will do something about the clock system as well…
I am working right now to finish the LPS for this model (similar approach as for Oppo models).

More to follow…

Attachments

  • UB9kSMPS.jpg
    UB9kSMPS.jpg
    590.6 KB · Views: 955
  • Like
Reactions: decramer

Bassreflex max SPL in BoxSim

Hallo,

I have a question about max SPL with bassreflex and closed boxes.

I tried to calculate a ~70L boxes with Wavecor WF223BD in BoxSim and suprised by the output.

As you can see in the images, I've added 3 such speakers in a 40cm box, one closed (red), one BR tuned to 30Hz (blue), and one tuned to 40Hz (green). In the efficiency plot, the blue plot looks good.

For the maxSPL plot, I've set the max themal power of the speakers to above 1000W, to make sure we see Xmax-limited results. Just as I'd expect, details like volume of the box drop their influence on max SPL then.

But isn't only about 97 db max SPL @50hz a suprisingly low number for a bass of that size? And how does BR manage to get ~12dB maxSPL more @fb given an Xmax limit? Wouldn't +6dB be the outcome to expect?

Attachments

  • eff.jpg
    eff.jpg
    146.8 KB · Views: 45
  • max.jpg
    max.jpg
    164.9 KB · Views: 46

Current-Buffered Polak-Groner Headphone Amplifier

Hi, I'm in the process of designing a high-quality audio interface. I'm already planning on using Polak-Groner composite op-amps for the ES9039Q2M I/V converter, (possibly using lower cost OPA1612s instead of the OPA2211s and the newer OPA891s instead of the THS4031s) and was wondering what you guys thought of using the same composite op-amp buffered with a current-boosting push-pull stage as mentioned in this article as an ultra-low distortion headphone amp?

I've posted the proposed schematic below, which with 10pF of parasitic load capacitance is simulated to have a phase margin of about 40° with a 32ohm load, though that becomes a dangerously low 15° at 16ohms. With the selected transistors the amplifier will do about 24Vpp into 16ohms, which is frankly complete overkill for all but the most demanding headphones, but I wanted to design it to power pretty much anything under the sun, including planar magnetics. The distortion is simulated as -180dB, though I suspect in reality that will be significantly higher. The gain is a fixed at 3.39, mainly because I can't figure out an easy solution for digitally-controlled gain switching that doesn't significantly impact distortion.

My questions (besides thoughts about this amplifier in general) are as follows:
  • Is it necessary to include gain switching with modern DACs' more advanced digital gain control and if so, is there a reliable, low-component count way to do it while maintaining these distortion figures?
  • Am I absolutely insane for using composite op-amps because SNR and THD+n are limited by the DAC itself?
  • Am I missing anything besides Aol/β and phase-margin for stability criteria?
  • Is the maximum Vpp I have for line-level (before the headphone amp) of 8.272V way too much? I know +4dBu is 3.472V, but also heard that most pro-audio has around +10dBu of headroom.
Sorry for the long post and all the questions, thank you in advance for all your help! :hphones:

Screenshot 2025-02-25 042901.png

Attachments

Which shielded cable for internal amp wiring?

Which shielded cable would you use for signals inside your amp or preamp chassis? Do you have a specific brand and model?

I'm looking for cables which are easy to work with for a semi-competent DIYer (me) and have excellent shielding.

I know that the Sound Of Cables is a big, hot topic, and I don't want to get into that debate. I will read all your opinions, and I hope you'll forgive me if I will quietly accept those which I can understand, given my (limited) knowledge. Therefore, for instance, I will select pure copper conductors over silver, in cables. I will ignore skin effect claims, and will happily work with solid-core or stranded conductors, depending on which are more easy to work with, break less easily, get soldered and desoldered more easily, etc. I will avoid cables which have capacitance or inductance which are too high for audio (do these things matter in the lengths of inches we need inside a chassis?) To give you an idea of my preferences: I blindly and happily buy cables made by Blue Jeans Cables and look no further.

I'm looking for two-core+shield type of cables, I guess. The better the shielding, the more I'd like it. Why two-core+shield and not coax? It is because I prefer to run signal ground separate from shield. I feel that shield is often more noisy than the signal ground, if I keep them separate. I have had remarkable success with long runs of unamplified mic output running through 2-core+shield cables, because I kept the signal ground separate from the shield.

Blue Jeans happily tells you which 2-core+shield cable they think are great for audio, for their XLR cables. But then, I would think those would be for external use, with thick outer jackets and mechanical protection. What version of those are available for internal wiring?

I searched for cable choices discussions on this site, and read those which I could find, but nothing is addressing the issue I'm asking. They're either asking about how to connect the shield, or getting into areas which I cannot understand.

Which cables do you use?

When I look at the Digikey catalog, I am seeing some 2-conductor cables which specify "1 pair twisted" and others which don't. I'd always pick the twisted over the untwisted -- is there any reason to do otherwise? I know twisting increases capacitance, but will it matter for lengths of a foot with circuits which are not at the hairy edge of unstable? Are the ones which don't specify "twisted" really untwisted? These are some of my doubts.

WTB Pair SML BUZ900 MosFETs

Looking to purchase a matched pair of SML BUZ900 N-channel power mosfets for a sensible price.

i recently picked up a REL Stadium III subwoofer and the PO buggered the plate amp by connecting the speaker to the wrong terminals. The P-channels tested good using a diode test on my Fluke DMV. In ideal world I'd replace them also, but looking to minimize my investment at this stage.

Thx!

Recommendations for capable but intuitive beginners measurement set up

I have been reading a few threads on this site regarding this topic which has answered some questions but then inevitably led to further questions. To be honest I am starting to go around in circles. To avoid the "paralysis by analysis" scenario, I thought I should try and break down my areas of concern as follows.

I need something that is easy to learn and intuitive to use, but also has most of the important functions I will require. I realise this can be a balancing act.

Most people mention Arta & REW as being excellent but then I hear other people on this forum state that they think USB mikes aren't the best. I think someone mentioned that they don't measure speaker phase? ( I could be wrong here, but I am new to this and could be mis interpreting/mis remembering things, so bear with me). I believe phase measurement is important for good imaging?

Is there a decent set up that will cover all the measurements I require including phase, that is also friendly enough to learn as a first timer?

I don't want to over complicate things but at the same time I don't want to invest time and money into something that only does part of the job.

Any help (and links) that will help me make a sensible first purchase will be appreciated. I should also perhaps mention that I am based in the UK.

Thanks

Paul

PASSdiy 4U/400 Deluxe Chassis – Limited Time Only Pre-Order

FrontPassDiy.jpeg


I’m honored to have partnered with @Nelson Pass to incorporate the PASSdiy logo into a Modushop chassis. We are offering this chassis for a limited time.
As you all know, Nelson is incredibly generous toward the DIY community. In honor of his love of animals, we will be donating 10 Euro from the sale of from each chassis to support animal rescue through the Canile Comunale di Bologna (Bologna’s local dog shelter).
I’ve visited the location personally, and their efforts to care for animals in need and find them forever homes is heartwarming. You can learn more through their Facebook and/or Instragram pages and through the Bologna City Hall.

Instagram

Facebook

Bologna City Hall

The chassis itself is a 4U/400 Dissipante Deluxe. It includes the standard 4U/400 chassis components with heatsinks pre-drilled for UMS compatibility.
In addition, you’ll receive the perforated base plate and a pre-cut back panel designed for use with the diyAudio store back panel parts kit.

RearPassDiy.jpeg


The back panel has two sets of holes compatible with Neutrik D-style jacks. It’s convenient for amplifiers using both XLR and RCA inputs, like the Aleph J. The front panel, featuring a CNC’ed PASSdiy logo, has two pilot holes for power indicating LEDs.

FrontLED.jpg


The chassis will work well with all First Watt style amplifiers and has plenty of heatsink for those that like to run their amps a little cooler or crank the bias a little higher. It fits the sweet spot right between the current 4U and 5U deluxe chassis.

We think they’re beautiful, and we hope you do also!

The price for each chassis is 319 Euro + VAT as applicable + shipping. The final cost of your order will be calculated at checkout.

Click below to pre-order your chassis. All critical dimensions and performance characteristics for the chassis can be found there as well.

Chassis Pre-Order

There is no limit to quantity, but again, this is a limited time offering. At the moment we don’t have plans to offer this front panel again. Pre-orders will be accepted through May 31, 2024. Chassis will be shipped in batches on a first-ordered, first-shipped basis directly from our factory in Italy.

Thank you,

Gianluca

Karlsonator

Since there's been a bit of interest in these things lately, I went and corrected a couple of small errors in the drawings, and updated the names. Just forget the old joke names, those were never intended beyond an audience of about 3-4 people... 😀 I plan to delete the old drawings to avoid confusion. They were basically draft versions anyway. This may screw up some links in the other threads.

Anyway, here are the links to the plans. They can be downloaded under 'More' on the menu.

Karlsonator "6"

Karlsonator "8"

Karlsonator

bonjour de la France

Passionate about sound since always, I first went towards the sound system, and dj, which I still practice.
I had home cinema with davis speakers. notably the chatenoy model from boulanger.
then 4 or 5 years ago I was given a pair of kef 104/2. wonderful speaker.
wanting to have them restored, especially at the level of the bass speakers with their special assembly with a donut in the center
i took them to a small vintage hifi store, we listened to them with real amps, by a home cinema thing. what a discovery….we left with a preamp and an amp
today 2 years later we therefore have 1 main system with:
b&w 801 series 80 speaker recaper restored
jeff rowland coherence one preamp recaped
jeff rowland model 3 mono block amp recaped
counterpoint da 10 ultra analog dac recaped
bluesound node 2i streamer
upton audi switch, with master clock
project 6.9 vinyl turntable
secondary system quad 33 and quad 303 set
acoustic research ar38s speaker
smsl su6
another 1 with philips speaker 22rh427
amp adcom 555
receiver sansui 1000x in preamp
dac 3d lad master 500
xduo bluetooth
and then the last one
speaker b&w 802 series 80 modif at the filter level
amp yamaha pc2602
preamp hafler 101
dac audio gd reference 7
xduo bluetooth

relaxed hifi, with great open-mindedness, who likes to test, lots of stuff, with the “cables”, the switches, all the stuff that “improves” the sound to see if…..

Razer's introduction

Hi, I'm razer, a 50 years old's french guy.
I play guitar since I'm a teenager and I'm an electrotechnic teacher.
I mostly like tubes amps, as most of guitar players do, especialy for my hifi setup.
I have several guitar tube heads amps, some are very old, but I'm using less these days with the benefits of modeling stuff and D class amps associations, and because I get older and older with back issues, lightweight cabs D class powered are my choice right now, I'm building them myself.
I have audio tube amps too, a cibot 2xPP EL84 and a antique sound lab PPx6L6 (converted to 5881). I got them out of service and repair boths.
I write english like a french cow and I'm sorry about it, but it's worth trying, I'll progress !

Most Recommended CD- CD-RW Brand For Music Recording

Hi folks!,
I have a Tascam professional CD-tape combo recording deck. Yesterday, I purchased a brand called Verbatim because the store had no Maxell, TDK, or Memorex products in stock. The problem is that with the Verbatim brand CDs, there is excessive skipping on playback. Heard that there have been lots of complaints about Verbatim CD products. If any of you folks have experienced this problem, please let me know. I’d like to find out which of the other 3 brands I mentioned above fare best besides Verbatim brand CDs. Please help me out on this subject.🙏🏻

6J1 China preamp thoughts

I normally build high voltage tube preamps but couldn't resist trying the China 6J1 kit even tho I didn't expect much at all. There are few versions, I got the blue one in the pic here. I must say I'm quiet impressed with the sound, it is very clean, no top end loss (that I can hear), smooths out audio little (for a single stage) and can double the output so it's more than a buffer. It is useful little preamp.
But I'm running it at 16V because that's all I had and on the back of the board is printed plate Voltage 28V. I'm reading 38V. Either they made a mistake or maybe it sounds good because it's getting more Voltage. Yes I did drop the heater Voltage resistor to 6.3. Anyone build this thing? What plate Voltage do you get at 12V and what are general thoughts on these 6J1 buffers?
An externally hosted image should be here but it was not working when we last tested it.

A DIY MEMS Measurement Microphone

FULL pic.jpg

Mic InLine.png
Program Manager: “Engineers never think the design is finished”.
(The Program Manager thinks all is done if the prototype isn’t in flames)

Hello, DIYers!

This is intended to be a series of posts about several trial batches of DIY measurement microphones that I built. I was playing with the design as a possible product for Dayton Audio. No decision was made yet on whether Dayton will actually pursue this, but they are ok with me writing about how these could be made (by some more skilled DIY constructors).

It will be partly a how-to, partly a technical design discussion, and partly a documentation about obsessive engineering behavior.

The microphone is an ultra-slim, small acoustic profile, wideband device with very flat response even without an individual correction file. A short cord connects the mic wand to its electronics board that provides power (9V battery or 48V Phantom), as well as response flattening circuitry and drive for balanced XLR and RCA outputs. The design capitalizes on the repeatability of MEMS chips’ sensitivity and frequency response.

-------
ERRATA:

  • some later posts mention using 38AWG enameled wires for wiring the chip. That should be 36AWG. AWG38 would of course work electrically, but won't have much of any stiffness and so is difficult to handle even with tweezers to position onto the pads and tack-solder. A little stiffness helps a lot. Even 34AWG would probably be ok, but 36 was easier to find. For example, TheElectricGodmine.com item #G27281
    https://theelectronicgoldmine.com/p...jlFgBwuZ5ccgkjYya1pgI-1UYeRFbfSuqFWYDJH3ljWOi

[index into relevant later design posts:]
  1. Frequency Response curves for mics without adjustment
  2. Arguments Pro and Con
  3. 3D Printed Mounting adaptor for MEMS chip
  4. Equalization Method
  5. Performance Specs
  6. Assembly Fixture
  7. Bypassing and Ground wire
  8. Assembly of the Microphone Wand
  9. Skill Level needed
  10. How Calibration was Done on test run mics
  11. Equalizer/Interface Box and related 3D printed parts
  12. Files download package

STL, GERBER, Lists, schematic, notes are now available 9/13/2024

Hello from Denmark

Recently retired, I now have more time to fiddle with my home theatre equipment, which has been dormant for quite some time.

Current gear:
Marantz SR6011 9.1 channel receiver,
Rauna Leira II, Front speakers
Jamo Concert Center speaker
Home build (Seas based) surround speakers
Home build sub (from now retired magazine "high fidelity") with (unknown) Peerless 15".

Mitsubishi DA-F20 tuner outputs levels

Greetings,

I recently picked up a sweet F20 and I'm wondering why Mitu would of decided on such a low (150mv/5k) output on the fixed outputs. I just installed it and listened to it for a week or so. And thought gee something must be off as the presentation was not well balanced. Like a fat bottom with murky mids and dampened highs. So I looked up the specs and was shocked to find such a low level. So I switched to the variable out(500mv/5k) and that completely changed thing for the better as the cloud has more or less lifted. Nevertheless both seem to be a bit low as I see 1000mv is more of the usual norm with many designs.

Which has me wondering if I shouldn't consider possibly altering the output stage to raise it. Plus I'm debating replacing the final 4.7uf coupling cap to a film type to see if that cleans things up a bit. Of perhaps I should just leave it stock.

Any thoughts would be greatly appreciated.

DD

Technics SU-V9 Startup Issues

Hello diy audio community. I currently have a Technics SU-V9 on my bench that I'm attempting to repair. I know my way around tube amps well enough, but my knowledge of anything transistor-based is sorely lacking, so I've come here seeking advice.

I believe the main problem with this amp is related to the protective circuitry which engages the main DC voltage rails. The amp powers up and doesn't blow the fuse, but neither of the internal relays click on.

I'll attach the service manual which has the schematic for reference… There are two transistors (Q601 and Q606) which I believe activate the thyristors for the DC + and - rails (D601 - D604), but I don't think they are turning on - Q601 collector and Q606 emitter both read 0V when they should be +16 and -14, respectively. Tracing things backward, Q603 and Q605 don't appear to be conducting, either. Neither does Q505, which seems to be what drives Q603 and Q605. Q505 has 0.1V on its emitter, when it should have 4.7V. Finally, some of the pins on IC501, the muting/relay drive circuit, don't show the correct voltage, but at least there's 3 volts on pin 9 (DC power to the chip itself).

And that's about as far as I've been able to get with it. Like I said, my knowledge of solid-state transistor logic is pretty weak...

Some other observations, which I'm not sure if they should be cause for alarm: the DC + and - rails after the thyristors read about +20 and -30 volts, and drift by +/- a few volts every couple seconds. There is also a very slight ticking sound coming from the power transformer, which is in sync with the fluctuations on those DC + and - lines.

The AC voltages from the power transformer secondary seem okay and are stable (I think around ~40V for one pair and ~50V for the other). And the DC + and - supplies prior to the thyristors also seem okay and stable, about +47V and -46V.

Phew, sorry for the long post. If you're still paying attention, any ideas what might be causing this behavior or what to chec
k next? TIA!

Attachments

Peppy player

Hi,

Almost one year ago I posted information about my audio player:
http://www.diyaudio.com/forums/pc-based/273684-another-raspberry-pi-radio.html
http://www.diyaudio.com/forums/construction-tips/273690-woodware.html
Since that time I redesigned the hardware and software components. Now it's based
on Raspberry Pi 2 and Amp+. The software part was changed completely. And now
the project has its name - 'Peppy Player'.

All the details about this project can be found here:
https://github.com/project-owner/Peppy.doc/wiki

And here is the summary:

This is DIY project which includes three components: hardware, software
and woodware. All three components were created for this project from scratch.

Here are the key features of the hardware component:
* It is based on the popular single-board computer Raspberry Pi 2.
* High quality audio achieved by using integrated Amplifier module HiFiBerry Amp+ and Sony speakers.
* The Hardware has six "senses" to control its functionality:
- Mouse
- Keyboard
- Touchscreen
- Infrared Remote Control
- Rotary Encoders
- Any computer in a local network or mobile device with Web Browser

Here are the key features of the Software component:
* This is application written in Python.
* Peppy provides Graphical User Interface for audio players running in a headless mode. Currently Peppy supports 'Mpd' audio player.
* Embedded Web Server allows to control audio playback from any Web Browser.
* The default touchscreen resolution is 480*320. This is the resolution of the TFT used for this project. Though UI is dynamic and can scale to any screen resolution.
* Currently Peppy has only Internet Radio functionality. In the future releases support for playing audio files and streams will be implemented as well.
* By default Peppy has playlists containing free radio stations for English, French, German and Russian languages. Users can add their own stations to the playlists.

The key features of the Woodware component include:
* Original custom design.
* Made of solid wood (Cherry and Walnut).
* Natural finish - the variation of French polish.

I hope that the information about this project will be useful for all
DIY developers as it brings together many different aspects of developing
hardware, software and woodware fro Raspberry Pi platform.

Enjoy!

Bad startup crackle

Sorry this isn't actually about a diy amp, but a triode labs. But this is probably the best forum to help me out.

My knowledge is fairly limited here. When I turn my amp on there is an intense "crackle" (the one thats kind of like radio static) that is actually causing major excursion on the driver - enough that I won't be turning it on again.

To me it sounds just like a tube that's gone out, I've heard this before, but I switched all tubes to the other channel and it's still in the same channel. That seems odd to me.

Could this be a bad transformer? Tune socket? Simple cable connection?

I'll have to bring another (cheap) speaker in to try any troubleshooting I guess, but any pointers would be appreciated.

Low cost reno / modernization of 1950's Zenith Console (Pictures of work so far)

This started as a project to simply replace the turntable... Then the amp was obviously shot and at that point the tuner was a lost cause to so it was gut and start over.

The mounting of new components is clunky for now as I work on finding someone to make me some actual mounting brackets etc.

I will post a few messages as a thread of sorts. Open to any additional suggestions or recommendations before I start wire management and buttoning it up.

Starting point:

1740529432429.png


The back off:

1740529574659.png


After a couple of removals:

1740529616918.png


1740529680856.png
  • Like
Reactions: Freedom666 and GM

Threshold 400A. L/R Channel out and fix

IMG_6352.jpeg


When i first opened for visual, no supply fuse., A toasted resistor divider which goes to lower 4 A6 pnp devices. Did a quick continuity check looking for CE shorts on A6s. Found 3 with BC shorts.
As show in pic, I proceeded to pull all 4 outputs. 3 were shorted as measured in circuit, the single survivor was limping along with ~ 2 mA collector leakage.Of Collector. All four will be replaced. Route cause is unknown as of now.
IMG_6347.jpeg
IMG_6335.jpeg


Pic of backside. Rated E for everyone.

IMG_6341.jpeg


Turned my attention to amp board. At first glance, I noticed the roached resistors. Both appear to be 1k ohm. 1-2W wirewound. I feel they are too closed to the board for my liking. I Will be replacing these with a higher wattage wire wound resistor and lifted further from board for better airflow. There are absolutely no markings on pcb. 🙄 A total of 18 transistors

10 x MPSA42’s——>MSP42’s
5 x MPSA92’s———>MSP92’s
2 x MPS6571’s—>ZTX694’s(1100 hfe)
1 x 2N4250—->KSC733C (ECB)

Note all are EBC orientation. I had to bend pins on 733C. Mind orientation.
Use schematic.

Diodes 1N4148x4 and 1N4007 x2

Dozen or so caps replaced. Go through all passives and verify values.

There're a few other pieces of silicon......... consisting of 6 diodes.

3 electrolytics and some film and tant capacitors.

5k bias trim pot. No trim for offset other than front end cascode diff pair and base mirror.

In this version CFE1078 a pair of moto 42/92’s is used as pre driver. Not as beefy as i would have expected.

This unit looks untouched so i suspect I'm looking at original components. Assuming this unit was used hard and has seen Venus type temperatures ….very impressed that it made it to year 2023.

The MPS6571 cascode devices and the 2n4250 concern me. I plan on testing each device. I suspect these have some high beta properties which may be difficult to match with modern replacements (IF NEEDED).

I’ll need to inspect the supporting circuits to see what else is damaged. I did notice the 47uF/50V is now open.


IMG_6363.jpeg
  • Like
Reactions: Mikerodrig27

Fast Sub-band Adaptive Filtering (FSAF)- an introduction

A long time ago, sound experts had to use their ears to do their job, which was hard. They wanted a better way to measure speakers and rooms. They could have used advanced math, but they didn't have the powerful computers that were needed back then (and still don't exist today).

In 1985, the iNTEL 80386 CPU just had just been released. Doug Rife founded DRA Labs in 1986, and released MLSSA in 1987. It was software AND hardware to go hand in hand for the PC. It came with sound card with a 12bit ADC that fit into the computer's ISA slot, and was capable of sampling in excess of 100KHz.
(IBM and compatible PCs didn't have ADCs at that time)

Around the same time a company called Audiomatica in Italy releases Clio, which it's own HR-2000 hardware that plugged into a PC's ISA slot + software to run in DOS.

These hardware/software solutions needed a 32bit PC, as well as also an optional math co-processor 80387, which costed US $800 in 1987)… $2000 in today’s money) just for MLSSA to run.

At this time computer were at their infancy, but anyone doing any real work had to opt for that math co-processor. When the 80486 CPU came in 1989, it had a built-in math co-processor, and a complete PC with monitor, keyboard and costed around US$3,000 (US$7,500 in today's money). Sounds like a lot, but it seemed like a bargain compared to the original IBM PC which has meagre performance.

Moving forward, in 2000, Angelo Farina with his AES paper, discussed the logarithmic sine sweep, aka log chirp, borrowing from radar technology, created by Sidney Darlington in 1947. It was better than the previous method… yet still people said these measurements didn't match what they actually heard.

In the early 2000s, Michael Tsiroulnikov invented a "divide and conquer" method that allowed acousticians to use better math, without spending too much money or computing resources and named it FSAF.

What is FSAF?

"Fast Sub-band Adaptive Filtering (FSAF) is a technique used in audio processing to measure and separate the music from everything else. It is a proven technology that has been tested, and used in the real world in the field of acoustic echo cancellation.

Have you experienced this technology before? Good chances you probably have. Have you ever witnessed someone talking to a smart speaker to say e.g.

“Hey Google, what’s the time?” whilst the smart speaker was still playing music?
How was the microphone able to hear what was said, above all the loud music that was being played?

Here's how it works in the context of listening to, and testing audio devices, like speakers.


1. Splitting the Signal:
FSAF divides the audio signal into smaller frequency bands, called sub-bands. Think of it as dividing a picture into small pieces, like pieces of a jigsaw puzzle. Each sub-band contains a specific range of frequencies, making it easier to analyze.

2. Adaptive Filtering:
The technique uses adaptive filters that can adjust themselves in real-time to changes in the audio signal. This helps in accurately measuring each sub-band.

3. Measuring distortions
In each sub-band, changes in the signal can be treated as additive noise. By using a mathematical method called Least Squares, we can estimate the true response of the speaker and the room for that specific sub-band. This estimation gives us a clear picture of how the audio should sound without the added character, effects or noise from the speaker.

4. Combining Results: After analyzing each sub-band individually, the results are combined to create a full-band response. Think of it like putting all the puzzle pieces back together to see the complete picture. The added character, effects and noise calculated for each sub-band are actually discarded in this step.

5. Full-Band Distortion Measurement: The full-band response, which is now a more accurate representation of the speaker and room's true sound, is used to identify the character, effects and noise. These distortions are the leftover “residuals” after applying linear filtering.


Thus, FSAF allows one to play music through a DAC/ADC, an amplifier, or a speaker, and “subtract” the original input from it.

What you have left over is the “residual” - parts that weren’t in the original audio file.

So what can expect to hear with FSAF, when measuring your speakers?

For starters, yes you will get your frequency response.

You will also be able to listen to distortion. Harmonic distortion, intermodulation distortion… all audio that isn't the original file being played back. This includes noise, the Barkhousen effect, ringing, echoes… even faint sounds that you had been accustomed to and your brain may have tuned out e.g. cars driving by, the steady tick of the second hand of a distant wall mounted clock, it’s all there.

For a long time FSAF was used in industry in acoustic echo cancellation, but as of June 2024, it was incorporated in REW 5.40 beta32. It is still in beta testing...

ALPS Motor Potentiometer Remote Control Circuit

Hi,
I have the ALPS27 Motor Potentiometer that I bought some time ago. I got it with a circuit for the remote conrol. But Ihave been looking all over to get a circuit diagram so that I can determine exactly what the J3 connector is used for. But I can not find anything. Any help with this is greatly appreciated.

Attachments

  • circuit.jpg
    circuit.jpg
    67.3 KB · Views: 161

DSL710A tray/transport

I've a DSL710 that has the usual no disk issue. It's been written that it's really a detector issue, but no matter. After opening the unit to my surprise I to found a HOP-1000 laser instead of a HOP1200s that I expected and had previously ordered. Can someone confirm or dismiss that the two lasers are interchangeable,? The player at present plays factory CDs but no CDR or DVDs. So most certainly it's the laser unit....

The best free program for modeling boxes for fullrange drivers and more?

Good afternoon everyone. I sold or gave away all of my programs but, bass box pro. Am looking to make a slot vented box for a pair of Mark Audio drivers I’m very fond of. The CHN-50s. I believe they are the best fullrange driver out there for the money hands down. So what program can I use to get the best results? Sorry if this has been asked before? Jeff

Cookies that should not be deleted when logging out

Whenever visiting DiyA, the first thing I do is scrolling to the bottom of the page to set the theme color and time/date format to my liking, but if I decide to log in and after a while log out, the theme color and time/date format cookies gets deleted at log out, would it be possible to exclude the following two cookies from being deleted at log out:
  • diyaudio_language_id
  • diyaudio_style_id
I have tried to use couple of cookie extensions in my browser and lock the cookies but it doesn't always work.
DiyA Style & Language (Date Time Style) Cookies.png


BTW, the placement of these theme color and time/date format settings at the bottom of the page and the behavior is rather annoying and frustrating when one have to reapply these setting several times a day, here's what the procedure look like right now:

  • Scroll all the way down to the bottom of the page (or use "End" button on the keyboard)
  • click on theme button
  • page represents the available styles in a pop-up window, but... AT THE TOP OF THE PAGE far from the bottom
  • ok, make a large mouse movement to the TOP OF THE PAGE to select the style...
  • page reloads and GOES BACK TO THE TOP, hey I am not done yet!!!
  • ok, one more round of this nonsense circus... scroll all the way down to the bottom of the page
  • ... click on the "YYYY-MM-DD / 12-hour clock" and select the one used in our region.
...rinse and repeat...........
  • page represents the available styles in a pop-up window, but... AT THE TOP OF THE PAGE far from the bottom
  • ok, make a large mouse movement to the TOP OF THE PAGE to select the style...
  • page reloads
Not fun.

please help with power supply for bass guitar combo amp

Hello all. David Seymour here. Long-time stalker, first-time poster. My current project is a bass guitar combo amp using this Sunn 200S preamp from EffectsLayouts.com coupled into this cheapo Chinese mono power amp stage. Meant to be small enough for solo practice and lugging around, but powerful enough for small ensemble gigs, maybe even with a modest drummer. Heatsink, cabinet design, and 8Ω speaker selection is done, but I need help figuring out the power supply. I'm definitely not a qualified electrical engineer. I'm handy with schematics and a solder station, but I know better than to mess around with power mains.

The Sunndering preamp is designed for DC 9V, presumably 500mA is plenty. The Chinese power amp PCB says it accepts wide power supply range, dual voltage DC +/- 20V-90V (not sure what that additional 12V input is on the bottom right.) I'm thinking 200W, 45V or 60V would be best, right? Trying to keep costs down; it's a bass guitar amp, after all, not a HIFI or audiophile grade application.

Is there such as thing as a ready-made solution for this? If not, can anyone point me to some existing DIY solutions, schematics, BOMs, etc? If not, who is able to design such a thing for cheap?

Thanks and cheers! 🍻

Preamp stage:
Sunndering.png


200W Power amp stage:
poweramp.png

Tapped-Kick-Horn

Hi guys! Are there any DIY tapped kick horn projects anywhere in the world? Or have such projects already been realized and I haven't found them? Or to put it another way: There are no TH kicks because it is perhaps impossible to construct a tapped horn as a kick horn? Or has no one tried to develop one yet? Questions, questions! I'm hoping for a little exchange of experience from the experts!

Best regards

Use volts measurement to determine max speaker volume?

I'm building a new system using a SEAS 4" Full Range and a SEAS 6" woofer. I'm trying to determine the point on my preamp volume control that represents enough power to blow the 4" driver (coil melt or cone damage) so that I don't get to or cross that boundary during listening sessions. 90% of the time I'm probably listening in the 65 to 85dB range, which I know isn't close to the power handling of the speaker. However, I'm sure we've all experienced a time or two when very loud is very good and inhibitions aren't properly in place. 🙄

The speaker has a 3.3ohm voice coil resistance. Handles 40W long term and 100W short term. If I use the equation of W = V-squared / ohms then it looks like somewhere around 11V amp output is the stopping point. I'm wondering if I can put my voltmeter on AC mode across the speaker terminals and figure out where the volume equals 11V and don't exceed that number on the preamp. (I also have an oscilloscope if that is a better tool to use.)

I'm asking in the Class D section because I'm using an ATI AT524NC amp that puts about 350W into 3.3 ohms at full tilt.

Balanced XLR output to unbalanced RCA question...

Hi. I don't mean to sound like a Gil Scott Heron song, but I'm new here, will ya show me around?

I'm tying to get the maximum level from a Source player that has both options of RCA's and XLR's outputs.
I would like to unbalance a balanced source, does that mean a straight short between pin 1 and 3 or ...

Decoupling capacitor between pin 1; Negative and pin 3; Gnd ? If so what type, material, size?

I'm used to studio gear and this Source player is a quasi balanced device, too sensitive for my likings.

O/C between 1 an 3 results in buzzzzzz

Hello all!

David Seymour here. Long time stalker, first time poster. I studied music production and audio engineering many years ago, am just getting back into it. I've designed or modified many stompbox circuits, mainly bass distortion, octave fuzz, reamping. Working on a few more primo balanced mic/instrument preamps. I'm a bass player, but no longer have a bass amp, so I'm currently building a combo amp from components designed by smarter people than myself. I need help with the power supply section, which I'll be posting about shortly.

Thanks and cheers everyone for generously sharing so much expertise!

Long time member but never posted

Hi all,

I guess I am posting this because it is a requirement to post.
🙂

Anyway, I never posted anything since my skill sets are still very novice and I never really had a question or challenge that I needed to seek an answer for. However, that is changing so I wlll be posting my question shortly that I hope someone can answer and lead me down the right path.

Dave
Projects by fanatics, for fanatics
Get answers and advice for everyone wanting to learn the art of audio.
Join the Community
507,825
Members
7,889,773
Messages

Filter

Forum Statistics

Threads
406,318
Messages
7,889,773
Members
507,825
Latest member
dawktah48