If using internal SMPS, just wire B1K to AC always on and only switch AC to the F6 supply.
That's a fascinating idea. The enclosure/chassis have to be pretty big!

Hi folks, I've been trying to read this thread and have been trying hard to digest all the information. So far, the only modification that I've decided to do is to change the Zener value to 5.6. I am going to stay with Mr. Nelson Pass as much I can. I just received my quads and the boards. Antek power trans (400VA...300VA out of stock) just arrived. This thing is heavy~ I am waiting for my Jenses to arrive (stuck in Houston) I am collecting my parts for the project. I am thinking about ordering Dissipante 4U, not the Deluxe model...budget issue. Needing to stay within my boundaries, I am going with the steal tops and rear panel. Has anyone used this for F6? And is it predrilled for F6? And is the rear panel predrilled as well?
The thought of using crazy glue to binding the Mosfets does not excite me!
If anyone can direct me to a different direction, my ears are open.
BTW, I am also building the NuTube pre. Now you see why I am tight with my budget.
Thanks everyone,
That chassis would be just fine. A very similar chassis (the 4U deluxe) was used in this build guide.
I think only the deluxe chassis are packaged with the pre-drilled UMS (Universal Mounting System) heatsinks. However, you can order the tapped heatsinks as a substitution. I'm not sure, but I think you can only get the 300mm depth in the 4U height tapped.
The standard Dissipante chassis does not come with a pre-cut back panel. The pre-cut panel as a substitution is only compatible with aluminum panels, I think, due to their configuration.
The store team is really responsive to questions if you're unsure or can't find what you're looking for.
Happy building!
The store team is really responsive to questions if you're unsure or can't find what you're looking for.
For sure! Trust worthy people. They are helping me with my quads as we speak.
I think only the deluxe chassis are packaged with the pre-drilled UMS (Universal Mounting System) heatsinks. However, you can order the tapped heatsinks as a substitution
This is a great information that helps me a lot. I may have to tapdrill myself though i have not done this before.
thanks for your help!
Last edited:
F6 Amp Question
Does anyone know if 4U Deluxe steel's rear is predrilled as well?
I think only the deluxe chassis are packaged with the pre-drilled UMS (Universal Mounting System) heatsinks.
Does anyone know if 4U Deluxe steel's rear is predrilled as well?
This page may help. Give it a quick skim. Everyone will be happy to fill in any gaps.
FAQs (Frequently Asked Questions) – diyAudio Store
FAQs (Frequently Asked Questions) – diyAudio Store
I am starting on my F6, I have the the universal power supply and I just got in the Deluxe chassis and I just discovered that the transformer and power supply board won't fit unless I mount the transformer vertically. I can not find a bracket - I tried a guy that had supplied some brackets earlier to folks in this group and he is sold out.
Does anyone know where to get one?
It seems to me that I could split the board, I think it is designed for that but I am not sure how to do that. I am following the Power supply guide.
The guide has you solder connectors that appear to be ground so maybe I could just split the board in half and have longer wires - maybe attached to a block in the middle
What depth / height of deluxe?
I've used "regular old" L-brackets from my local hardware store.
I've mounted the transformers on the front panel of the chassis using a riser board. Pain in the rump, but I like it and it saves a tiny bit of space.
These guys have two solutions I've used that I also like - I've used both the Omega and the L-bracket. Toroid Corporation > Products > Mounting & Hardware
Lots of choices depending on budget, how impatient you may be (cough... me), and your goals.
I was thinking the same thing. I've used this before.
https://www.homedepot.com/p/Simpson...uge-Galvanized-Medium-L-Angle-ML26Z/202071149
or this
https://www.homedepot.com/p/Simpson...04842400;300068630;300068626;-_-100374962-_-N
and this
https://www.homedepot.com/p/Simpson...-20-Gauge-Galvanized-Tie-Plate-TP15/100375260
These are used for deck building and such.
BUT as Zen Mod would say, they may be Fugly! J
I was thinking the same thing. I've used this before.
https://www.homedepot.com/p/Simpson...uge-Galvanized-Medium-L-Angle-ML26Z/202071149
or this
https://www.homedepot.com/p/Simpson...04842400;300068630;300068626;-_-100374962-_-N
and this
https://www.homedepot.com/p/Simpson...-20-Gauge-Galvanized-Tie-Plate-TP15/100375260
These are used for deck building and such.
BUT as Zen Mod would say, they may be Fugly!
This page may help. Give it a quick skim. Everyone will be happy to fill in any gaps.
FAQs (Frequently Asked Questions) – diyAudio Store
I have. But I was confused. It wasn't clear if both Steel and Aluminum had the same features. It may be b/c I was disoriented.FAQs (Frequently Asked Questions) – diyAudio Store[/url]
Does anyone know if 4U Deluxe steel's rear is predrilled as well?
No worries. It's a ton of information. Perhaps someone that's purchased one can confirm or the Modushop team (they read the forums too).
My guess is yes, based on...
"This is a steel-covered version of the Deluxe 4U Aluminum. Everything is the same except the top cover, bottom cover and rear cover are all made of steel, painted black in an anti-scratch finish."
From the 4U Deluxe Aluminum page..
"BACK PANEL
1 x aluminum back panel 3mm thick and CNC routed to our back panel specification, ready to accept your choice of PEM, RCAs and premium binding posts or drop our back panel parts kit (not included) straight in
It has Neutrik XLR compatible holes on the back to accept XLR, XLR/1/4" combo or RCA-in-XLR-format connector so you can easily connect XLR, 1/4" or RCA cables to your amplifier
Please see the 4U Back Panel Specification for more details"
Edited to add - You specifically mentioned you're on a budget, but the back panel / mounting kit made my life soooooo much easier as a novice builder.
Last edited:
I am starting on my F6, I have the the universal power supply and I just got in the Deluxe chassis and I just discovered that the transformer and power supply board won't fit unless I mount the transformer vertically. I can not find a bracket - I tried a guy that had supplied some brackets earlier to folks in this group and he is sold out.
Does anyone know where to get one?
Would this work for you:
Mounting Bracket for Toroidal Transformer Ø150mm
Not how much overseas shipping would be. Hardware store L Bracket might make more sense.
I am starting on my F6, I have the the universal power supply and I just got in the Deluxe chassis and I just discovered that the transformer and power supply board won't fit unless I mount the transformer vertically. I can not find a bracket - I tried a guy that had supplied some brackets earlier to folks in this group and he is sold out.
Does anyone know where to get one?
It seems to me that I could split the board, I think it is designed for that but I am not sure how to do that. I am following the Power supply guide.
The guide has you solder connectors that appear to be ground so maybe I could just split the board in half and have longer wires - maybe attached to a block in the middle
I used these on my dual mono F6 and they worked great:
Toroid Corporation > Products > Mounting & Hardware > Vertical > L-Bracket
Does anyone know if 4U Deluxe steel's rear is predrilled as well?
Yes, I confirm it is predrilled.
Keep in mind the steel rear panel cannot be mounted with aluminium covers and viceversa, both parts have to be made of the same material
If somebody like me is looking for identification of Zener diodes supplied by diyaudiostore kit:
* ON231C = 1N5231C (5.1Vz)
* F233B = 1N5233B (5.7/6.0/6.3Vz; min/typical/max)
I couldn't read the labels on those for the life of me. Ended up putting each in a circuit with a 100 ohm resistor and 9v battery to see which ones had a 6v drop and used those. The remaining were 5.1v by default.
Mixed up polarity
Hey guys,
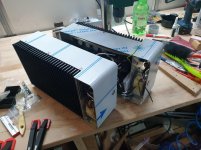
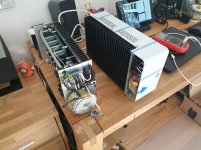
I finally finished my F6 mono amps.
Unfortunately I had a bit of an accident while switching from my first chassis version to the second one....
I mixed up + and - going to the board...
That cooked one of the 1000uF capacitors.
I replaced both capacitors to be safe, but now I have a harsh sound when turning the amp off and a silent hum when turned on.
Could someone help me sorting out, which part could be damaged, too.... apart from the capacitors?
Thank you very much.
Hey guys,
I finally finished my F6 mono amps.
Unfortunately I had a bit of an accident while switching from my first chassis version to the second one....
I mixed up + and - going to the board...
That cooked one of the 1000uF capacitors.
I replaced both capacitors to be safe, but now I have a harsh sound when turning the amp off and a silent hum when turned on.
Could someone help me sorting out, which part could be damaged, too.... apart from the capacitors?
Thank you very much.
Attachments
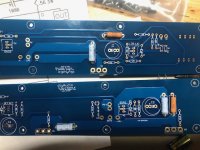
I'm a newby just starting on my F6 - I comparing my layout with the phtos in the build guide it looks like I have R1 and R3 reversed - The Board is missing some labels but I think I am right based on the Schematic (But I'm no expert) -
I am thinking it is just his resistors look different - R1 = .56 3W R3 = 100 3W I have attached pictures of my boards
I am thinking it is just his resistors look different - R1 = .56 3W R3 = 100 3W I have attached pictures of my boards
Attachments
- Home
- Amplifiers
- Pass Labs
- F6 Illustrated Build Guide