lohk said:gychang, just in case you did find the according pdf yet, here a copy to gif of the w3-871 datasheet:
thanks, great!
gychang
Could someone give me some details about routing to open up the space around the driver to let it breathe?
I wonder if clearing out this space leaves less wood for your speaker mounting screws to grab into... is this a problem? Is there any trouble about decreasing the strength of the speaker face in this area? When you clear out this space, approx what angle have people been using to cut it back at? (call 90 no cut - people like it steep, like 60 or 70 degrees? and even 45? Shallower?) Would making a smooth transition to the flat inside of the panel be worth the effort, or is a hard transition acceptable?
I'm considering using a dremel to carve out spaces around the mounting screws, leaving thick board running up to the driver in those areas for mounting strength and panel vibration control. Also I consider trying to make a nice rounded space through here, leaving no sharp edges where the driver will be radiating backward into the box.
Does this sound like it would be worth the effort? Perhaps I will eventually construct multiple boxes in order to examine this issue. But if any of you can save me the work by just telling me that would be cool.
- Adam (noob)
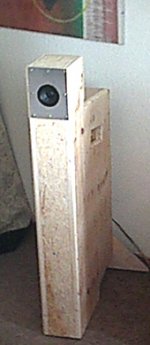
ervington said:And the finished product. Finished with four coats of Tung Oil. Continually amazed at the low end of these things.
http://static.flickr.com/50/147883768_8aee10a151.jpg
http://static.flickr.com/47/147883767_9398542c67.jpg
nice, do u feel subwoofer is necessary for this classic and jazz fan?
thanks,
gychang
Bjohannesen said:Hi,
it could be interesting if one of you built my TABAQ and compared it to the Needle. It is very easy to put together, as I have made it as simple as possible.
Please take a look at
http://coolcat.dk/bjoern/TABAQ_TL_for_TB.pdf
Hi from Bjorn
Bjorn: what do you expect will be the benefit of your design compared to the needle, besides obvious difference in cabinet configuration.
I am considering getting the TB speaker but am not sure which design I should consider.
gychang
Hi gychang
I have just tried to make a speaker as simple as possible and with the best possible frequency repsonse with this nice TB drivers.
I have never heard Needle, and can not say if my design is better or not. I have compared Needle and TABAQ using MJK simulations software. This shows TABAQ has a more flat frequency response. Furthermore, I have not tuned the cabinet fundamental as low as Needle. TABAQ is tuned to 55 Hz, which I found was the lowest fundamental the TB drivers could manage.
Please note, MJK MathCad simulations is a prediction of the finished result in an anechoic environment. The actual in-room repsonse will be different depending on the actual room and the location of the speaker.
Hi from Bjorn
@greenie512,
these are one of the nicest Needles I have seen by now, congratulations!
@AdamThorne:
The most important thing is that the drivers have enough space to breathe. I usually make the cut in about 60°. In this case the screws still find enough wood. Rounding the cut on the inner side can theoretically give an advantage, but I doubt that one can hear the difference. But if you can do the woodwork, do it. It gives a good feeling afterwards.
Nice greetings, Berndt
Bjohannesen said:Hi gychang
I have just tried to make a speaker as simple as possible and with the best possible frequency repsonse with this nice TB drivers.
I have never heard Needle, and can not say if my design is better or not. I have compared Needle and TABAQ using MJK simulations software. This shows TABAQ has a more flat frequency response. Furthermore, I have not tuned the cabinet fundamental as low as Needle. TABAQ is tuned to 55 Hz, which I found was the lowest fundamental the TB drivers could manage.
Please note, MJK MathCad simulations is a prediction of the finished result in an anechoic environment.
Hi from Bjorn
Bjorn: thanks for your clear explanation, I found your speakers very attractive as a DIY project.
gychang
Routing out Baffles for Cyburg's Needles
Adamthorne,
A couple days ago you asked about opening out the back of the baffle on Cyburg’s Needles.
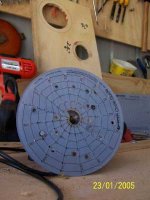
I used a 45 degree ½ inch chamfer bit with a guide bearing. Because I had routed out a recess running the bearing on the remaining thickness wouldn’t have given much of a chamfer (see right router bit in diagram attached).
I therefore cut a hole in some scrap the same diameter as the speaker hole using a home-made router compass, put it underneath the baffle and ran the bearing round it (see left router bit in diagram attached).
The photo under the diagram shows a test piece I made. You can see I’ve left material around the bolt holes. The pencil circles are approximately ½ inch diameter. These are a visual ‘stop’ when routing.
I don’t think this weakens the baffle much. There’s plenty of material left for whatever small compressive load you get from 4mm bolt.
If you need any more information please ask.
Mark
Adamthorne,
A couple days ago you asked about opening out the back of the baffle on Cyburg’s Needles.
I used a 45 degree ½ inch chamfer bit with a guide bearing. Because I had routed out a recess running the bearing on the remaining thickness wouldn’t have given much of a chamfer (see right router bit in diagram attached).
I therefore cut a hole in some scrap the same diameter as the speaker hole using a home-made router compass, put it underneath the baffle and ran the bearing round it (see left router bit in diagram attached).
The photo under the diagram shows a test piece I made. You can see I’ve left material around the bolt holes. The pencil circles are approximately ½ inch diameter. These are a visual ‘stop’ when routing.
I don’t think this weakens the baffle much. There’s plenty of material left for whatever small compressive load you get from 4mm bolt.
If you need any more information please ask.
Mark
Attachments
Routing out baffles for Cyberg's needles
Very nice Mod_Sonic.
I did something similar, but since I didn't have a router, I used a variable speed electric drill with a 1 1/2 inch (38mm) sanding drum - 60 grit IIRC. It's faster than a Dremel, but you have to be careful when you get down to the last 1/4 inch (6mm) or less. MDF just melts away with 60 grit at full speed") .
.
If you're using an Aura Sound or Hi Vi driver with a square frame, you might be able to do a full circle relief instead of a 'clover leaf' since they have a larger mounting circle (90,93mm) than the Tang Band (84.5mm).
Mike.
Very nice Mod_Sonic.
I did something similar, but since I didn't have a router, I used a variable speed electric drill with a 1 1/2 inch (38mm) sanding drum - 60 grit IIRC. It's faster than a Dremel, but you have to be careful when you get down to the last 1/4 inch (6mm) or less. MDF just melts away with 60 grit at full speed
.If you're using an Aura Sound or Hi Vi driver with a square frame, you might be able to do a full circle relief instead of a 'clover leaf' since they have a larger mounting circle (90,93mm) than the Tang Band (84.5mm).
Mike.
Doing it wihout a router ?
Hi Mike,
I think I've spent as much time so far making bits from scrap timber and MDF to make a better job of making the Needles as I have assembling the Needles themselves. Bits include :
- a router compass to cut the speaker holes and recess
- temporary extensions for the guide bearing when trimming the sides and tops
- an offset router base on which I rest a weight to stop the router tipping when I'm trimming using the guide base
How did you manage to make the speakers without a router ?!
Mark
Mike - don't know if you've got one but I wouldn't be without my Jasper jig for cutting driver openings.
I packed up yesterday totally "routered out" - see WIP shots http://www.greenie512.net/greenie512/assets/images/HT8-20.jpg (this ones not a full ranger)
I packed up yesterday totally "routered out" - see WIP shots http://www.greenie512.net/greenie512/assets/images/HT8-20.jpg (this ones not a full ranger)
Attachments
Doing it without a router
Mod_Sonic,
I used an adjustable hole saw to cut the driver openings - it wobbles, but if you let the mdf wobble with it, the holes come out round and the right size.
I'm using a double terminal block for the connectors, so all I had to do there was drill holes.
I've gotten a nice little Wilton router at a local home improvement store, and used it to do a 1/2 inch (12mm) round over on the edges, but haven't tried doing any compass work with it yet.
I've got a Dremel too. In the future, I may try using it with the router attachment for small diameter (3 inch) holes .
Mike.
Mod_Sonic,
I used an adjustable hole saw to cut the driver openings - it wobbles, but if you let the mdf wobble with it, the holes come out round and the right size.
I'm using a double terminal block for the connectors, so all I had to do there was drill holes.
I've gotten a nice little Wilton router at a local home improvement store, and used it to do a 1/2 inch (12mm) round over on the edges, but haven't tried doing any compass work with it yet.
I've got a Dremel too. In the future, I may try using it with the router attachment for small diameter (3 inch) holes
.Mike.
greenie512 said:Mike - don't know if you've got one but I wouldn't be without my Jasper jig for cutting driver openings.
I packed up yesterday totally "routered out" - see WIP shots http://www.greenie512.net/greenie512/assets/images/HT8-20.jpg (this ones not a full ranger)
tried to resist buying the jig but jig saw is not good for perfect circles in my hands. I have Hitachi router, hope it fits.
gychang
gychang said:tried to resist buying the jig but jig saw is not good for perfect circles in my hands. I have Hitachi router, hope it fits.
gychang
Yep - for the life of me I can not cut any where near even a slightly accurate line with a jig saw. Jasper come with loads of fixing holes for various routers. If yours isn't one of them - with a bit of care - you can drill fixing holes. It comes with a centring plate - so that should help.
I was somewhat suprised that I managed to get speaker mounting holes cut with a jig saw. Not that the lines look particularly nice, but the driver fits.
The dremel opened up breathing space for the driver quickly and easily, with the sanding drum. The MDF didn't put up much of a fight, I imagine plywood might have been a bit tougher.
I'm torn between trying to get a real router or the router attachments for the dremel. If you get (or already have) the dremel-router lemme know what you think.
-A
AdamThorne said:I was somewhat suprised that I managed to get speaker mounting holes cut with a jig saw. Not that the lines look particularly nice, but the driver fits.
I'm torn between trying to get a real router or the router attachments for the dremel. If you get (or already have) the dremel-router lemme know what you think.
-A
I don't have a dremel, but my impression is on a plywood, does not work, since the project is too large.
I finally gave in and bought router and jasper jig, jig is on its way.
gychang
AdamThorne said:
I'm torn between trying to get a real router or the router attachments for the dremel. If you get (or already have) the dremel-router lemme know what you think.
-A
I have a dremel router attachment, .. it works okay but a bit of a pain to use, . .mostly because the dremel is underpowered for this kind of work and takes a long time to eat away wood stock. I prefer my plunge router 1000% over.
Low-tech tools
Hole saws are available in sizes suited to make the speaker mounting hole, are inexpensive and safe to use.
Start the hole from the front, go half-way through, and complete the hole from the opposite side. Be patient (slow rpm, don't overheat the tool) and clear the sawdust very frequently (every few seconds).
A coarse round file works well to open up the back side of the hole and it is easy to leave wood where the mounting screws go. Drill a golf ball to make a file handle.
- Home
- Loudspeakers
- Full Range
- Cyburgs-Needle for Tangband W3-871S