Now that you have the blessing of MR. PASS I'm sure this will become a classic. I think the bulb issue scares people off a little. The Halo stick info helps, those are common around here.
A big favor would be to mention the total wattage rating needed at 240, 120 volts, to help people find bulbs that work, and how many they need to parallel. It appears that you need about 1000 watts total per side of the circuit? (2000 for a monoblock channel) Does this mean 120volt rated bulbs would require about 500 watts rated per side of circuit i.e. 1000 watts rated per channel? We can buy 500 watt 120 volt halogen sticks here in the U.S. easily which would mean only 2 per channel
Also VA ratings for the power supply, resistor wattages-
yup some of us are prettty darned ignorant.
Planet 10 Help!!!! Can you draw this circuit up for the authors approval? I guess you have spoiled us with your clear schematics you have done for other circuits.....
A big favor would be to mention the total wattage rating needed at 240, 120, 24, 12 volts, to help people find bulbs that work, and how many they need to parallel.
ok, my 1kW halo says 225V and gives 1,6A at 48V power supply voltage. The amp works with 300W 230V halostick also, but the right region of bias is at 3 or for * 300W in parallel. Also we could ask cyclotronguy as i think he tested differen kinds of bulbs.
Re: Hey Nobody......
Consider it done... look for it later today!
Thanks for the interest
carpenter said:Are you in a position to clean up the schematic you posted? I would find it much more interesting if I could see it clearly. Being's that I'm a carpenter, not an E.E., I need all the help I can get with electronics, i.e. a clean schematic for a start. If you are able, a description of how the circuit operates would be fantastic. A show of options and their associated benefits would be most useful.
Many thanks,
John Inlow
Consider it done... look for it later today!
Thanks for the interest
One thing that is nice about the circuit is that by varying the upper rail, it will adjust the amount of current. If you were to use a variac on the + supply rail, you could vary your idle current.A big favor would be to mention the total wattage rating needed at 240, 120 volts, to help people find bulbs that work, and how many they need to parallel. It appears that you need about 1000 watts total per side of the circuit
I don't know what else to tell you, except to look at the original zenlight article... there is a graph there with current/voltage for various wattage of bulbs.
Steve
This thread is losing altitude......
.....but at least it's not dropping like a rock!
I located an exquisite piece of maple with a wild, almost three dimensional grain pattern. It should wrap around the outer rim of my monoblocks quite nicely. I also assembled my pair of heatsinks. The have black anodized fins that are 6" x 6" and stack out at 12" with 1/2" spaces in between. They will bolt to the back of my chassis. My amps' appearance will resemble the old single ended exposed tube/ transformer 2A3 amps. You can see how I created my heatsinks here:
diy heatsinks
This is so much fun
Carpenter,
Where do you find a nice piece of wood like that? I would like to use something similar on my AlephX's.
Steve
Where do you find a nice piece of wood like that? I would like to use something similar on my AlephX's.
Steve
Locate a specialty lumber yard.....
at least that's what you do in Portland, Oregon. They have at least thirty different species of wood at "Woodcrafters" here in Portland. It would be pretty expensive for me to ship you a piece, but if there's no wood where you live, I can offer you my services.
John Inlow
at least that's what you do in Portland, Oregon. They have at least thirty different species of wood at "Woodcrafters" here in Portland. It would be pretty expensive for me to ship you a piece, but if there's no wood where you live, I can offer you my services.
John Inlow
Re: Locate a specialty lumber yard.....
I appreciate the offer. I'm sure I can locate someone locally and save us both some trouble. I didn't know there was such a thing as a "specialty" lumber yard. I will have to look around.
Any advice on where to look for general woodworking tips? I have some tools (compound miter, table saw, various hand tools) but I suck at using them! I wish I could get a good 45 on wood for speaker cabinets.
Steve
a good 45.......
Create an off-bearing table on the back of your table saw, if you own one, to catch the material. Cut at 45-1/2 degrees. This allows the tips of the cuts to touch and not be impeaded by the rest of the cut. Do not rock the material up or down or the cut will wander. 🙁 Perhaps you can make your first cut a quarter of and inch too wide in order to get the feel for the job. Then tighten up the fence and hit it again.
Most of all: Pratice!
Have fun.
off-bearing.....
This is just a term we use to describe the table that the cut piece is transferred to. In this case, the load is transferred from the saw's table top to the off-bearing table top.
John
This is just a term we use to describe the table that the cut piece is transferred to. In this case, the load is transferred from the saw's table top to the off-bearing table top.
John
as i understand it, in this case (http://www.passdiy.com/projects/zenlite1.htm) some inductivity would be very advantageous....
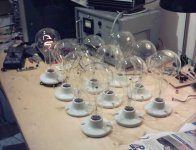
I bought them in mexico city on the street. 10 * 300W + ceramic sockets about 30€. Very happy KLM managed to transport without breaking them.
Now the hard decision is: balanced? balanced and x-ed?
I bought them in mexico city on the street. 10 * 300W + ceramic sockets about 30€. Very happy KLM managed to transport without breaking them.
Now the hard decision is: balanced? balanced and x-ed?
At the Home Depot, the same ceramic sockets were $0.97
thats about the same as in mexico: 120peso for 10 sockets, ca. 200 for 10 bulbs.
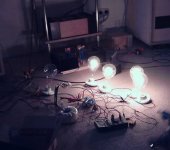
now testing: 4 bulbs at 47V give 5.7A and the transformer 18+18V 500VA has 29°C after 1h.
Attachments
Old thread, but anyway..... 🙂
Is it possible to build the Lightenment with 19VDC PSU and 24v bulb?
Thinking about single ended and not balanced, same as Fig.5 in Pass article:
http://www.firstwatt.com/pdf/art_zv1.pdf
Is it possible to build the Lightenment with 19VDC PSU and 24v bulb?
Thinking about single ended and not balanced, same as Fig.5 in Pass article:
http://www.firstwatt.com/pdf/art_zv1.pdf
- Status
- Not open for further replies.
- Home
- Amplifiers
- Pass Labs
- zen lightenment!