That sounds reasonable George.
I find myself in the same position with many old radios. I'll fix the best and sell the rest.
-Chris
I find myself in the same position with many old radios. I'll fix the best and sell the rest.
-Chris
... During a collecting / hoarding time in our lives we stomped flea markets and yard sales for "stuff." ...
I've been in business long enough that people know I'm a radio guy, and bring me "stuff" or leave it at the back door of my office. Sacks of parts I keep, radios I try to distribute to someone who has the time to refurbish them. I have all I can do keeping the rack of stuff working - and that's just the stuff here at the office ... I knew I had too much "stuff" when I had to walk past a nice R-390A in a junk shop for $200. If it had been a non "A", I would have found room for it.
A client brought me the Eico Sig Gen a few weeks ago - I'll probably save the transformer and case and knobs, and just scrap the rest. Unless someone wants it ...
... I would use the closest can capacitor from CE manufacturing (tubesandmore). ...
You guys probably know this, but Hayseed Hamfest is another source for cans. I don't know if they are old style, or new caps put in a can.
Attachments
Last edited:
Hi George,
Enjoy your radio! It does have a unique look for a tube radio. The meter is pretty funky sitting there front and center.
I would use the closest can capacitor from CE manufacturing (tubesandmore). Using separate capacitors might be cheaper, but makes a mess and is more difficult to install nicely. I use new cans for any rebuilds I do. Stuffing the old can with new caps isn't really a viable plan either. There is no ventilation for the new capacitors. People forget that.
-Chris
Well Chris, CE cans are fine, I've used them in some cases, however this Magnavox 65-02 chassis has sufficient room under the chassis for 3 radial electrolytics.
Some resistors are also suspects, I also had to replace a few that drifted "high".
Also, increasing the grid coupling to the 50EH5 output tube from .01 to .047 improves the bass response of the two 6" speakers.
It's a relatively spacious, easy chassis to work on as well.
As I previously mentioned, it was featured on the old Dick Van Dyke show, so prices of it only peaked at $200.
As opposed to the "Gilligan" Packard Bell radio and the "Walton" Zenith radio going for rediculous prices on the vintage market.
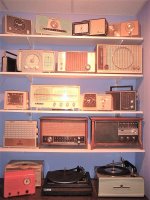
Nice collection.
They would all tune in only 60Hz and static in my place even though I'm on the 24th floor facing the transmitters.
They would all tune in only 60Hz and static in my place even though I'm on the 24th floor facing the transmitters.
I repaired the Philco radio my daughter-in-law had inherited from her grandmother in San Francisco. Must have cost a fortune in 1948. It had some leaky coupling caps and I put some new electrolytics in the power supply.
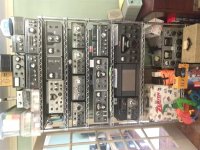
The cabinets that the Eico test equipment were built in were all standardized to just a few sizes. They are steel for the most part, with aluminum front panels. Makes a pretty decent shielded housing for measuring device noise.
I collected a lot of Hallicrafters ham gear over the years. It takes two people to handle the HT33A Linear Amplifier.
Hi W5jag,
Nice collection.
I have one of those Eico generators in unrestored condition. I don't think I will get around to it.
Hi wiseoldtech,
That's a nice, clean collection. Mine are scattered around the house.
Hi kodabmx,
Nice collection.
I have one of those Eico generators in unrestored condition. I don't think I will get around to it.
Hi wiseoldtech,
That's a nice, clean collection. Mine are scattered around the house.
Hi kodabmx,
Why is that? Besides, AM transmitter sites are typically in rural settings. Are you talking about the FM transmitters in the CN tower?They would all tune in only 60Hz and static in my place even though I'm on the 24th floor facing the transmitters.
Hi wiseoldtech,
That's a nice, clean collection. Mine are scattered around the house.
Oh, I've got a few scattered around the house too.
I use them all the time
In fact every room has a radio somewhere, including the laundry room and garage.
I like my music and news too much to be without them. 😉
Hi kodabmx,
Why is that? Besides, AM transmitter sites are typically in rural settings. Are you talking about the FM transmitters in the CN tower?
No idea really but I'm guessing the electrical system in this building has something to do with it. The reception is about the same as I would get in a car driving under a bridge.
The transmitters are rural, but they aren't North of me... I can get AM at my dad's house in Scarborough and in my car. Even an AM5 tunes in static across the whole dial in here though.
Here in my basement lab the AM band is just one loud 60 Hz buzz with one station heard above the noise, but unlistenable. I can get 4 FM stations. The major radio jammers are the cheap non compliant LED light bulbs and shop lights. The SMPS in those things radiates lots of nasties, and the building wiring is a giant antenna.
We have an intercom system that uses the power lines for a carrier that's somewhere in the hundreds of KHz. It has degraded from works great, to totally useless in the 6 years that we have been here. Works pretty good if every light in the house is off though. That reduces the AM buzz considerably, but not enough to make AM reception useful.
We have an intercom system that uses the power lines for a carrier that's somewhere in the hundreds of KHz. It has degraded from works great, to totally useless in the 6 years that we have been here. Works pretty good if every light in the house is off though. That reduces the AM buzz considerably, but not enough to make AM reception useful.
>The major radio jammers are the cheap non compliant LED light bulbs and shop lights. The SMPS in those things radiates lots of nasties, and the building wiring is a giant antenna.
Makes you wonder. What have we given up for the cheap and convenient? Regarding EMI anyway. No one knows what it does when you're just pickled in the stuff...
Makes you wonder. What have we given up for the cheap and convenient? Regarding EMI anyway. No one knows what it does when you're just pickled in the stuff...
During the daytime, I get an annoying hum/buzz on the AM dial from around 960 to 1060kHz.
I suspect it's the power distrubution transformer outside on the pole, about 100 feet from the back of my home.
Odd thing is, if it should rain, the noise goes away, and also stops during evening hours at sunset.
Weird.
I suspect it's the power distrubution transformer outside on the pole, about 100 feet from the back of my home.
Odd thing is, if it should rain, the noise goes away, and also stops during evening hours at sunset.
Weird.
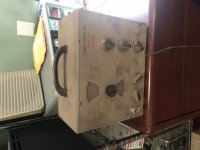
My ~20yr old Gaggia Classic.
Bad limescale deposits over last 5 years pretty much made it unusable. I've had it apart before but cleaning wasn't enough to clear the problems so its been sitting idle for a while.
Thankfully since I last looked at it spares are much easier to come by (I think since Gaggia was bought by Philips? the reputation of this model has gone down since then but it seems the afterservice is much improved).
Well it must have worked as well as this when it was new, but for now I am just enjoying it and trying to find the right grind and load to work with the new water flow.
Gosh, that brings back memories. I had a Gaggia Classic for my home espresso hobby, plus a really nice Spanish grinder, the brand name of which I forget now.
I really enjoyed perfecting the double shot, and got pretty good at it - I could certainly pull a better straight double than any of the local shops (A low bar I know, since most of those places tailor their espresso toward the milk drinks that make up the large majority of their sales.) It was nice to achieve those wonderful dark chocolate & berry flavors when everything came out just right.
I was just getting set to add a PID unit to control the boiler temp on the Gaggia - probably overkill for a unit with such a tiny little boiler, but hey, it's DIY! 🙂 - when I started having some serious trouble with acid reflux. Like the classic joke, I said, "Doc, it hurts when I do this," to which the doctor replied, "Then stop doing that!" So I sold my stuff to friend at work, who still uses it regularly. The little Ebay PID controller is in a parts bin in my closet. 🙁
These days I stick mostly to cold-brew iced coffee, which is naturally less acidic, but not as interesting to make...
Got a voicemail yesterday from a very distraught church organist. She described how she'd dropped a large, heavy hymnal on the keyboard while practicing, and now one of the keys was stuck in the down position and would not play.
Fortunately this is an easy repair. On this model, when a key is forced way beyond its downstop position, the switch actuator gets hung up on the edge of the switch. Takes a bit of disassembly to reach the scene of the crime, after which all that's necessary is to take the actuator apart & put it back together again, then adjust the contact point back to normal.
Spent about 10 minutes repairing the organ, and another 20 chatting with the organist, whom I hadn't seen in awhile. 🙂
Hi Jim,
Nice. Very good of you to repair the organ for them, and nicer still you had that human contact and settled her stress over the incident. I'm glad it was a straight forward repair.
Nice. Very good of you to repair the organ for them, and nicer still you had that human contact and settled her stress over the incident. I'm glad it was a straight forward repair.
Just built up a power amp.
45 volts on speaker output !
A good visual inspection found R30 22k input resistor was completely missing.
Soldered it in and output back to zero volts.
45 volts on speaker output !
A good visual inspection found R30 22k input resistor was completely missing.
Soldered it in and output back to zero volts.
Mig Welder (home use, not a professional model).
Not really a repair since it never worked properly from new.
It's a long story, settle down with a cuppa.
Bought the welder new about 30 years ago. Not the cheapest model but it was 'highly recommended' by Practical Classics magazine. SIP Topmig 150 Turbo.
Never got on with it. Wire would either stub or burn back and stick to the tip.
Messed about with it without success. It stymied my hope of a car restoration project.
I did replace the wire feed motor with one I had as the original wouldn't run at a constant speed even when mechanically removed from the machine. Also fitted seperate transformer/rectifier to feed the wire motor as originally it was fed from the welding transformer with voltage fluctuating with the weld arc.
The internet was in the future.
Move forward to a couple of years ago, looked on Google and found loads of 10 year old posts on car/welding forums stating what a c**p welder it was and how to fix it.
Started with replacing the plastic torch liner with a curtain wire giving some improvement but I thought it could be better.
Last year, lockdown & furlough from work. Lots of free time to do all the jobs I never had the time/inclination for while working. More Googling.
Bought and fitted Euro Torch Socket & Professional Euro Torch. Much better. Also made & fitted stiffening bracket over wire feed roller. Also replaced wire feed tranny with a laptop power brick and fitted a relay to short the motor for braking .
Last Week -
However, the consistent feed from the new torch highlighted that the wire feed motor was too slow when welding at the highest settings. calculation & guesstimation revealed a 10,000 rpm motor would be suitable. A suitable one was sourced and fitted.
I also sourced and fitted a PWM board for speed control.
Motor current draw was 0.3A when running. The 3.5A power brick would shut down and not start the motor. DC resistance of the motor was 2 ohms therefore an instantaneous current of 10A.
Tested with current limited supply and everything ran fine so junked the PWM controller and replaced with an LM2596 based CC/CV regulator board. I replaced the voltage trimmer with a 10k linear pot salvaged from some old electronics.
But, this being a regulator, full power (~18V) was achieved at mid position of the pot. It was a 35V regulator (though fed from ~19V). Google again was my friend. I found the data for adjusting the voltage and feeding values into Excel determined the board must have contained a 360 ohm resistor. Close examination with a strong lens revealed this to be true. What to do? The resistor was tiny, well beyond my skill to remove and replace.
Inspiration struck.
If I couldn't replace the fixed resistor on the board then I must make the variable resistor a suitable value to suit - 5000k.
This I achieved by wiring both sections of the stereo pot in parallel.
Finished Today -
The addition of a 390 ohm resistor in series with the pot raised the slowest speed thus saving umpteen degrees of wasted movement at the bottom end of the range.
The speed control is very progressive and on start-up you can see the CC LED flashing as it limits the current thus preventing the laptop brick shutting down.
Last edited:
- Home
- Member Areas
- The Lounge
- What did you last repair?