I'll bet they were!
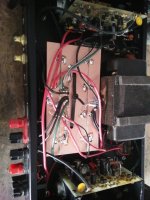
I just got to repair my "light bulb amp"... I didn't ground the jacks to the case on this one so when I decided to swap left and right RCA cables, I got a 60Hz buzz at full blast and it too out the left channel MOSFET... I had a spare so 15 minutes later it works again 🙂
The burn mark on the heatsink is why I'm using that giant cement resistor - apparently the TO-220 doesn't like the start up surge...


A side note: This record still plays with this dirty warp! https://disk.yandex.com/i/ZeY6-wVSGTgyGA
I just got to repair my "light bulb amp"... I didn't ground the jacks to the case on this one so when I decided to swap left and right RCA cables, I got a 60Hz buzz at full blast and it too out the left channel MOSFET... I had a spare so 15 minutes later it works again 🙂
The burn mark on the heatsink is why I'm using that giant cement resistor - apparently the TO-220 doesn't like the start up surge...
A side note: This record still plays with this dirty warp! https://disk.yandex.com/i/ZeY6-wVSGTgyGA
I've seen worse. On my own records.I'll bet they were!
This record still plays with this dirty warp! https://disk.yandex.com/i/ZeY6-wVSGTgyGA
I'm shocked it tracks with 1.3 grams of force! I think if it was out of alignment it would fly out.
Depends on where the resonance is, and how damped.I'm shocked it tracks with 1.3 grams of force! I think if it was out of alignment it would fly out.
True. I'm just used to DJ turntables and 3.5G - 5G to track with.
I have a Pinochio record from when I was a kid that is warped like a Pringles... I left it on top of a 60W lamp because it was convenient. I then learned about the properties of PVC 🙂 It still plays and all. It sounds like a crackling fire but it plays.
I have a Pinochio record from when I was a kid that is warped like a Pringles... I left it on top of a 60W lamp because it was convenient. I then learned about the properties of PVC 🙂 It still plays and all. It sounds like a crackling fire but it plays.
Wise:
Try LEDs in the bulb housing. You get concentrating lenses if needed.
5 watt LED was enough in a doctor friend's microscope, in place of 50W halogen.
I have a goose neck magnifying lamp with a ring of LEDs around the lens.
$6 some years back.
Try LEDs in the bulb housing. You get concentrating lenses if needed.
5 watt LED was enough in a doctor friend's microscope, in place of 50W halogen.
I have a goose neck magnifying lamp with a ring of LEDs around the lens.
$6 some years back.
A light socket switch to the lamp I often use to repair my audio gear. Priorities are important… lol.
Wise:
Try LEDs in the bulb housing. You get concentrating lenses if needed.
5 watt LED was enough in a doctor friend's microscope, in place of 50W halogen.
I have a goose neck magnifying lamp with a ring of LEDs around the lens.
$6 some years back.
I did outfit that shop lamp a few years back with 10 high brightness LED's around the magnifying lens on it, seperately switchable.
As for the main 100w bulb, I'm looking around for a screw-in version - 100w halogen screw-in type, they're under $7 at the hardware places.
The overhead tubes near the ceiling are blinding now with LED tubes, but I gotta have a close up lamp for intricate work.
68 year old eyes need all the help they can get, ya know?
https://www.amazon.com/type-100-watt-light-bulb/s?k=type+a+100+watt+light+bulb
https://www.amazon.com/LED-Replacem...e_keywords_five_browse-bin:7801675011&sr=8-10
Halogen bulbs tend to run hot, and at mains voltages they can be short lived.
We had a hardness tester, the halogen lamp (220V, special, expensive, short supply) kept blowing, so we put ordinary turn blinker lamps and a transformer, it was used to project the indentation from the ball, for measurement of hardness. We bought a dozen bulbs, and they used to last much longer than the halogens.
My eyes have blind spots, too much staring at bright lights, added to that maybe diabetes. I am 56, and do use jeweler's loupes for fine work.
The goose neck is used if the work will take time.
Why?Why would anybody use a halogen bulb except as a room heater?
If you sat in my basement workshop, in the winter it's a bit on the chilly side.
The halogen originally in the lamp didn't throw off that much heat anyway, I still needed a space heater down there.
Boy do I know!I did outfit that shop lamp a few years back with 10 high brightness LED's around the magnifying lens on it, seperately switchable.
As for the main 100w bulb, I'm looking around for a screw-in version - 100w halogen screw-in type, they're under $7 at the hardware places.
The overhead tubes near the ceiling are blinding now with LED tubes, but I gotta have a close up lamp for intricate work.
68 year old eyes need all the help they can get, ya know?
I find too much light level has a lot of glare...I prefer to work near a window in natural light, supplemented by artificial light if needed.
Glare also is tiring.
You could try two small lamps from different angles to give light without shadows. I try to use diffuse light, not point sources. Masking tape or matt finish translucent tape over a point source may be a solution in an emergency...or just use abrasive paper on the plastic lenses, bit permanent though, hard to reverse.
Another option is to mount a panel lamp on a support, a modified table lamp...
Last Sunday night I was doing some last-minute things to the car, preparing for a 5-hr. road trip to St. Louis on Monday morning for a family gathering. (Better really, really late than never, that's my motto. 👍)
First and foremost was the temp control for the HVAC. It uses a cable-actuated gear & pinion to move the duct under the dash between the hot & cold supply. The pinion had developed the very rude habit of randomly popping out onto the carpet when attempting temp. adjustments. A properly variable temp control was a priority, as the weather around here has been pretty variable to say the least.
An online search revealed an actual Nissan TSB addressing this very issue, which said something along the lines of, "Oh yeah, you gotta just glue that pinion in there or it's gonna keep doing that." OK fine but... Maybe coulda did that at the factory eh?? Just sayin'... 🙄
A few days earlier I'd procured the recommended 2-part plastic adhesive and glued the little bugger in its hole. Sunday night, with adhesive cured and holding, after a couple of tries and some moderate cursing, the cable & gear (located or course at the very most awkward place under the dash) were reinstalled & adjusted.
Next on the list was to correct a bug I'd created an embarrassingly long time ago when I installed an aftermarket head unit. On the 2002 Nissan Altima, there's a blue wire in the original radio harness which is not used in the aftermarket install. But it must be connected to ground or else you lose the steering wheel control for the multipurpose dash display (trip meters, mpg, that stuff). Sure wish I'd known about this when I installed the Pioneer head unit, but, well.
Incidentally, I'd like to take just a moment to mention that the Pioneer DEH-P6000UB head unit has the most brazenly terrible user interface of any device I've ever encountered. It is a saga of frustration and misery all its own, but I digress.
At least it's easy to get a radio in & out of this car. Working from the front passenger seat, I pulled the big hunk of dash center trim, removed the deck, found the blue wire and introduced it to chassis ground, then tested & reassembled everything. All done, I thought, doing that inexplicable hand-clap cymbal-clash thing we sometimes do at such moments. Except, no.
The head unit's aux in jack is a stereo mini-jack on the rear panel, so I have a "temporary" stereo patch cable trailing out onto the floor on the passenger side, for connecting my trusty ClipZip music player. This hasn't been a bother, since nobody ever sits on that side. <sniffle> Except for that one night of course, whereupon I managed to snag the cable on the tread of my shoe while exiting the vehicle, YANKING it completely out of the car and, of course, destroying the crappy little plastic jack it was occupying. Oops.
Of course the crappy little plastic jack is installed on the main PC board, which is screwed & soldered to the bottom panel of the enclosure, and is accessed by basically gutting the entire unit like, well, something else that has guts. And since there are at last count an infinite number of variations on the basic crappy little plastic jack design, I didn't have anything close in stock. The good news is, this unit has a second identical jack, labeled 'R/W' or something. I don't even remember what the hell that one was for, but it don't do nuthin' now because there's no jack there anymore!
Anyway... Got to bed a little later than planned, but not too bad.
Epilogue / Disclaimer: I just finished the return trip tonight. I've been drinking coffee for several hours, and may be somewhat over-caffeinated this evening. 😛
Last edited:
Natural light is in short supply this time of year; even at midday the lights are on.I find too much light level has a lot of glare...I prefer to work near a window in natural light, supplemented by artificial light if needed.
Recently I "repaired" a pile of old all-metal 1960s illuminated theatre exit sign to disuse the original 20W frosted T-6 1/2 intermediate base tubular lamps, which are an odd size and now costly, at $4 to $7 each, as are the replacement screw-in LED replacement bulbs. The signs themselves were free from a cleanout of an estate. They were to be thrown out.. Not so fast!
After the lamps and their sockets were removed and the fixtures completely disassembled, there was so mych dust and dirt. Every piece was totally cleaned including the red translucent panel that forms the letters through the cutout aluminum front. Five rows of 12V 70mA 12" red LED strips from ebay were installed in the back of each sign, for more uniform back-lighting. The original lamps had given an uneven distribution of light across the red letters of the sign. A DC jack was added on the back of the sign to fit the plug on a brick-type 12V 1A power supply.


After the lamps and their sockets were removed and the fixtures completely disassembled, there was so mych dust and dirt. Every piece was totally cleaned including the red translucent panel that forms the letters through the cutout aluminum front. Five rows of 12V 70mA 12" red LED strips from ebay were installed in the back of each sign, for more uniform back-lighting. The original lamps had given an uneven distribution of light across the red letters of the sign. A DC jack was added on the back of the sign to fit the plug on a brick-type 12V 1A power supply.
- Home
- Member Areas
- The Lounge
- What did you last repair?