If you look at the packaging info section of the datasheet,
both OPA2134PA and OPA2134PAG4 orderable parts give devices
marked OPA2134PA.
The "G4" indicates a low halogen lead free process:
http://www.ti.com/support-quality/environmental-info/lead-free/lead-free-conversion.html
Note the OPA2134PA is also lead free.
So beyond a possible difference in the lead free process, I don't
expect a difference between the two.
Dennis
Thank you.
answer to mjf
Hello mjf,
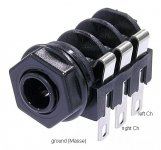
I have added a foto of the contacts at an 6,35mm jack / plug socket (stereo).
For the foto of the 6,35mm jack plug: 1 ground
2 right channel
3 left channel
I hope that helps you.
Greets Dirk
Hello mjf,
I have added a foto of the contacts at an 6,35mm jack / plug socket (stereo).
For the foto of the 6,35mm jack plug: 1 ground
2 right channel
3 left channel
I hope that helps you.
Greets Dirk
Attachments

much happier camper
as a continuum in my WHAMMY saga, in loss of ideas how to change the square wave response, I searched my drawers and found a OPA2134 chip. quickly I installed it and voila, it rectified the notorious bad leading shoulder.
does it sound better? honestly, I don't know anymore.
The Sennheiser MOmentum 2 connected to the phone directly or via the amp, although easy to drive, sounds different, and I'm very much used to the direct set up.
There is still the slight crosstalk I have not fully resolved, but there are still experiments to do.
Hey there. Any thoughts on this illuminated power switch?
19mm Metal Alumina black press button Led power mark lamp button latching control switch self lock PushButton Switch 19DY.S.BK-in Switches from Lights & Lighting on Aliexpress.com | Alibaba Group
I figure I would need the blue (of course) 10V version (for US usage). I would use the Wiring Diagram 1 on the page.
Neat switch. How are you going to power the led?
I’m assuming (hoping) that the 110 version has the appropriate resistor built in to allow for direct connection as shown in the wiring diagram 1 on the aliexpress page.
Oops, just notice I said 10v on my prior post. I meant 110v
I liked that switch. But i would use wiring diagram 5 that is not shown. Switch open, ligth on. Switch closed, light off. That could be done by linking NC to LED positive, and NO to the device. That way you could have a red backlight on the powerswitch when the amp is off.
I belive the 110V and 220V switch are AC switches. the rest i belive is DC switches.
I sent the seller a question about this, but Ali sellers wary answer.
That’s fantastic!!
I have to order one and try it.")
Well, I have one on order now!
I just realized that the case I got has an 8mm thick front plate. Yikes! That’s gonna be a challenge to work with. I think my local “makers” club has a CNC mill. Is that what I need to make some partial holes? Kinda like what a Forstner bit can do with a router.
If you’ve got CNC it’s trivial to make a cutout for the knob and a hole for the shaft. Or hog out the back of the panel in spots to where it’s thin enough to mount the various panel mount widgets.
Doh! Hogging out the back is brilliant! (and so obvious)
Many thanks.
Alternatively, I may just get a nice piece of wood for the faceplate.
Last edited:
Allan for doing the cut out in the back of the alloy face plate just use a regular flat bit in a drill press it only takes a few seconds. Be sure to mask the face side up well to protect from scratches. You could use a cutting compound like boelube which works brilliantly with alloy but wd40 will also do the job.

Last edited:
- Home
- Amplifiers
- Pass Labs
- "WHAMMY" Pass DIY headphone amp guide