Hi All,
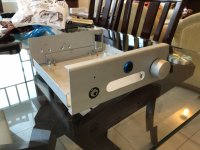
I did the WHAMMY as my first DIY. I got the full kit and the recommended case. Sourcing parts would have been a bit much for a first project.
What a great project. It had just enough challenges for this newbie to make me think, and it was simple enough to figure out where I had questions. I'm no pro at schematics or tracing boards.
Thanks to Wayne for putting the design out to the world. I've only listened for about 10 minutes to confirm everything was working, but the sound is excellent. I kept it 100% stock with the recommended LED configuration.
A HUGE thanks to @6L6 for putting out the build guide. Thanks to all the other posters that put up questions and pics of their builds. They help.
I made a few noob mistakes. I'm sure these recommendations get repeated over and over and over, but:
1) Take ONLY the parts out the you intend to solder onto the board. Not look-alikes etc. Keep all the other parts out of reach. Gosh those resistors and (ahem) even the regulators look alike. It's too easy to mix them up and desoldering is a PITA.
2) If I had it to do again, I'd probably pick a different case. It's a great case, and I'm very happy with it, but I'd have liked a bit more room (and pre-cut holes) for my first build. Overall, I learned a ton slogging through it. Chewing gum was involved at one point...
3) If you get the full kit and the recommended case, don't stress. The wires are not the same colors in the build guide. In addition to the things listed in the build guide, you also may want some hookup wire for the AC. You'll also need some kind of plan for your safety ground (I just used a machine screw, a nut, and star washer I had laying around) since it't not included in the WHAMMY kit or the case. Other than that, you can complete the project with the things listed. Also, they include an op-amp socket. It's not on the parts list. This noob soldered the op-amp directly to the board...
Can't wait to do my next build.
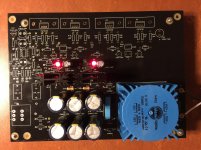
New poster here, so I'll try to figure out how to post pictures.
I did the WHAMMY as my first DIY. I got the full kit and the recommended case. Sourcing parts would have been a bit much for a first project.
What a great project. It had just enough challenges for this newbie to make me think, and it was simple enough to figure out where I had questions. I'm no pro at schematics or tracing boards.
Thanks to Wayne for putting the design out to the world. I've only listened for about 10 minutes to confirm everything was working, but the sound is excellent. I kept it 100% stock with the recommended LED configuration.
A HUGE thanks to @6L6 for putting out the build guide. Thanks to all the other posters that put up questions and pics of their builds. They help.
I made a few noob mistakes. I'm sure these recommendations get repeated over and over and over, but:
1) Take ONLY the parts out the you intend to solder onto the board. Not look-alikes etc. Keep all the other parts out of reach. Gosh those resistors and (ahem) even the regulators look alike. It's too easy to mix them up and desoldering is a PITA.
2) If I had it to do again, I'd probably pick a different case. It's a great case, and I'm very happy with it, but I'd have liked a bit more room (and pre-cut holes) for my first build. Overall, I learned a ton slogging through it. Chewing gum was involved at one point...
3) If you get the full kit and the recommended case, don't stress. The wires are not the same colors in the build guide. In addition to the things listed in the build guide, you also may want some hookup wire for the AC. You'll also need some kind of plan for your safety ground (I just used a machine screw, a nut, and star washer I had laying around) since it't not included in the WHAMMY kit or the case. Other than that, you can complete the project with the things listed. Also, they include an op-amp socket. It's not on the parts list. This noob soldered the op-amp directly to the board...
Can't wait to do my next build.
New poster here, so I'll try to figure out how to post pictures.
Attachments


Hey IAIMH! What a great first build for you! A very nice accomplishment!
Even better? You're enjoying it from day one! I love mine too - a seriously
nice piece of kit that you can be proud of 🙂 Onward!
Even better? You're enjoying it from day one! I love mine too - a seriously
nice piece of kit that you can be proud of 🙂 Onward!
Hey IAIMH! What a great first build for you! A very nice accomplishment!
Even better? You're enjoying it from day one! I love mine too - a seriously
nice piece of kit that you can be proud of 🙂 Onward!
Thank you! I am extremely happy. I sat and listened for hours last night. Most posters here already know this, but (IMO) it is an incredible amp.
I have a reasonable (unless you ask my wife) amount of gear, and this amp is already in the favorites. It's so good that one of my friends just ordered his first "real" set of headphones, and I just ordered more kits. 3 of us are having a build party in two weeks. I guess I'm the "experienced" one now. LOL!
Now, I'm trying to think of what I may change. Nothing except adding an LED power indicator most likely (and retrofitting one to the first build). I've seen some inspirational ideas on this thread.
I'd welcome any suggestions.
I started with an LED power indicator, and ended up switching to a neon bulb, tapping directly off the mains. The reason has to do with the ungodly amount of capacitance in the power filtering stage 😛 After you cut the power, the LED will linger for a while. There's other ways to deal with it, but I didn't want to get into relays and the like. Just wanted to get you a head start.
FYI, I found the included resistor on neon bulbs to be too low resistance. The bulb is too bright, and the resistor gets hot enough to toast the heat shrink, so I would add an extra inline resistor.
Last edited:
More on my "hum" issue. I replaced the inputs to PCB wires with shielded mic cable, and much of the hum went away. Since my case is larger then the board, the pot is mounted on the face plate about a couple of inches in front of the board, so I have wire between the board and the pot. I replaced that with shielded mic cable too, and more hum went away.
There is still a barely discernible amount of hum when the volume is above 12:00, which is needs to be for some of my headphones. I tried the pot directly on the board, and there is no hum.
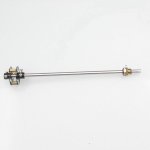
First, any other ideas to reduce the hum? I'm thinking of just mounting the pot on the board and using a shaft extender like this one:

Aluminum 300mm Volume Potentiometer Extension Shaft Audio Connecting Long Rod 699927808457 | eBay
Has anyone used a shaft extender or have other ideas?
Thanks.
There is still a barely discernible amount of hum when the volume is above 12:00, which is needs to be for some of my headphones. I tried the pot directly on the board, and there is no hum.
First, any other ideas to reduce the hum? I'm thinking of just mounting the pot on the board and using a shaft extender like this one:
Aluminum 300mm Volume Potentiometer Extension Shaft Audio Connecting Long Rod 699927808457 | eBay
Has anyone used a shaft extender or have other ideas?
Thanks.
You just need to ground the body of the pot, that usually does the job. Otherwise the shaft sticking out will act as an antenna.
You just need to ground the body of the pot, that usually does the job. Otherwise the shaft sticking out will act as an antenna.
Thanks.
Pot is gounded. I should have mentioned that. That helped a lot too, but there is still a slight audible hum. I’m gong to try the extension shaft and see how it works out. I guess I’m just picky and want the lowest possible noise floor at all volume settings.
Note, the hum is really very slight, but it’s not there if the pot is board mounted.
For this hum: let me share again a concern I had when building mine: in the Whammy, great care is taken to have the "wall ground" separated from the audio ground. BUT! The headphone jack sleeve is shorted to chassis ground (wall ground) AND audio ground.
No one seemed to think this was an issue, but audio ground is nicely connected to chassis ground through a CAP in the inputs, yet here we are shorting audio ground to chassis ground without the benefit of that cap?
Something didn't ring OK with me with that setup... so I isolated the sleeve of the jack from chassis and is only audio ground. I have the POT off the PCB with the individual cables that came with the kit for audio, and I have no hum whatsoever.
Perhaps you can try that before attempting the rod option?
Best regards,
Rafa.
For this hum: let me share again a concern I had when building mine: in the Whammy, great care is taken to have the "wall ground" separated from the audio ground. BUT! The headphone jack sleeve is shorted to chassis ground (wall ground) AND audio ground.
No one seemed to think this was an issue, but audio ground is nicely connected to chassis ground through a CAP in the inputs, yet here we are shorting audio ground to chassis ground without the benefit of that cap?
Something didn't ring OK with me with that setup... so I isolated the sleeve of the jack from chassis and is only audio ground. I have the POT off the PCB with the individual cables that came with the kit for audio, and I have no hum whatsoever.
Perhaps you can try that before attempting the rod option?
Best regards,
Rafa.
Rafa,
How did you isolate the headphone jack sleeve from the chassis? And did you use the same cap (with the inputs)?
Thanks
More on my "hum" issue. I replaced the inputs to PCB wires with shielded mic cable, and much of the hum went away. Since my case is larger then the board, the pot is mounted on the face plate about a couple of inches in front of the board, so I have wire between the board and the pot. I replaced that with shielded mic cable too, and more hum went away.
There is still a barely discernible amount of hum when the volume is above 12:00, which is needs to be for some of my headphones. I tried the pot directly on the board, and there is no hum.
First, any other ideas to reduce the hum? I'm thinking of just mounting the pot on the board and using a shaft extender like this one:
Aluminum 300mm Volume Potentiometer Extension Shaft Audio Connecting Long Rod 699927808457 | eBay
Has anyone used a shaft extender or have other ideas?
Thanks.
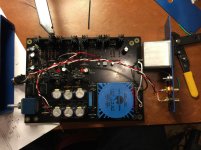
I used this. Works great.
Attachments
I did use the same cap that was included with the KIT for the inputs, and that is the only audio ground that is going to chassis ground.Rafa,
How did you isolate the headphone jack sleeve from the chassis? And did you use the same cap (with the inputs)?
Thanks
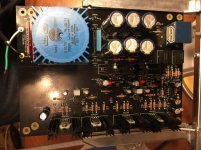
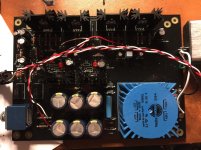
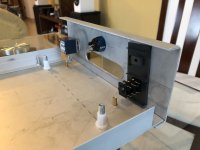
I isolated the headphone jack by creating a bigger opening on the chassis and then securing the jack to a hard plastic (cut from an old HD external enclosure).
I am attaching a couple of pictures so they can help clarify if my wording is not enough. If there are further questions or I can better explain what I did, please let me know.
Best regards,
Rafa.
ps. Just to clarify: Only the inputs are connected to the cap. The headphone jack is NOT connected to the cap at all.
Attachments
Last edited:
For this hum: let me share again a concern I had when building mine: in the Whammy, great care is taken to have the "wall ground" separated from the audio ground. BUT! The headphone jack sleeve is shorted to chassis ground (wall ground) AND audio ground.
No one seemed to think this was an issue, but audio ground is nicely connected to chassis ground through a CAP in the inputs, yet here we are shorting audio ground to chassis ground without the benefit of that cap?
Something didn't ring OK with me with that setup... so I isolated the sleeve of the jack from chassis and is only audio ground. I have the POT off the PCB with the individual cables that came with the kit for audio, and I have no hum whatsoever.
Perhaps you can try that before attempting the rod option?
Best regards,
Rafa.
Thanks. I don't think that is my issue. My face plate right now is scrap wood until I figure out exactly where I want to drill holes in the aluminum face plate the case came with. The audio ground is only connected to the chassis group via the orange cap.
If that is the case, how are you grounding the 'body' of the pot (which is isolated from all its 6 contacts) to the chassis?
If that is the case, how are you grounding the 'body' of the pot (which is isolated from all its 6 contacts) to the chassis?
I unscrewed one of the screws on the back and ground that to the chassis.
What would be the proper power supply configuration for +/- 15V. Do I include the LED's and short R9+R13 or just short them? Does it matter? Also, so using the LED's raises the regulator ground 1.3V above ground, so would I be getting +/- 16.3?
Last edited:
Leave out the Leds and short R9 and R13.
If using this 15V transformer (Amgis, LLC L01-6363) one should do the above? Just making sure I understand.
Last edited:
Shorting R9 & R13, removing LEDs and using 15-0-15 Vac transformer is perfect if you want to have +/- 15Vdc supply rails.
The stock 22=0-22 Vac transformer will make the both regulators hotter, but it will still work flawlessly.
The stock 22=0-22 Vac transformer will make the both regulators hotter, but it will still work flawlessly.
On that 'shaft-extender' for the board mounted pot, it's fairly easy to use either a plastic/nylon rod or even a more flexible tube and/or flexible coupling.
- Home
- Amplifiers
- Pass Labs
- "WHAMMY" Pass DIY headphone amp guide