Yuppers...the diodes i got from mouser had one lead shorter than the other and that according to the data sheet is the cathode...
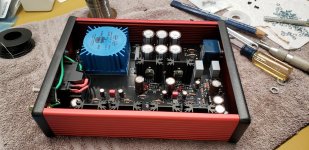
Got the power supply up and running!!
Next to stuff more parts!
Alex
Got the power supply up and running!!
Next to stuff more parts!
Alex
Lots of alternatives. Since you put in a Mouser part number, I'd recommend typing that back into Mouser. When the part comes up, the page has a number of tick boxes in the description. I'd suggest (if you want) clicking the Vishay, RN series, and 330 ohm boxes. Then click the "Show Similar" button. You'll see some options. Since that part is 1/8W - pick your favorite option that is 1/8W or more.
The "Show Similar" and the sorting functions in Mouser and other on-line shops are great for finding alternative parts.
As an example, this may be a nice one.
https://www.mouser.com/ProductDetail/Vishay-Dale/RN60D3300FB14?qs=F%2B4GoDNhlYSOSNOO13HqMw==
Very much appreciated for this! I had no idea there were alternatives to these resistors.
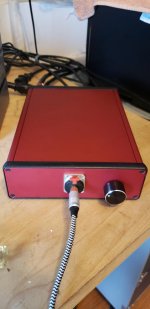
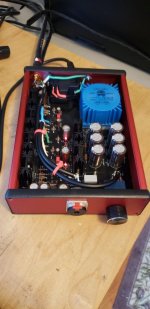
Whammy is up and running!
Dead Silent.
Drive my Focal Clears and HEDD Headphones nicely.
Alex
Dead Silent.
Drive my Focal Clears and HEDD Headphones nicely.
Alex
Attachments
Last edited:
Very nice build and congrats on the completing the Whammy. Love the red chassis!
Can someone tell me how the amp would react to negative feedback? Someone was asking me about this
Can someone tell me how the amp would react to negative feedback? Someone was asking me about this
Nice build! I used the same red case so I'm biased to think it looks great. Which OP AMP did you use?

...Can someone tell me how the amp would react to negative feedback? Someone was asking me about this
You can say what ever you wan't about it, you won't hurt it's feelings 😀
The op amps won't work without feedback, R4 & R8 form negative feedback loops, combined with R1 & R12 to set the gain. C26 & C27 reduce the DC gain to unity with the added benefit of minimising the output offset voltage.
OP2134 in it right now.
Its superlative!!
Very simple but really well thought out design...compares very well with many of my other 20+ amps!
Focal Clears are light saber clean....very open and realistic pairing!
Case is tight, might consider getting a case an inch longer next time around, would make it easier to mount front panel I/O stuff..
Using a 500 ma fuse in hot lead of AC...is this the "correct: size fuse to use?
Thanks Wayne and 6L6 for asking some of my questions!!
All the best
Alex
Note, I measured the temps of the regulators and they are both approx 112 deg F.
OP2134 in it right now.
Its superlative!!
Very simple but really well thought out design...compares very well with many of my other 20+ amps!
Focal Clears are light saber clean....very open and realistic pairing!
Case is tight, might consider getting a case an inch longer next time around, would make it easier to mount front panel I/O stuff..
Using a 500 ma fuse in hot lead of AC...is this the "correct: size fuse to use?
Thanks Wayne and 6L6 for asking some of my questions!!
All the best
Alex
Note, I measured the temps of the regulators and they are both approx 112 deg F.
You think that's a good op amp. Have a try of the OPA2107 and the AD746. Those are both on another level. 😉
You can say what ever you wan't about it, you won't hurt it's feelings 😀
The op amps won't work without feedback, R4 & R8 form negative feedback loops, combined with R1 & R12 to set the gain. C26 & C27 reduce the DC gain to unity with the added benefit of minimising the output offset voltage.
Thank you for that information.
You think that's a good op amp. Have a try of the OPA2107 and the AD746. Those are both on another level. 😉
I really like the sound of the 2107. It's also nice that it fits into the socket without adapters or having to solder itty bitty parts.
The OP2134 and LM833 also sounded pretty good. Liked them better than the AD823 and the RC4580, both of which were a bit rough sounding in my system.
Interesting and thanks for the comments!
looking at the 2107 vs tge 2134.
The 2134 is shown as an audio op amp and the 2107 is not?
spec wise the 2134 seems a better part?
But sonically it would be nice to try. The 2107 is $22 while the 2134 is $4.
Alex
looking at the 2107 vs tge 2134.
The 2134 is shown as an audio op amp and the 2107 is not?
spec wise the 2134 seems a better part?
But sonically it would be nice to try. The 2107 is $22 while the 2134 is $4.
Alex
Whammy 2
Hi everyone. This is my second Whammy build. My first one was the stock kit with no modifications except that I settled on using the SparkOS dual-discrete OpAmp after a long series of trials. It sounded so awesome that my son stole it to use for himself, so I needed to build myself a new one!
For this build, I went with “premium parts” and some other modifications I picked up along the way. I am going to include links/references to the parts here so you can can easily find them.
As in the first build, I used the same larger Galaxy chassis from DiyAudioStore based on Wayne’s recommendation to use a larger chassis than the one in the build and I agree because its nice having a little room for your hands to get in there!
These are the other parts changes I employed:
1) Glassware Audio’s “House GND” ground isolation board/kit: House GND Kit
2) SparkOS discrete, low-noise regulators: Sparkos Labs, Inc. audio power supply discrete voltage regulators
3) UXCEL M4 rubber isolators for the main board for some vibration isolation: uxcell M4 Male Female Rubber Mounts, Vibration Isolators, Shock Absorber 10mm x 10mm Black 8pcs: Amazon.com: Industrial & Scientific
4) I used 2 rubber washers under the transformer to help dampen mechanical vibrations there. I bought these at HD (don’t have the part #s).
5) Solen .1 uF 700V Silver Sound MKP Film Caps for the input coupling caps (C1/C2)
6) GlassWare Select-5 5-input switch/breakout board: Select-5 Signal Selector Switch
7) blue front panel knobs from TESI Switch: Amazon.com: Tesi Solid Aluminum Replacement Knob Set for Line 6 Helix Floor and Rack (Hot Pink): Musical Instruments
8) blue front LED uses a power supply breakout board from Gareth (Gaz213) that he helped me locate off the main supply.
9) DiyAudioStore Alps potentiometer breakout board (https://diyaudiostore.com/collectio...ucts/rk27-breakout-pcb?variant=31661950763081)
10) Neutric D-style RCA i/o connectors ()
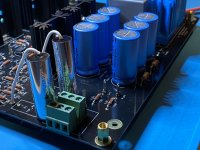
11) Nichicon Audio KA(M) and KG(M) caps for the power supply (50V filter caps in the supply) and elsewhere. For the 22uFs I used the Muse types (bright green).
13) WIMA MKS 2 bypass caps everywhere except in the power supply.
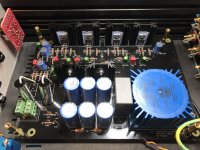
I wanted to also thank Jim (6L6) for all of his help in selecting some of the parts for this build, specifically the caps, and of course The Wizard’s Assistant because this preamp is really the best I’ve listened to since I had a Krell KSP preamp 20 years ago!
For now I have the Burson V6 Classic OpAmp in there and sounds really awesome. It is a bit more laid-back than the SparkOS in the other build but I am finding it to be less fatiguing when listening for longer periods of time on headphones, but I’ve found using this as a preamp on my ACAs (pictured) really loves the extra “pop” in spatial positioning that the SparkOS gives it (and I suspect the Vivid Burson would too).
I am using AKG K712s as headphones. The preamp is still audibly silent on headphones and as a preamp.
I am doing a trial/comparison of it against the SparkOS and will also try the Vivid when I get the samples for that and I will report on this shortly. I’ll also post a head-to-head comparison of the stock/kit version versus this “premium” build version. I will include measurement comparisons of both too.
Stay tuned…
—Tom
Hi everyone. This is my second Whammy build. My first one was the stock kit with no modifications except that I settled on using the SparkOS dual-discrete OpAmp after a long series of trials. It sounded so awesome that my son stole it to use for himself, so I needed to build myself a new one!
For this build, I went with “premium parts” and some other modifications I picked up along the way. I am going to include links/references to the parts here so you can can easily find them.
As in the first build, I used the same larger Galaxy chassis from DiyAudioStore based on Wayne’s recommendation to use a larger chassis than the one in the build and I agree because its nice having a little room for your hands to get in there!
These are the other parts changes I employed:
1) Glassware Audio’s “House GND” ground isolation board/kit: House GND Kit
2) SparkOS discrete, low-noise regulators: Sparkos Labs, Inc. audio power supply discrete voltage regulators
3) UXCEL M4 rubber isolators for the main board for some vibration isolation: uxcell M4 Male Female Rubber Mounts, Vibration Isolators, Shock Absorber 10mm x 10mm Black 8pcs: Amazon.com: Industrial & Scientific
4) I used 2 rubber washers under the transformer to help dampen mechanical vibrations there. I bought these at HD (don’t have the part #s).
5) Solen .1 uF 700V Silver Sound MKP Film Caps for the input coupling caps (C1/C2)
6) GlassWare Select-5 5-input switch/breakout board: Select-5 Signal Selector Switch
7) blue front panel knobs from TESI Switch: Amazon.com: Tesi Solid Aluminum Replacement Knob Set for Line 6 Helix Floor and Rack (Hot Pink): Musical Instruments
8) blue front LED uses a power supply breakout board from Gareth (Gaz213) that he helped me locate off the main supply.
9) DiyAudioStore Alps potentiometer breakout board (https://diyaudiostore.com/collectio...ucts/rk27-breakout-pcb?variant=31661950763081)
10) Neutric D-style RCA i/o connectors ()
11) Nichicon Audio KA(M) and KG(M) caps for the power supply (50V filter caps in the supply) and elsewhere. For the 22uFs I used the Muse types (bright green).
13) WIMA MKS 2 bypass caps everywhere except in the power supply.
I wanted to also thank Jim (6L6) for all of his help in selecting some of the parts for this build, specifically the caps, and of course The Wizard’s Assistant because this preamp is really the best I’ve listened to since I had a Krell KSP preamp 20 years ago!
For now I have the Burson V6 Classic OpAmp in there and sounds really awesome. It is a bit more laid-back than the SparkOS in the other build but I am finding it to be less fatiguing when listening for longer periods of time on headphones, but I’ve found using this as a preamp on my ACAs (pictured) really loves the extra “pop” in spatial positioning that the SparkOS gives it (and I suspect the Vivid Burson would too).
I am using AKG K712s as headphones. The preamp is still audibly silent on headphones and as a preamp.
I am doing a trial/comparison of it against the SparkOS and will also try the Vivid when I get the samples for that and I will report on this shortly. I’ll also post a head-to-head comparison of the stock/kit version versus this “premium” build version. I will include measurement comparisons of both too.
Stay tuned…
—Tom
Attachments
-
 IMG_1987.jpg782 KB · Views: 336
 -
 95A0A8D7-C7A0-441A-9D4A-9A0EAC5B409B_1_105_c.jpeg285.8 KB · Views: 296
 -
 D925E7DB-1438-4592-B060-F6D4DB00D161_1_105_c.jpeg219.2 KB · Views: 292
 -
 6CE48371-3483-4887-A343-478390C90D55_1_105_c.jpeg234.9 KB · Views: 305
 -
 3F8EE2F8-F84A-491E-912E-4F5822E9DEA1_1_105_c.jpeg218.7 KB · Views: 318
 -
 8C19989E-12FA-46C4-AB6B-FFC3D0EECE36_1_105_c.jpeg305.7 KB · Views: 553
 -
 6D2258AC-69D7-4731-99C6-7B6E5BC77438_1_105_c.jpeg292.7 KB · Views: 487
 -
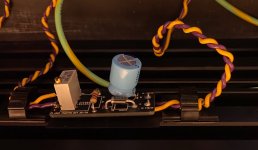 image0.jpeg250.6 KB · Views: 493
 -
 image1.jpeg293.1 KB · Views: 588
 -
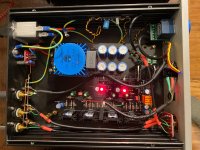 image2.jpeg874.4 KB · Views: 615
Very impressive and thorough. Did you track how much the premium version added to cost or did you not want to know?
One more nice build 
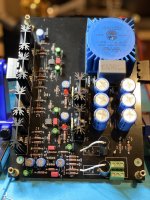
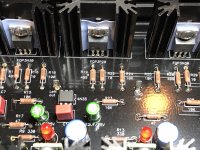
What are these thick insulating pads (https://www.diyaudio.com/forums/attachments/pass-labs/883121d1602366680-whammy-pass-diy-headphone-amp-guide-8c19989e-12fa-46c4-ab6b-ffc3d0eece36_1_105_c-jpeg)?
What are these thick insulating pads (https://www.diyaudio.com/forums/attachments/pass-labs/883121d1602366680-whammy-pass-diy-headphone-amp-guide-8c19989e-12fa-46c4-ab6b-ffc3d0eece36_1_105_c-jpeg)?
One more nice build
What are these thick insulating pads (https://www.diyaudio.com/forums/attachments/pass-labs/883121d1602366680-whammy-pass-diy-headphone-amp-guide-8c19989e-12fa-46c4-ab6b-ffc3d0eece36_1_105_c-jpeg)?
Those are keratherm insulator pads. They just look thick because of the close-up. 😉
I've gotten them from various sources including the diyaudiostore:
Keratherm Transistor Insulators – diyAudio Store
--Tom
Hi everyone. This is my second Whammy build. My first one was the stock kit with no modifications except that I settled on using the SparkOS dual-discrete OpAmp after a long series of trials. It sounded so awesome that my son stole it to use for himself, so I needed to build myself a new one!
For this build, I went with “premium parts” and some other modifications I picked up along the way. I am going to include links/references to the parts here so you can can easily find them.
As in the first build, I used the same larger Galaxy chassis from DiyAudioStore based on Wayne’s recommendation to use a larger chassis than the one in the build and I agree because its nice having a little room for your hands to get in there!
These are the other parts changes I employed:
1) Glassware Audio’s “House GND” ground isolation board/kit: House GND Kit
2) SparkOS discrete, low-noise regulators: Sparkos Labs, Inc. audio power supply discrete voltage regulators
3) UXCEL M4 rubber isolators for the main board for some vibration isolation: uxcell M4 Male Female Rubber Mounts, Vibration Isolators, Shock Absorber 10mm x 10mm Black 8pcs: Amazon.com: Industrial & Scientific
4) I used 2 rubber washers under the transformer to help dampen mechanical vibrations there. I bought these at HD (don’t have the part #s).
5) Solen .1 uF 700V Silver Sound MKP Film Caps for the input coupling caps (C1/C2)
6) GlassWare Select-5 5-input switch/breakout board: Select-5 Signal Selector Switch
7) blue front panel knobs from TESI Switch: Amazon.com: Tesi Solid Aluminum Replacement Knob Set for Line 6 Helix Floor and Rack (Hot Pink): Musical Instruments
8) blue front LED uses a power supply breakout board from Gareth (Gaz213) that he helped me locate off the main supply.
9) DiyAudioStore Alps potentiometer breakout board (https://diyaudiostore.com/collectio...ucts/rk27-breakout-pcb?variant=31661950763081)
10) Neutric D-style RCA i/o connectors ()
11) Nichicon Audio KA(M) and KG(M) caps for the power supply (50V filter caps in the supply) and elsewhere. For the 22uFs I used the Muse types (bright green).
13) WIMA MKS 2 bypass caps everywhere except in the power supply.
I wanted to also thank Jim (6L6) for all of his help in selecting some of the parts for this build, specifically the caps, and of course The Wizard’s Assistant because this preamp is really the best I’ve listened to since I had a Krell KSP preamp 20 years ago!
For now I have the Burson V6 Classic OpAmp in there and sounds really awesome. It is a bit more laid-back than the SparkOS in the other build but I am finding it to be less fatiguing when listening for longer periods of time on headphones, but I’ve found using this as a preamp on my ACAs (pictured) really loves the extra “pop” in spatial positioning that the SparkOS gives it (and I suspect the Vivid Burson would too).
I am using AKG K712s as headphones. The preamp is still audibly silent on headphones and as a preamp.
I am doing a trial/comparison of it against the SparkOS and will also try the Vivid when I get the samples for that and I will report on this shortly. I’ll also post a head-to-head comparison of the stock/kit version versus this “premium” build version. I will include measurement comparisons of both too.
Stay tuned…
—Tom
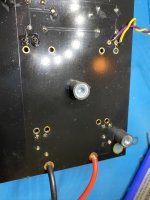
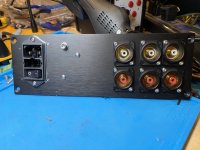
I was not able to put up this pic of the back panel where I used the d-style RCAs as the forum only allows for 10 pictures to be uploaded at a time. I also forgot to put the mouser reference for those wanting to use them. These can be found here:
https://www.mouser.com/ProductDetai...bJzGI4/4l%2B6KFs6UysXwkcqbNL5yPvZazi2bt7bvA==
Attachments
Hi everyone. This is my second Whammy build. My first one was the stock kit with no modifications except that I settled on using the SparkOS dual-discrete OpAmp after a long series of trials. It sounded so awesome that my son stole it to use for himself, so I needed to build myself a new one!
For this build, I went with “premium parts” and some other modifications I picked up along the way. I am going to include links/references to the parts here so you can can easily find them.
As in the first build, I used the same larger Galaxy chassis from DiyAudioStore based on Wayne’s recommendation to use a larger chassis than the one in the build and I agree because its nice having a little room for your hands to get in there!
These are the other parts changes I employed:
1) Glassware Audio’s “House GND” ground isolation board/kit: House GND Kit
2) SparkOS discrete, low-noise regulators: Sparkos Labs, Inc. audio power supply discrete voltage regulators
3) UXCEL M4 rubber isolators for the main board for some vibration isolation: uxcell M4 Male Female Rubber Mounts, Vibration Isolators, Shock Absorber 10mm x 10mm Black 8pcs: Amazon.com: Industrial & Scientific
4) I used 2 rubber washers under the transformer to help dampen mechanical vibrations there. I bought these at HD (don’t have the part #s).
5) Solen .1 uF 700V Silver Sound MKP Film Caps for the input coupling caps (C1/C2)
6) GlassWare Select-5 5-input switch/breakout board: Select-5 Signal Selector Switch
7) blue front panel knobs from TESI Switch: Amazon.com: Tesi Solid Aluminum Replacement Knob Set for Line 6 Helix Floor and Rack (Hot Pink): Musical Instruments
8) blue front LED uses a power supply breakout board from Gareth (Gaz213) that he helped me locate off the main supply.
9) DiyAudioStore Alps potentiometer breakout board (https://diyaudiostore.com/collectio...ucts/rk27-breakout-pcb?variant=31661950763081)
10) Neutric D-style RCA i/o connectors ()
11) Nichicon Audio KA(M) and KG(M) caps for the power supply (50V filter caps in the supply) and elsewhere. For the 22uFs I used the Muse types (bright green).
13) WIMA MKS 2 bypass caps everywhere except in the power supply.
I wanted to also thank Jim (6L6) for all of his help in selecting some of the parts for this build, specifically the caps, and of course The Wizard’s Assistant because this preamp is really the best I’ve listened to since I had a Krell KSP preamp 20 years ago!
For now I have the Burson V6 Classic OpAmp in there and sounds really awesome. It is a bit more laid-back than the SparkOS in the other build but I am finding it to be less fatiguing when listening for longer periods of time on headphones, but I’ve found using this as a preamp on my ACAs (pictured) really loves the extra “pop” in spatial positioning that the SparkOS gives it (and I suspect the Vivid Burson would too).
I am using AKG K712s as headphones. The preamp is still audibly silent on headphones and as a preamp.
I am doing a trial/comparison of it against the SparkOS and will also try the Vivid when I get the samples for that and I will report on this shortly. I’ll also post a head-to-head comparison of the stock/kit version versus this “premium” build version. I will include measurement comparisons of both too.
Stay tuned…
—Tom
I like those RCA sockets as well, used them on my latest valve amp project.
I prefer them too and am using them wherever I can. The trade-off is obviously back panel square footage but its well worth it if you ask me.
I found that you can really sinch them down and not worry about them because the outer shell is secured by 2 bolts. I got the idea from the balanced connector on the ACAs where I had a couple of ACA's where I managed to make the non-D style RCAs come loose by spinning the RCA cable ends to get them to come off because the cable's connector diameter really fit tight. These have never suffered from that.
- Home
- Amplifiers
- Pass Labs
- "WHAMMY" Pass DIY headphone amp guide