Gentlemen,
I've been struggling to set-up the arm.
To avoid a mess, I'm not adding the oil until I get the needed adjustments & modifications made. I have the pulley on the overhead 'gallows' as seen on the original WTA.
I have two major problems that I don't think the oil would completely cure:
The arm rotates easily about it's axis in either direction & when the arm is placed in the playing position, it won't stay in the record groove but swings too forcibly back to the 'rest' position.
Will the addition of the hi viscosity oil stop the above problems?
I have the attachment points to the golf ball at about the 9:30 & 2:30 positons on the sides. Should I move them up & closer together ? It seems there is too much weight above the attachment points making it top heavy.
I've noticed some use a rubber grommet on the 'gallows' to hold the thread in place that's wrapped around the shaft. Should I remove the free wheeling pulley & gain the friction of the shaft?
I copied the dimensions of the Ortofon RMA309i tonearm that's 309mm to the spindle & used a graphite arrow shaft filled with fine sand The anti skating effect is still severe without the oil.
Frank
Frank,
The spool glued to the top of the golf ball is probably causing a top heavy condition. The attachment of the pins that are the monofilament attachment points are at approximately 9:30 and 3:30, sighting down on the arm [EDIT: these are the lateral positions looking straight down in relation to the arm, the vertical angles are pretty much what you've stated]. The rubber grommet mounted on the "gallows" allows a bit of movement up and down the stationary rod, but grips well enough to stay in place once set.
BTW: The "gallows" rod is at an angle of about 150 degrees where it crosses over the arm and fluid cup, if yours is 90 degrees that may be one of the reasons why it's acting up.
The monofilament goes (from the 9:30 side) under, then around over the top of the grommet, then behind the other strand to the 3:30 pin. IOW: It's wrapped counter clockwise over the grommet.
The angles need to be fairly precise for the anti-skating to work correctly.
Mine has a brass tube (sleeve) around the aluminum arm-wand. The brass/aluminum sand filled arm is heated then pressed into the golf ball which melts around the tube and results in a well bonded assembly when cooled. The tube is about 1/3 of it's diameter into the golf ball when finished. I'd lose the pulley, get a grommet, build a new arm/GB assembly and try it again.
Better yet, could you post a couple of good pictures of your present set-up? Say , one from the top looking down and another looking down the armwand towards the counterweight. BTW: A clump of plumbers putty can be used as a temporary non-resonent counterweight. Just add a bit, or pinch off a bit, to get the precise tracking pressure.
Get some photos posted and we'll see if I can be of some help.
Best Regards,
TerryO
Last edited:
I found that a rifle swab cleaning tip has the same thread as the arrow tip socket on the shaft I'm using.
That makes a very good looking attachment for the cartridge. The long slot also enables adjusting the overhang of the stylus.
I'll be using only one bolt to support the cartridge to the arm. That way the stylus will be inline with the arm rather than offset.
I'll use the other cartridge bolt to attach the lift handle.
~~~~~~~~~~~~~~~~~~~SNIP~~~~~~~~~~~~~~
I just looked at this posting. You want the cartridge and stylus tip to be at an angle to the arm. The exact angle depends on the length of the arm from the pivot to the stylus tip. This may be contributing to the stylus jumping out of the groove.
Best Regards,
TerryO
Set-up
TerryO,
Thank you for your reply. After I slept on the problem, I feel more confident to tackle the difficulties.
Looking at it with fresh eyes, I can see I have a top heavy condition. I'll raise the suspension point, since it's easier to do right now. Later, I can finesse it to your attachment method. Narrowing the attachment will reduce the anti-tracking force. I can widen it later as necessary to get the right amount of tracking.
As for the angle of the cartridge; I set it initially to the 16 deg. used by the Ortofon RMA309i. The overhang is copied, too.
The cleaning swab tip gave me the feeling that the cartridge was hanging out in space so a short mounting adaptor was fabricated to use the threaded arrow point attachment. Thank goodness for epoxy.
I'll try to take some photos after this next round of changes.
Thanks again,
It helps to have someone to discuss this with.🙂
Frank
Progress?
TerryO,
I just found that I can stop the swiveling of the tonearm around it's axis by offsetting the rear weight to compensate for the cartridge ofset on the other end, even with the pulley in use. The top heavy condition still needs to be corrected but shows it can be controlled.
Please bear with me if I'm off on a tangent with the monofilament. I have the support post 180 degrees opposite the normal position due to the spacing on the mounting board. The support is at 90 degrees to the arm when the arm is half way between the start & end of the record grooves.
After rereading your description of the monofilament hanger & reexamining photos of other WTA suspensions , I think you have the monofilament crossing at rest & increasing the crossing as the arm travels towards the spindle. This nullifies the anti-skating effect by provideing ,essentially, a single point suspension. Please reexamine the threading & tell me where I may be wrong.
I've yet to modify the suspension points upward & hope this will clear up my problem & point the direction I need to take.
Frank
Last edited:
I just ran into this thread. I made a well tempered knock off last year. See these pictures. Index of /rustysdad. You can get the silicon fluid from Dow Corning, just ask on their site. The thing worked pretty well. I got a great deal on a Rega P9 so I am not using it any more.
John
John
orange dividers
johnmarkp,
Where did you get the dividers? That's an idea I'd like to incorporate.
Frank
johnmarkp,
Where did you get the dividers? That's an idea I'd like to incorporate.
Frank
suspension
TerryO,
I found you're right about the suspension.
It reduces the anti-tracking without eliminating it.
I'm still cleaning up the details, but the results are promising.
At my age, my fingers feel like sausages but I eventually get there. If only those 32 gauge stranded wires would stop breaking. 🙁
Frank
Success
It's finally working the way I hoped it would.
In retrosprect, I don't think the problems I had would have been so prominent with the oil in place. That high viscosity really masks details. I recommend setting it up as much as possible before adding the oil.
The rotation of the arm with the pulley was still slightly there. Rather than removing it & starting the suspension stringing all over again, I applied a judicious dab of silicone to lock it into place. Problem solved.
It's amazing how much less surface noise there is with this tonearm.
The viscous oil makes it an enjoyable arm to handle, too.
I'm pleased with the results.
Thanks to everyone here for their help.
Frank
Frank,
That's great! 😀
After you have a chance to listen to it for awhile, let us know what you think. It would be nice if you could also post pictures, everybody enjoys seeing what others have done.
Best Regards,
TerryO
Offset cartridge
Gentlemen,
"The rotation of the arm with the pulley was still slightly there. Rather than removing it & starting the suspension stringing all over again, I applied a judicious dab of silicone to lock it into place. Problem solved."
I've thought about the 'rotation' problem & it's apparent that the cartridge being offset to the outside of the arm is causing the tendancy to rotate.
I'll be reworking the cartridge support to center it.
I haven't found any other concerns to tackle. It's working very well.
Frank
Frank,
What's left, is to relax and enjoy it!
Do you have another TT to compare it to? When you've had a chance to to some critical listening to some of your favorite LPs, be sure to tell us how it sounds...to you.
Best Regards,
TerryO

Rek-O-Kut & WTA
Gentlemen,
I finally figured out my wife's camera & here they are.
I took the easy way out in making the turntable base. I used prefinished
3-1/2" maple flooring & an old table saw.
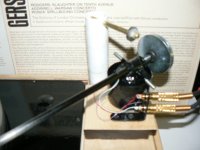
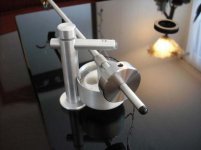
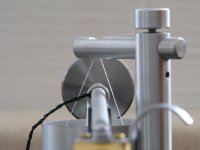
The pins sticking out the side at the top of the golf ball are wedges to hold the fish line leader in place. They're wedged into a roller pin holding the thread.
The post was located opposite the usual place due to the limited space because of the 12" arm location. It's three sections of PVC couplings glued together.
The oil cup is a top off of a spray can.
The pulley is three washers epoxied together.
The arm is a door hinge pin.
The arm holder is a washer ground into a crescent to hold the arm. It's epoxied to a slot headed long bolt. I found a brass tube to dress it up.
I have been listening to old favorites & I'm still pleased with the arm.
The RCA jacks are mounted into a small angle reenforcement bracket.
You can see the present epoxy located aluminum disk supporting the offset cartridge. I had bought a selection of weights from ebay & set them all aside in favor of two large fender washers held in place with rubber grommets.
I picked up another arrow shaft & will make another (improved) arm.
Frank
Gentlemen,
I finally figured out my wife's camera & here they are.
I took the easy way out in making the turntable base. I used prefinished
3-1/2" maple flooring & an old table saw.
The pins sticking out the side at the top of the golf ball are wedges to hold the fish line leader in place. They're wedged into a roller pin holding the thread.
The post was located opposite the usual place due to the limited space because of the 12" arm location. It's three sections of PVC couplings glued together.
The oil cup is a top off of a spray can.
The pulley is three washers epoxied together.
The arm is a door hinge pin.
The arm holder is a washer ground into a crescent to hold the arm. It's epoxied to a slot headed long bolt. I found a brass tube to dress it up.
I have been listening to old favorites & I'm still pleased with the arm.
The RCA jacks are mounted into a small angle reenforcement bracket.
You can see the present epoxy located aluminum disk supporting the offset cartridge. I had bought a selection of weights from ebay & set them all aside in favor of two large fender washers held in place with rubber grommets.
I picked up another arrow shaft & will make another (improved) arm.
Frank
Attachments


Gentlemen,
I finally figured out my wife's camera & here they are.
I took the easy way out in making the turntable base. I used prefinished
3-1/2" maple flooring & an old table saw.
The pins sticking out the side at the top of the golf ball are wedges to hold the fish line leader in place. They're wedged into a roller pin holding the thread.
The post was located opposite the usual place due to the limited space because of the 12" arm location. It's three sections of PVC couplings glued together.
The oil cup is a top off of a spray can.
The pulley is three washers epoxied together.
The arm is a door hinge pin.
The arm holder is a washer ground into a crescent to hold the arm. It's epoxied to a slot headed long bolt. I found a brass tube to dress it up.
I have been listening to old favorites & I'm still pleased with the arm.
The RCA jacks are mounted into a small angle reenforcement bracket.
You can see the present epoxy located aluminum disk supporting the offset cartridge. I had bought a selection of weights from ebay & set them all aside in favor of two large fender washers held in place with rubber grommets.
I picked up another arrow shaft & will make another (improved) arm.
Frank
Frank,
Very nice work! I can now see what I didn't understand before, on the pivot "gallows" yours is on the other side of the arm. On mine the gallows is outside the arm, while yours is inside. Either way will work just fine as long as the pivot orientation is the same, which looks like it is. The grommet or whatever is used to wrap the monofilament around, needs to be at approximately 90 degrees to the spindle of the platter. Mine actually is centered at about 25% of the spindle's diameter to the outside.
I have to say that I like your arm rest support much better than the "stock" pillar, I'll have to see if I can make a similar one, maybe with a little larger washer and install a rivet to serve as a pivot for another half washer to pivot over the top and serve as an arm lock. I know that it would be more attractive than that piece of masking tape you see in the picture!
Your workmanship is excellent, good job!
Best Regards,
TerryO
Armrest
TerryO,
I forgot to add that I 'painted' the washer & the top of the bolt with 5 minute epoxy. It works very well to round up the surfaces & make a soft rest. I had a little too much & had to trim it but plan to touch up the tips just enough to require pushing the arm past the tips as I had it once before. That would eliminate the need for a 'keeper' you're planning.
Frank
Another good idea, Frank you're really on a roll!
😀
Best Regards,
TerryO
Sorbethane
TerryO,
Not all of my ideas are good!
What's hidden under the record in the photo is a Rek-O-Kut rubber mat that makes me sea sick every time I look at it.
I thought it would be a good idea to add a 1/8" layer of Sorbethane to the top of the aluminum platter. It does quiet the ringing.
No matter how many times I press it flat, it returns to an undulating surface.
It stuck very well to the aluminum & I'm waiting til I'm up to the challenge of removing it. I'm hoping it works as well on the underside of the platter.
Frank
Update: Over on AudioKarma, one of the members has purchased a WT Amadeus which looks to have incorporated a number of significant changes not shown on the WT website.
Attached is a picture of the tonearm suspension:
The thread itself, with more pictures, is here:
Life with a Well Tempered - AudioKarma.org Home Audio Stereo Discussion Forums
Best Regards,
TerryO
Attached is a picture of the tonearm suspension:
The thread itself, with more pictures, is here:
Life with a Well Tempered - AudioKarma.org Home Audio Stereo Discussion Forums
Best Regards,
TerryO
Attachments
Last edited:

- Home
- Source & Line
- Analogue Source
- Well tempered labs tonearm