I agree. If twisted is good enough, and FREE, I will go that route. Plus there are all sourts of colours in a CAT6, so easy to work with and connect etc. And I have 60 feet of CAT6, so should last a few builds😀
Any drawbacks in using a front mounted AC switch? Something with an integrated LED would be nice. But KIS would be an IEC with switch, fewer parts and connections and most important: less drilling.
Any drawbacks in using a front mounted AC switch? Something with an integrated LED would be nice. But KIS would be an IEC with switch, fewer parts and connections and most important: less drilling.
Last edited:
OTOH, if you go the front-switch route, you could just pull in a power-cable directly to the switch, thus you‘d just need to drill a hole on the back (to insert a grommet and the cable) and one on the front. Instead of cutting out a square for that iec-thing. (I question the effect of those filter-things, but could be wrong here too)...
And having the switch at the front is more... „finished“?
And having the switch at the front is more... „finished“?
OTOH, if you go the front-switch route, you could just pull in a power-cable directly to the switch, thus you‘d just need to drill a hole on the back (to insert a grommet and the cable) and one on the front. Instead of cutting out a square for that iec-thing. (I question the effect of those filter-things, but could be wrong here too)...
And having the switch at the front is more... „finished“?
I too have limited belief in filtering. However, an unfiltered one costs - I dont know - 10 dollars, whilst the filtered thing from TE costed me around 20 dollars. So I thought what the heck.
I agree that it is more finished. And easier for other users of the equipment than myself. Any tips for a switch that might to the trick?
Sorry not really. I‘m using a mediocre rocker-switch with the appropriate voltage/amperes. (Been searching very long for the fancy stuff, until I realized that form isn’t function—maybe a rotary switch like Lorlin RMS1035 with a modushop-knob?)
I've always had a soft spot for toggle switches and have used this APEM-switch for several projects: https://no.farnell.com/apem/631h-2/switch-spst-15a-250vac-solder/dp/1082324
A bit old fashioned perhaps, but I think it looks good and it has very solid feel to it. Makes a very satisfying sound too.
I think a front mounted switch is an advantage, especially if you are in the habit of turning things off for the night.
A bit old fashioned perhaps, but I think it looks good and it has very solid feel to it. Makes a very satisfying sound too.
I think a front mounted switch is an advantage, especially if you are in the habit of turning things off for the night.
Looks neat. Maybe I’ll order one of those for my BA-3 as well. That means I’ll have two switches for the power amp, one on the IEC inlet and on at the front. Guess that’s not a bad thing, seeing as there are kids in the house.
Tbaashus: What do you think of the frontpanel attenuator and source selector? Will it work OK? The one you use looks good, but the PSU board is out of stock. This one is cheap as well.
Tbaashus: What do you think of the frontpanel attenuator and source selector? Will it work OK? The one you use looks good, but the PSU board is out of stock. This one is cheap as well.
Last edited:
Hey Andynor,
This might be a neat project to look into if you want to use front mounted switch for your BA3:
PCB: low voltage On-Off switch drives AC mains relay \ includes soft start .. H9KPXG
This might be a neat project to look into if you want to use front mounted switch for your BA3:
PCB: low voltage On-Off switch drives AC mains relay \ includes soft start .. H9KPXG
What do you think of the frontpanel attenuator and source selector? Will it work OK? The one you use looks good, but the PSU board is out of stock. This one is cheap as well.
I'm sure it will! I suppose it depends on what you need (number of inputs and if you can do without a remote). The only input selector I personally have any experience with is the Muffsy.
Hello all, I am new to the forums and I am looking for some advice on building Wayne's linestage. So far I have built an F6 and B1 - and now I'm hooked--
I am also interested in eventually building a Pearl 2 phono stage - so the main question is whether the linestage and the Pearl 2 can be combined in one chassis or if they are better separated. I like the idea of a full-feature preamp since I use both vinyl and digital. I was also thinking if they are combined then maybe a separate power supply for both is a good idea.
On the power supply - I was thinking a TubeCAD PS or trying to find a VRDN somewhere. Can one power supply (say +/1 24V) work for both the linestage and phono stage?
Thanks in advance for any guidance.
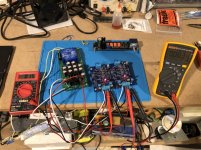
I built Wayne's today, fairly easy job knocked it out in a few hours. One thing I would have liked is a snap point to separate the boards if you wanted to do so. Also, all the parts tossed into one bag is counter productive, it took longer to sort that all out then it did to stuff the board. I would suggest it easier to order from Mouser and write the part location on the BOM. That way, you aren't trying to read codes or meter every part. It's nice to have the parts, but I think the group pack defeats the ease of just ordering it from the site. Just say'n
JT
JT
Attachments
Last edited:
I wanted to follow the previous post... it looks very negative and the cost of it all and having everything there is nice. Nobody is making any a lot here and I'm sorry if I came off unappreciative.
Politics have me a little off my game right now....
JT
Politics have me a little off my game right now....
JT
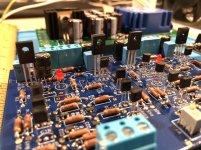
The LEDs are not just lightbulbs for each channel. The circuit is designed around using the LiteOn LTL-1CHE as a voltage reference.
I'd suggest swapping the green for the red provided in the kit. 😀
I'd suggest swapping the green for the red provided in the kit. 😀
I got that, but I didn't have 2 in the pack. 🙄 lol What I did was look it up and sub this:
https://www.mouser.com/ProductDetail/Lite-On/LTL-1CHE?qs=ImLoyPzIOkVHLfnGR%2BrysQ==
The specs looked the same except the OV which was 2.0 (grn) vs 2.1 (red)
AM, I good there, or should I order a $8 LED?
JT
https://www.mouser.com/ProductDetail/Lite-On/LTL-1CHE?qs=ImLoyPzIOkVHLfnGR%2BrysQ==
The specs looked the same except the OV which was 2.0 (grn) vs 2.1 (red)
AM, I good there, or should I order a $8 LED?
JT
I read through 6L6's Pearl 2 build guide - and I answered one of the own questions. It appears that the power supplies need to be separate - the linestage needs <= +/- 26 volts and the Pearl 2 needs between 29 and 40.
For a two chassis solution, I guess it would be ok to build two power supplies in one, and the linestage and Pearl 2 in the other.
Or maybe a 3 box solution - linestage with it's power supply in one, and two for the Pearl. Any other ideas?
Thanks bmdduck
For a two chassis solution, I guess it would be ok to build two power supplies in one, and the linestage and Pearl 2 in the other.
Or maybe a 3 box solution - linestage with it's power supply in one, and two for the Pearl. Any other ideas?
Thanks bmdduck
Another Wayne’s Line Stage Going Together!
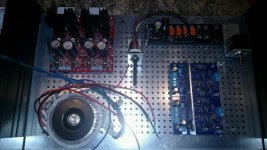
Well after reading through this entire thread, many unplanned parts order expenses and a rough start with the surface mount parts I fired up my BA2018 line stage today. I am pleased to say it turned on with no smoke, no fire, and no fury, and the DC Offset adjusted nicely to around +0.009v DC on both channels. I hope it’s safe to assume that it will function as designed from this point on...
Next stop on this journey will be to listen to it and to order a (custom) Slimline 2U case from the parts store.
Here’s a summary of my build so far:
-BA2018 big output transistor version (I am not planning a headphone jack, I was just short on the JFETs, LOL)
-Peter Millet PSU configured for +-18 VDC (15v transformer; R4=16.9kOhm; R6=16kOhm)
-Salas/Tee-Bag I-select relay controlled input selector/volume pot (Alps 50k Volume Pot from Parts-Express)
Roll The Credits:
-Thanks to Jim, 6L6 for your tireless efforts in support of this amazing community!
-Thanks to Wayne for your generosity in providing the fruits of your knowledge for the DIY community to explore!
-Thanks to all of the active members on this forum who asked questions, shared your insight and knowledge, and posted pictures of your incredible builds!
-Glen
Attachments
to glenv6
Very good build and specs (offset).
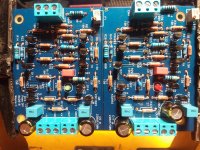
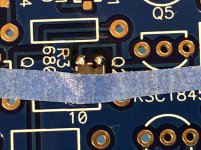
You also used the self- adhesive- tape- technic for the Toshiba -SMD-JFets.
Good looking PSU.
Enjoy the sound!

Dirk
Very good build and specs (offset).
You also used the self- adhesive- tape- technic for the Toshiba -SMD-JFets.
Good looking PSU.
Enjoy the sound!
Dirk
- Home
- Amplifiers
- Pass Labs
- Wayne's BA 2018 linestage