on the optimize bit flipping I'm pretty sure what 3ll3d00d is requesting is already available.
Drag to select (or shift click to select) multiple components. Then right click on one and select optimize on or optimize off from the context menu and the bit is flipped for all selected components. Unless I've misinterpreted what the request is 🙂
Tony.
Drag to select (or shift click to select) multiple components. Then right click on one and select optimize on or optimize off from the context menu and the bit is flipped for all selected components. Unless I've misinterpreted what the request is 🙂
Tony.

re point/click, I was probably just being hamfisted.
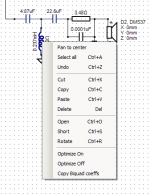
re bit flipping, I was selecting multiple components and thinking that the visible checkbox (in the component edit fields below) would apply to all selected components but I think that set of fields follows the highlighted component instead irrespective of how many are selected. At least that is how it seemed to behave (and hopefully that makes sense, probably easier to show a picture but am not in front of that computer). If there is already a context menu option for that then great.
re bit flipping, I was selecting multiple components and thinking that the visible checkbox (in the component edit fields below) would apply to all selected components but I think that set of fields follows the highlighted component instead irrespective of how many are selected. At least that is how it seemed to behave (and hopefully that makes sense, probably easier to show a picture but am not in front of that computer). If there is already a context menu option for that then great.
Rev 2.0.0.6
* Added indication of optimized parameters to the schematic. Background color is PaleGreen with 50% opacity. Girly pink wasn't that good 🙂
* Added Optimize Toggle (Ctrl+W) to context menu. Toggling is possible with previous status indication. It is different than setting On (Ctrl+Q) and Off (Ctrl+E) because toggling enables swapping of two components groups without changing selection set. In practice, this enables faster optimizing of two Ways - one Way at a time to prevent drifting of crossover frequency.
Although I haven't had any time to look at this yet the new version looks quite exciting. 🙂
It sounds like the file format between 1 and 2 will always be incompatible, are there any plans to provide a Vituixcad 1 import option to migrate a project to the new format, or would it always be a matter of duplicating an existing design in the old version by hand to migrate it across ?
It sounds like the file format between 1 and 2 will always be incompatible, are there any plans to provide a Vituixcad 1 import option to migrate a project to the new format, or would it always be a matter of duplicating an existing design in the old version by hand to migrate it across ?
Now VituixCAD v2 is the best freeware software for design loudspeakers.
Limiting the upper frequency to 24 kHz is limited by the sampling frequency?
Could you add 10 ohm max impedance in options ?
Limiting the upper frequency to 24 kHz is limited by the sampling frequency?
Could you add 10 ohm max impedance in options ?
Now VituixCAD v2 is the best freeware software for design loudspeakers.
Limiting the upper frequency to 24 kHz is limited by the sampling frequency?
Could you add 10 ohm max impedance in options ?
Superiority is just suitable compromise of different features for individual. For me it has been only capable tool since version 0.1 i.e. about 4 years now. For someone else it could be still just useless crap 😀
24 kHz limit just tries to keep calculation speed decent. Equation solver with sparse matrix is typically about 50% slower than simple Ohm's law principle in ver1.1, and difference just increases with more complex networks.
Higher frequency limit was asked no more than 3 users world-wide (maybe 0.5% of users), but I decided to try 40 kHz to version 1.1. It has been mostly pain in the ... because cheap tricks and shortcuts were needed for preventing bad behavior due to forced extrapolation. Majority does not have or want measurement and calibration data higher than 24 kHz.
Higher limit is possible to restore if performance of solver increases. Some other choices such as Math.Numerics and ALGLIB are available for sparse matrices.
No problem to add 10 ohms max.
Are there any plans to provide a Vituixcad 1 import option...
I have 135 projects with 1.1 version. The most motivated customer for conversion utility should be me, but actually I'm not so interested to make it. Main reasons are that I'm able to convert all 135 projects in the same time what is needed to make conversion utility, and only few of those projects are still active and really worth to be converted to version 2.0.
Version 1.1 will not disappear while new projects are created with 2.0.
I think this is a minor bug
pressing ctrl+w when an inductor is highlighted only toggles the L portion of the inductor not the DCR
pressing ctrl+w when an inductor is highlighted only toggles the L portion of the inductor not the DCR
Not a bug. Optimize selection via context menu is meant for main parameters of the components. You can optimize DCR, ESR, driver's rotation and tilt but you have to set Opt bit from parameter grid. This prevents accidental optimizing of secondary parameters.
All parameters of "dsp" active blocks are main parameters, but both OP amp parameters are not.
All parameters of "dsp" active blocks are main parameters, but both OP amp parameters are not.
User manual in English updated for version 2.0. Some links could be broken but I'll fix them later.
Help command is enabled and 10 ohms impedance span added in rev 2.0.0.8.
Help command is enabled and 10 ohms impedance span added in rev 2.0.0.8.
Does VituixCAD consider the position of the drivers on the box when simulating the summed crossover response?
Last edited:
^Yes. That is only possibility to get close to correct result in 3D simulation.
Wow that's a fast reply! I edited my previous post after you've replied. I'll change it back and ask the follow up question in this post.
So how do I specify the box/baffle dimensions and where the mic is pointing at? I want the results to simulate the effects of the speaker when the mic is pointing at the tweeter. Also, what is the distance of the mic to the speaker? The distance will affect the angle of different drivers relative to the mic.
Thanks
Last edited:
Also, any way to disable the consideration of the driver positions? While this is nice, it requires during measurement the mic is pointing at each driver. When I measure, the mic points at the tweeter and I don't change when measuring other drivers. Because of the complexity of the measurement setup, it would be a lot of work to change the mic position for every driver.
^Most of the answers can be found indirectly from user manual, measurement preparations document and playing with the program.
You have several (all) possibilities available, but only the best method is recommended by me because it supports simulation of power response, directivity index and off-axis responses:
You need off-axis frequency response data individually for each driver in horizontal plane, and also in vertical plane with non-circular drivers or asymmetrical driver locations. Physical rotation origin while polar measurements is in the center point of each driver, on baffle surface. Measurement distance and time window settings depending on vicinity of reflecting boundaries. Then you load this data into simulator and set relative location (in 3D), rotation and inclination for each driver instance in crossover with X,Y,Z,R,T parameters. Distance from drivers' origin to virtual mic/ear is defined in Options window. Amount of off-axis measurements is unlimited in version 2.0, but usually steps of 10 degrees is totally okay with well behaving - typical commercial drivers.
You can also use single (axial) measurement for each driver. In that case direction and angle to microphone should give quite compatible response and timing with final listening point & distance. This is not so easy if construction is large and measurement "estate" is not. But this is crap design method because designer doesn't have much control to sound balance due to missing directivity information. The result is more or less lottery and some redesign may be needed.
Producing adequate off-axis data with individual rotation center point for each driver is actually not so difficult and slow. It can save days or weeks design time and some money too because crossover is quite probably final at once without listening+tuning iterations. Of course, this kind of design process requires some practicing. Designer needs some knowledge to interpret combination of multiple curves in the simulator.
Third option is to generate directivity information for measured axial data. That is also supported for box speakers with Diffraction tool, though generated directivity is quite reliable only for bass drivers and enclosures.
Last edited:
The exported crossover image has a cropped top edge.
Attachments

Last edited:
^White sheet is quite expensive and also dangerous for environment. 1/4 of few dots is not so important. But I've already given you 5px more margin for free 😀 Just download rev 2.0.0.10.
Next issue will be model name of the drivers. Image will be cropped after about 13 letters because size of "estate" canvas is fixed. You can cheat program by adding short wire or other dummy component on the right.
Next issue will be model name of the drivers. Image will be cropped after about 13 letters because size of "estate" canvas is fixed. You can cheat program by adding short wire or other dummy component on the right.
- it would be nice to get closer to the old (visual) style of selecting library blocks
This is now done in rev 2.0.0.12. Images are show 128x128px but the largest blocks are still quite fuzzy. List view is also available if icons are useless. Block is selected with double-click or Open button.
Drag&drop of vxl files from Library folder (or somewhere else) works too.
An externally hosted image should be here but it was not working when we last tested it.
- Home
- Design & Build
- Software Tools
- VituixCAD